> ## Documentation Index
> Fetch the complete documentation index at: https://www.ayrshare.com/docs/llms.txt
> Use this file to discover all available pages before exploring further.
# Generate JWT Overview
> Generate a social network linking URL for a user profile.
export const PlansAvailable = ({plans = [], maxPackRequired}) => {
let displayPlans = plans;
if (plans && plans.length === 1) {
const lowerCasePlan = plans[0].toLowerCase();
if (lowerCasePlan === "basic") {
displayPlans = ["Basic", "Premium", "Business", "Enterprise"];
} else if (lowerCasePlan === "business") {
displayPlans = ["Business", "Enterprise"];
} else if (lowerCasePlan === "premium") {
displayPlans = ["Premium", "Business", "Enterprise"];
}
}
return
Available on {displayPlans.length === 1 ? "the " : ""}
{displayPlans.join(", ").replace(/\b\w/g, l => l.toUpperCase())}{" "}
{displayPlans.length > 1 ? "plans" : "plan"}.
{maxPackRequired && window.open('https://www.ayrshare.com/docs/additional/maxpack', '_self')} className="flex items-center mt-2 cursor-pointer">
Max Pack required
}
;
};
The [generateJWT endpoint](/apis/profiles/generate-jwt) generates a social network linking URL for a single User Profile.
See the [Business Plan API integration](/multiple-users/api-integration-business) for more details.
## Switching Profiles
To switch between different profile sessions (for example, when testing with multiple profiles), you'll need to log out the current profile first. See [Automatic Logout of a Profile Session](/multiple-users/api-integration-business#automatic-logout-of-a-profile-session) for instructions on how to properly handle profile switching.
## Private Key and Profile Key
### Where to Get the Private Key
The Private Key file (private.key) and a sample Postman JSON file is included with your [Integration Package](/multiple-users/api-integration-business#integration-package) received during onboarding.
The Integration Package may also be retrieved in the Ayrshare developer dashboard in the API Page -> Integration Package.
### Using the Private Key
We recommend reading the Private Key private.key from a file and sending it as a string in the `privateKey` field, which allows you to preserve all characters including newlines.
The Private Key must be precise, meaning preserving all characters including newlines.
If you paste the key into your code, you might need to manually replace newlines with a `\n` character or URL encode the string.
Pasting the key directly into code often causes issues.
## Generate a JSON Web Token
1 minute video explaining how to generate a JSON Web Token (JWT):
The JWT URL is valid for **5 minutes**. After 5 minutes you must generate a new JWT URL.
See the [Max Pack `expiresIn`](/apis/profiles/generate-jwt-overview#jwt-expires-in) for additional options.
## Opening the JWT URL
Open the JWT URL in a new browser tab, browser window, or View Controller on iOS.
You may control the [closing or redirecting](/multiple-users/api-integration-business#opening-and-closing-the-social-linking-url) of the new window or tab.
The social networks do not allow opening the URL in an iFrame or obfuscating the approved partner
origin domain profile.ayrshare.com.
## Verify the JWT URL
The `generateJWT` endpoint does not validate the returned JWT URL by default.
For example, if a corrupt Private Key is passed into `generateJWT` a URL will still be returned and the URL result in a 401 error.
You can verify the returned JWT URL by including `verify: true` in the `generateJWT` body parameters. If the JWT URL cannot be validated an error will be returned. For example, if the Private Key had a character removed the following would be returned:
```json JWT Error theme={"system"}
{
"action": "JWT",
"status": "error",
"code": 189,
"message": "Error generating JWT. Check the sent parameters, such as the privateKey has no extra tabs, spaces, or newlines. Also the entire private.key file including -----BEGIN RSA PRIVATE KEY----- and -----END RSA PRIVATE KEY-----. Error: secretOrPrivateKey must be an asymmetric key when using RS256"
}
```
We recommend using `verify: true` only in a non-production environment since the validation takes additional processing time.
## Testing in Postman
It is **recommended** to first test the JWT URL creation in [Postman](/testing/postman).
Included in the Integration Package, found in the Primary Profile API Key page of the dashboard, is a sample Postman config JSON file that included everything you need to verify your the JWT URL creation.
Just import the config file into Postman, fill in your Profile Key (found in the Ayrshare developer dashboard by switching to the profile you want to test) in the `profileKey` *body* field, and click the blue *Send* button.
All other required fields are already filled in.
You can also [generate the code from Postman](/testing/postman#auto-generate-api-code-with-postman), or read the key file from a directory or database.
## JWT Expires In
If you want a longer JWT timeout than the default 5 minutes, include the `expiresIn` field.
For example, send the following JSON to set the JWT URL valid for 30 minutes:
```json JWT Expires In theme={"system"}
{
"expiresIn": 30
}
```
This allows you to [email the link](/apis/profiles/generate-jwt-overview#connect-accounts-email) to your users instead of them having to go to your app or platform.
A common use case is when your user needs to reconnect a social account, you can email them the JWT link to directly re-link the social account instead of having to navigate to your platform.
Be sure to review with your security team how long your business wants to keep the JWT alive.
Longer expire times create additional risk of an unauthorized party accessing the link.
## Integrations
### Bubble.io JWT
If you are a Bubble user, please see *Generate JWT Token* in the Bubble.io section for instructions:
### Mobile JWT
The following Swift, Flutter, and React Native [mobile code examples](/apis/profiles/generate-jwt-overview#mobile-code-examples) show how to launch the social linking page on an iOS device.
Replace the `jwtURL` String variable with the return from the [/generateJWT endpoint](/apis/profiles/generate-jwt).
#### Swift (iOS)
In Swift, use a `UIViewController` and `SFSafariViewControllerDelegate`.
We don't recommend using a `WebView` since some social networks such as Facebook and Google block authentication.
#### Flutter (Dart)
In Flutter (Dart), there is no direct equivalent to a `UIViewController` or the `SFSafariViewController`.
However, you can achieve a similar functionality by using the `url_launcher` package to open web URLs.
#### React Native
React Native also doesn't have a direct equivalent to `SFSafariViewController`, but you can achieve a similar result with the `WebBrowser` API provided by `expo-web-browser`, which opens a URL in a modal browser window that shares cookies with the system browser. Otherwise, you can use the built-in React Native `Linking` function to open Safari: `await Linking.canOpenURL(jwtURL);`
#### Mobile Code Examples
```swift Swift theme={"system"}
import UIKit
import SafariServices
class ViewController: UIViewController, SFSafariViewControllerDelegate {
var jwtURL = "https://profile.ayrshare.com?domain=acme&jwt=eyJhbGciOiJ"
override func viewDidLoad() {
super.viewDidLoad()
setupButton()
}
func setupButton() {
let button = UIButton(type: .system)
button.frame = CGRect(x: (view.bounds.width - 200) / 2, y: (view.bounds.height - 50) / 2, width: 200, height: 50)
button.setTitle("Open URL", for: .normal)
button.addTarget(self, action: #selector(buttonTapped), for: .touchUpInside)
view.addSubview(button)
}
@objc func buttonTapped() {
openURLInInAppBrowser()
}
func openURLInInAppBrowser() {
if let url = URL(string: jwtURL) {
let safariVC = SFSafariViewController(url: url)
safariVC.delegate = self
present(safariVC, animated: true, completion: nil)
}
}
// Optional: If you want to handle when the in-app browser is closed
func safariViewControllerDidFinish(_ controller: SFSafariViewController) {
controller.dismiss(animated: true, completion: nil)
}
}
```
```dart Flutter theme={"system"}
/** yaml dependencies
dependencies:
flutter:
sdk: flutter
url_launcher: ^6.2.1
*/
import 'package:flutter/material.dart';
import 'package:url_launcher/url_launcher.dart';
void main() {
runApp(MyApp());
}
class MyApp extends StatelessWidget {
@override
Widget build(BuildContext context) {
return MaterialApp(
title: 'URL Launcher Example',
theme: ThemeData(
primarySwatch: Colors.blue,
),
home: MyHomePage(),
);
}
}
class MyHomePage extends StatelessWidget {
final String jwtURL = "https://profile.ayrshare.com?domain=acme&jwt=eyJhbGciOiJ";
@override
Widget build(BuildContext context) {
return Scaffold(
appBar: AppBar(
title: Text('URL Launcher Example'),
),
body: Center(
child: ElevatedButton(
onPressed: () {
openURLInBrowser(context);
},
child: Text('Open URL'),
),
),
);
}
void openURLInBrowser(BuildContext context) async {
if (await canLaunch(jwtURL)) {
await launch(jwtURL);
} else {
ScaffoldMessenger.of(context).showSnackBar(
SnackBar(
content: Text('Could not launch $jwtURL'),
),
);
}
}
}
```
```jsx React Native theme={"system"}
/**
• Using the API provided by expo-web-browser,
• which opens a URL in a modal browser window that shares cookies
• with the system browser.
• Learn more about expo: https://reactnative.dev/docs/environment-setup?guide=quickstart
• and running the following command:
• expo install expo-web-browser
*/
import React from 'react';
import { StyleSheet, Button, View } from 'react-native';
import * as WebBrowser from 'expo-web-browser';
export default function App() {
const jwtURL = 'https://profile.ayrshare.com?domain=acme&jwt=eyJhbGciOiJ';
const openURLInBrowser = async () => {
try {
await WebBrowser.openBrowserAsync(jwtURL);
// Optional: WebBrowser.openBrowserAsync returns a promise that resolves with an object containing
// 'type' that can be 'cancelled' or 'dismissed'. You can use this to handle when the browser is closed.
} catch (error) {
console.error(error);
}
};
return (
);
}
const styles = StyleSheet.create({
container: {
flex: 1,
justifyContent: 'center',
alignItems: 'center',
},
});
```
## Connect Accounts Email
In conjunction with the longer expire time option, you can also automatically have Ayrshare email your users a link to the social linkage page.
### Connect Accounts JSON
For example the following JSON will send an email to `john@user.com` with the company name ACME, contact email `support@mycompany.com`, and links to the terms and privacy policy:
```json Example Contact Email Request theme={"system"}
/**
All fields are in the email object required.
Missing fields will cause the email to fail.
*/
{
"email": {
"to": "john@user.com",
"contactEmail": "support@mycompany.com",
"company": "ACME",
"termsUrl": "https://www.ayrshare.com/terms",
"privacyUrl": "https://www.ayrshare.com/privacy",
"expiresIn": 60
}
}
```
The response will include the following if the email and expire time was set:
```json Example Contact Email Response theme={"system"}
{
"emailSent": true,
"expiresIn": "30m"
}
```
### JWT Connect Accounts Email Example
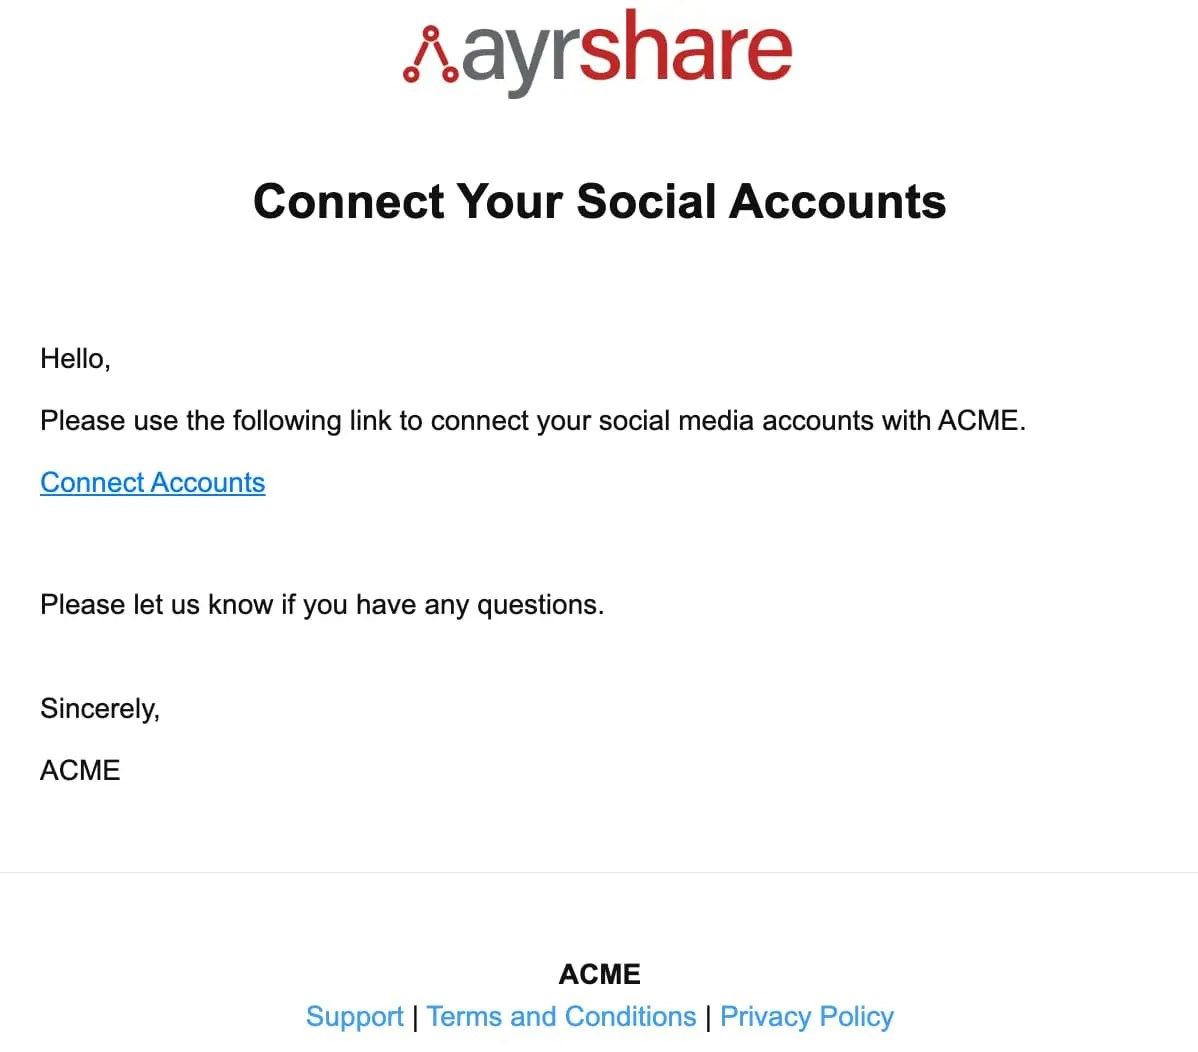
Here is an example of an email with the Connect Account link that opens social linkage page:
The email will come from the address:
`Social Connect Hub `
 The email will come from the address:
`Social Connect Hub
The email will come from the address:
`Social Connect Hub