> ## Documentation Index
> Fetch the complete documentation index at: https://www.ayrshare.com/docs/llms.txt
> Use this file to discover all available pages before exploring further.
# सोशल लिंकिंग का अवलोकन
> आपके उपयोगकर्ता अपने सोशल अकाउंट कैसे कनेक्ट करते हैं — तीन सरफ़ेस, उन सबके पीछे का लिंक सेशन, और उनके साझा विकल्प।
export const PlansAvailable = ({plans = [], maxPackRequired}) => {
let displayPlans = plans;
if (plans && plans.length === 1) {
const lowerCasePlan = plans[0].toLowerCase();
if (lowerCasePlan === "business") {
displayPlans = ["Launch", "Business", "Enterprise"];
} else if (lowerCasePlan === "premium") {
displayPlans = ["Premium", "Launch", "Business", "Enterprise"];
}
}
return
Available on {displayPlans.length === 1 ? "the " : ""}
{displayPlans.join(", ").replace(/\b\w/g, l => l.toUpperCase())}{" "}
{displayPlans.length > 1 ? "plans" : "plan"}.
{maxPackRequired && window.open('https://www.ayrshare.com/docs/additional/maxpack', '_self')} className="flex items-center mt-2 cursor-pointer">
Max Pack required
}
;
};
आपके उपयोगकर्ता अपने सोशल अकाउंट स्वयं कनेक्ट करते हैं — वे हर नेटवर्क के साथ सीधे प्रमाणित करते
हैं, और आप कभी भी उनकी क्रेडेंशियल्स नहीं देखते या संग्रहीत नहीं करते। इस पेज पर सब कुछ उन्हें उस
क्षण तक पहुँचाने और यह जानने के बारे में है कि सब कैसा रहा।
हर रास्ते में एक चीज़ समान है: एक **लिंक सेशन**, जो आपकी API Key और एक `Profile-Key` से
[Link Session बनाएँ](/docs/apis/profiles/create-link-session) के साथ बनाया जाता है।
आपकी ओर से कुछ भी साइन नहीं किया जाता और फ़्लो में कोई private key नहीं है।
## कनेक्ट करने के तीन तरीक़े
तीन रूप, और पहले दो एक ही इंटीग्रेशन हैं। हर फ़्लो के हिसाब से चुनें — ये परस्पर अनन्य नहीं हैं,
और कई इंटीग्रेशन ऑनबोर्डिंग के लिए होस्टेड पेज और बाद में ऐप के अंदर विजेट का उपयोग करते हैं।
| सरफ़ेस | आपका उपयोगकर्ता देखता है | व्हाइट-लेबलिंग | इसे कब चुनें |
| - | - | - | - |
| **विजेट — एम्बेडेड फ़्रेम** ([mount](/docs/multiple-users/connect-widget#mount-a-slot)) | हमारे बटन आपके अपने लेआउट में inline; नेटवर्क के अपने पॉपअप तक कोई पॉपअप नहीं | **सबसे मज़बूत।** आपका पेज, आपके फ़ॉन्ट और रंग, और आपका उपयोगकर्ता उसे कभी नहीं छोड़ता | आपके पास प्रति नेटवर्क एक row वाला डैशबोर्ड है और आप चाहते हैं कि लिंकिंग वहीं हो। Max Pack। |
| **विजेट — आपका अपना बटन** ([popup](/docs/multiple-users/connect-widget#your-own-button)) | आपका बटन, फिर नेटवर्क के लिए एक पॉपअप | **मज़बूत।** पॉपअप हमारा है, लेकिन वह संक्षिप्त है और आपका appearance अपनाता है | आप अपना बटन और styling चाहते हैं, और अपने लेआउट में कोई फ़्रेम नहीं। Max Pack। |
| **होस्टेड लिंकिंग पेज** ([कैसे करें](/docs/multiple-users/api-integration-business#single-sign-on-with-jwt-authentication)) | हमारे द्वारा होस्ट किया गया पेज, जिस पर आपका लोगो, रंग और कस्टम CSS होते हैं | **सबसे कमज़ोर।** यह हमारा पेज है, और आपका उपयोगकर्ता इसका उपयोग करने के लिए आपका पेज छोड़ता है | आप बाँटने के लिए एक ही लिंक चाहते हैं, या ईमेल से ऑनबोर्ड कर रहे हैं। कुछ भी बनाने की ज़रूरत नहीं, कोई Max Pack नहीं। |
विजेट की दोनों rows **एक ही इंटीग्रेशन** हैं, दो नहीं। एक ही `init` आपको दोनों देता है: जहाँ आप
हमारे बटन चाहते हैं वहाँ फ़्रेम mount करें, और बाक़ी हर जगह अपने बटन से `popup()` कॉल करें। वे
एक ही सेशन साझा करते हैं और एक ही handlers पर रिपोर्ट करते हैं।
[डायरेक्ट मोड](/docs/multiple-users/connect-direct-mode) वही पॉपअप है **बिना** हमारी स्क्रिप्ट के —
सख़्त Content-Security-Policy वाले पेज, server-rendered पेज, या native ऐप के लिए। वहाँ पॉपअप
आप स्वयं खोलते और देखते हैं।
**तय नहीं कर पा रहे?** होस्टेड लिंकिंग पेज से शुरू करें। इसके लिए न Max Pack चाहिए और न कोई
अतिरिक्त पैरामीटर, और यह कुछ चालू करने का सबसे तेज़ रास्ता है — बाद में विजेट पर जाने से सेशन
बनाने का तरीक़ा नहीं बदलता।
## लिंक बनाना
हेडर में उपयोगकर्ता की `Profile-Key` के साथ [Link Session बनाएँ](/docs/apis/profiles/create-link-session)
को कॉल करें। होस्टेड पेज के लिए यही पूरा अनुरोध है:
```bash cURL theme={"system"}
curl -X POST https://api.ayrshare.com/api/profiles/link-sessions \
-H "Authorization: Bearer $AYRSHARE_API_KEY" \
-H "Profile-Key: $PROFILE_KEY" \
-H "Content-Type: application/json" \
-d '{}'
```
आपको वापस एक `url` मिलता है जिसमें अल्पकालिक, ओपेक token होता है:
```javascript Linking URL theme={"system"}
https://profile.ayrshare.com?session=ayr_ls_kJ8mQ2vX9pLnR4tYwZ6aBcD1eFgH3iJkLmN0oPqRsTu&domain=YOUR_DOMAIN
```
आप यह भी [देख सकते हैं कि लिंक खोला गया या नहीं](/docs/apis/profiles/get-link-session) और समय समाप्त
होने से पहले [उसे रद्द](/docs/apis/profiles/revoke-link-session) कर सकते हैं।
यह एक-मिनट का वीडियो लिंक बनाने की प्रक्रिया दिखाता है। यह link sessions से पहले का है, इसलिए
इसमें अब भी Private Key भेजते हुए दिखाया गया है — वह चरण अब ज़रूरी नहीं है, और इसमें दिखाया गया
बाक़ी सब कुछ अपरिवर्तित है।
लिंकिंग URL भेजना
लिंकिंग URL आपके उपयोगकर्ता को उनके प्रोफ़ाइल में साइन इन कर देता है, इसलिए इसे पासवर्ड की तरह मानें। इसे
भरोसेमंद चैनल से भेजें, इसे लॉग न करें, और किसी तीसरे पक्ष को न दें। यह अपनी पूरी अवधि तक काम करता रहता है,
इसलिए रीलोड या OAuth री-ट्राई चलता है — लेकिन हर लिंक केवल एक उपयोगकर्ता को भेजें, और हर व्यक्ति के लिए
अलग लिंक बनाएँ।
### लिंकिंग URL खोलना
इसे एक नए ब्राउज़र टैब, विंडो, या view controller में खोलें। आप उस विंडो के
[बंद करने या पुनर्निर्देशन](/docs/multiple-users/api-integration-business#opening-&-closing-the-social-linking-url)
को नियंत्रित कर सकते हैं।
सोशल नेटवर्क होस्टेड लिंकिंग पेज को iFrame के अंदर खोलने या approved partner origin
`profile.ayrshare.com` को अस्पष्ट करने की अनुमति नहीं देते। यदि आप चाहते हैं कि लिंकिंग आपके अपने
पेज के अंदर हो, तो [एम्बेडेड विजेट](/docs/multiple-users/connect-widget) इसीलिए है: इसके फ़्रेम
Ayrshare origin से serve होते हैं और ऐसा करने का समर्थित तरीक़ा हैं।
### कब पूरा हुआ, यह जानना
दो संकेत हैं, और आप दोनों में से कोई भी इस्तेमाल कर सकते हैं:
* **[Link completion events](/docs/multiple-users/link-completion-events)** — लिंक बनाते समय एक
`origin` सेट करें और लिंकिंग विंडो घटित होते ही `connect:success`, `connect:error` और
`connect:cancelled` आपके पेज पर पोस्ट करती है। कोई polling नहीं।
* **[Link Session प्राप्त करें](/docs/apis/profiles/get-link-session)** — `completedAt`,
`lastCompletedAt` और `completedNetworks` रिपोर्ट करता है। native ऐप्स के लिए यही संकेत है, और
Telegram के लिए एकमात्र, जो out of band पूरा होता है।
लिंक की समाप्ति
लिंक डिफ़ॉल्ट रूप से **5 मिनट** के लिए मान्य है। उसके बाद नया लिंक बनाएँ।
Max Pack के साथ, उस अवधि को बढ़ाने के लिए `expiresIn` को मिनटों में सेट करें — अधिकतम **2880 मिनट
(48 घंटे)** तक, जो API की स्वीकार्य अधिकतम सीमा है:
```json Expires In theme={"system"}
{
"expiresIn": 30
}
```
लंबी अवधि ही [लिंक ईमेल करने](#connect-accounts-email) को व्यावहारिक बनाती है — कोई उपयोगकर्ता
जिसे किसी छूटे हुए अकाउंट को फिर से कनेक्ट करना है, आपके ऐप पर आए बिना आपके ईमेल से सीधे नेटवर्क
तक पहुँच सकता है।
अपनी सुरक्षा टीम के साथ समीक्षा करें कि लिंक को कितनी देर तक जीवित रहना चाहिए। लंबी अवधि का अर्थ
है वह लंबा समय जिसमें intercept किया गया लिंक अब भी काम करता है। यदि कोई लिंक बाहर निकल जाए, तो
आप समय समाप्त होने का इंतज़ार करने के बजाय [उसे रद्द](/docs/apis/profiles/revoke-link-session) कर
सकते हैं।
## Profile Key
`Profile-Key` बताती है कि लिंक किस User Profile के लिए है। इसे Ayrshare डेवलपर डैशबोर्ड में उस
प्रोफ़ाइल पर स्विच करके पाएँ।
**Private Key अब इस्तेमाल नहीं होती।** लिंक साइन नहीं किए जाते, इसलिए किसी फ़ाइल से कुछ पढ़ने या
अपने कोड में चिपकाने की ज़रूरत नहीं है। पुराना `privateKey` पैरामीटर अब भी स्वीकार किया जाता है
और नज़रअंदाज़ कर दिया जाता है, इसलिए मौजूदा इंटीग्रेशन काम करते रहते हैं, और आपके Integration
Package की `private.key` फ़ाइल अनुपयोगी छोड़ी जा सकती है।
## प्रोफ़ाइल स्विच करना
यदि कोई प्रोफ़ाइल पहले से साइन इन है, तो किसी अन्य प्रोफ़ाइल का लिंक खोलने से प्रोफ़ाइल नहीं बदलती —
यह जानबूझकर है, और यह पहले से मौजूद उपयोगकर्ता के लिए अनुभव को तेज़ रखता है। स्विच बाध्य करने के
लिए देखें
[Automatic Logout of a Profile Session](/docs/multiple-users/api-integration-business#automatic-logout-of-a-profile-session)।
Instagram लिंक विधि
Instagram अकाउंट [दो तरीक़ों](/docs/dashboard/connect-social-accounts/instagram) से लिंक किए जा सकते
हैं: सीधे **Instagram Login** के साथ, या **connected Facebook Page** के माध्यम से। जब कोई
उपयोगकर्ता Instagram बटन क्लिक करता है तो कौन सा फ़्लो शुरू होता है, यह सामान्य रूप से अकाउंट-वाइड
[Instagram Login](/docs/multiple-users/manage-user-profiles#instagram-login) सेटिंग द्वारा नियंत्रित
होता है।
`instagramLinkMethod` बॉडी पैरामीटर एकल लिंक के लिए उस सेटिंग को ओवरराइड करता है:
| मान | Instagram लिंकिंग फ़्लो |
| - | - |
| `instagram` | सीधा Instagram Login। कोई Facebook Page आवश्यक नहीं। |
| `facebook` | कनेक्टेड Facebook Page के माध्यम से लिंक। |
```json Instagram Link Method theme={"system"}
{
"instagramLinkMethod": "instagram"
}
```
ओवरराइड उस लिंक की पूरी अवधि तक लागू रहता है, जिसमें Instagram/Facebook प्राधिकरण redirect के
दौरान भी शामिल है। कुछ बातें जानने योग्य हैं:
* यह आपकी अकाउंट-वाइड सेटिंग को नहीं बदलता और न ही किसी अन्य लिंक को प्रभावित करता है।
* इसे छोड़ दें तो अकाउंट-वाइड सेटिंग लागू होती है, बिल्कुल पहले जैसी।
* अमान्य मान मान्य मानों (`instagram`, `facebook`) को सूचीबद्ध करते हुए `400` लौटाता है।
* चुनने से पहले
[फ़ीचर अंतर](/docs/multiple-users/manage-user-profiles#direct-instagram-login-vs-facebook-page-authentication)
की समीक्षा करें — कुछ Instagram फ़ीचर, जैसे हैशटैग खोज और सहयोग, केवल Facebook Page
प्रमाणीकरण के साथ उपलब्ध हैं।
Connect Accounts Email
Ayrshare आपके लिए आपके उपयोगकर्ता को लिंक ईमेल कर सकता है, ताकि वे आपके ऐप पर आए बिना अपने
लिंकिंग पेज तक पहुँच सकें। इसे लंबे [`expiresIn`](#jwt-expires-in) के साथ जोड़ें — डिफ़ॉल्ट पाँच
मिनट किसी inbox में शायद ही टिकते हैं।
### Connect Accounts JSON
**`email` के अंदर हर फ़ील्ड आवश्यक है।** कोई एक भी गुम होने पर भेजना विफल हो जाता है।
```json Example Contact Email Request theme={"system"}
{
"expiresIn": 60,
"email": {
"to": "john@user.com",
"contactEmail": "support@mycompany.com",
"company": "ACME",
"termsUrl": "https://www.ayrshare.com/terms",
"privacyUrl": "https://www.ayrshare.com/privacy"
}
}
```
`expiresIn` एक **टॉप-लेवल** पैरामीटर है, `email` ऑब्जेक्ट का हिस्सा नहीं। `email` के अंदर nested
होने पर यह नज़रअंदाज़ कर दिया जाता है, और आपके उपयोगकर्ता को ऐसा लिंक मिलता है जो पाँच मिनट में
समाप्त हो जाता है।
प्रतिक्रिया `emailSent` में परिणाम बताती है:
```json Example Contact Email Response theme={"system"}
{
"status": "success",
"sessionId": "c7a2434e72e91bde27579efde0fd6dd0b74ceee29a471fd368407f273708c2e8",
"url": "https://profile.ayrshare.com?session=ayr_ls_kJ8mQ2vX9pLnR4tYwZ6aBcD1eFgH3iJkLmN0oPqRsTu&domain=YOUR_DOMAIN",
"expiresAt": "2026-09-02T09:03:26.838Z",
"emailSent": true,
"title": "Acme Client"
}
```
अगर ईमेल नहीं भेजा जा सका, तब भी अनुरोध सफल होता है और आपको लिंक मिलता है। प्रतिक्रिया में `emailSent: false` के साथ एक `emailError` ऑब्जेक्ट होता है, ताकि आप लिंक को किसी और तरीके से अपने उपयोगकर्ता तक पहुँचा सकें:
```json Example Failed Email Response theme={"system"}
{
"status": "success",
"sessionId": "c7a2434e72e91bde27579efde0fd6dd0b74ceee29a471fd368407f273708c2e8",
"url": "https://profile.ayrshare.com?session=ayr_ls_kJ8mQ2vX9pLnR4tYwZ6aBcD1eFgH3iJkLmN0oPqRsTu&domain=YOUR_DOMAIN",
"expiresAt": "2026-09-02T09:03:26.838Z",
"emailSent": false,
"emailError": {
"code": 333,
"message": "Email failed to send. Please confirm a valid email was provided."
},
"title": "Acme Client"
}
```
जब भी आपने ईमेल का अनुरोध किया और वह नहीं भेजा गया, `emailError` दिखता है: या तो भेजना विफल रहा, या `email` ऑब्जेक्ट में कोई आवश्यक फ़ील्ड नहीं था, और उस स्थिति में `details` छूटे हुए फ़ील्ड बताता है। `emailError` के बिना `emailSent: false` का अर्थ है कि कोई ईमेल अनुरोधित नहीं था। `to` न होने पर स्थिति अलग है: पूरा अनुरोध `code: 188` के साथ अस्वीकार कर दिया जाता है।
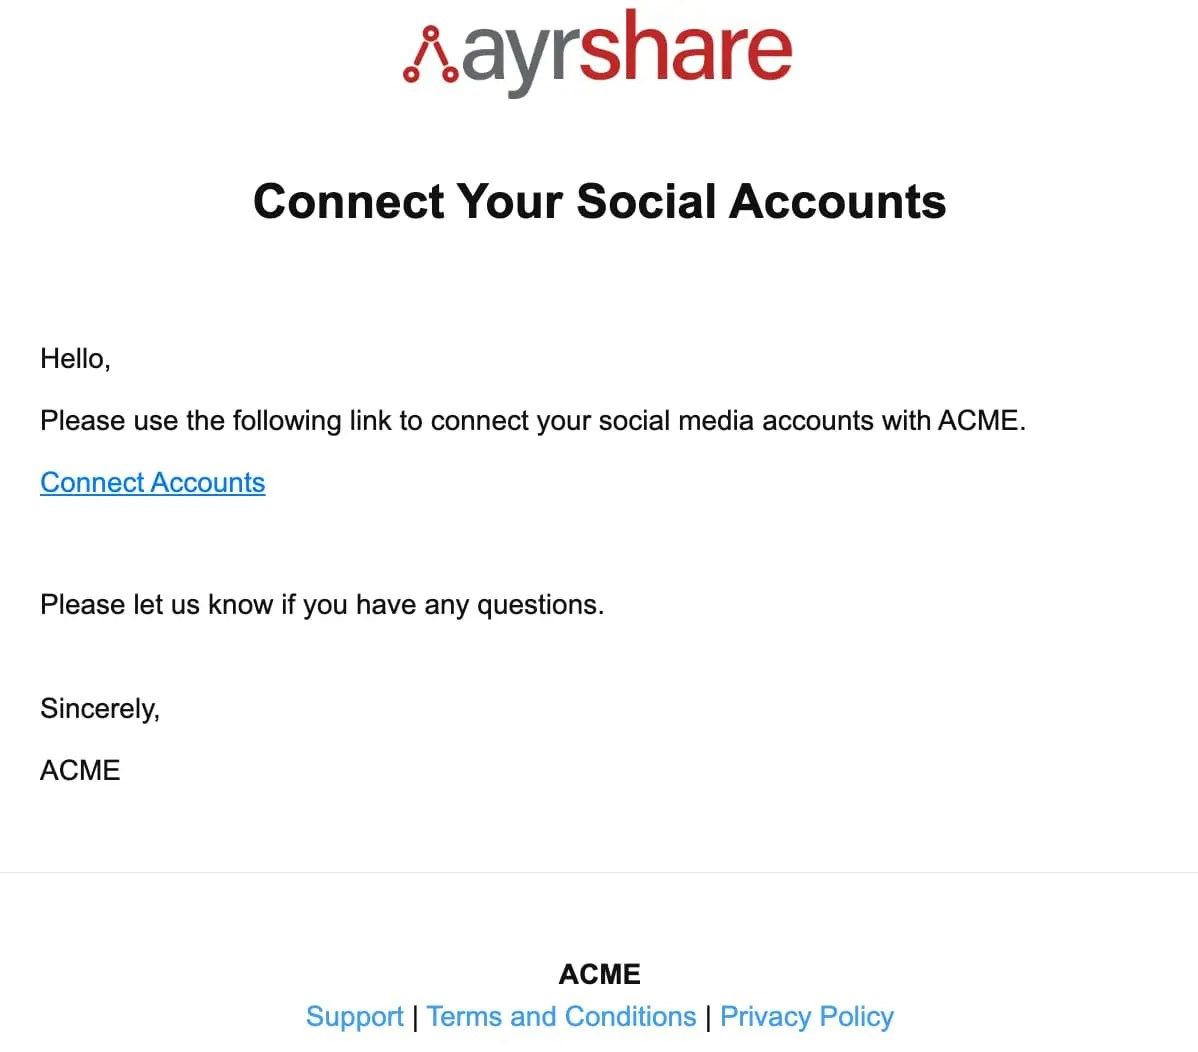
### Connect Accounts Email उदाहरण
यहाँ उस ईमेल का उदाहरण है जो सोशल लिंकिंग पेज खोलता है:
ईमेल इस पते से आता है:
`Social Connect Hub `
मोबाइल ऐप्स
लिंकिंग URL को **सिस्टम ब्राउज़र** में खोलें, कभी भी embedded webview में नहीं: Google उसमें
साइन-इन को `disallowed_useragent` के साथ अस्वीकार करता है, और Meta उसे सिरे से ब्लॉक कर देता है।
आपका उपयोगकर्ता नेटवर्क का अपना error पेज देखेगा, और आपकी ओर से कुछ भी इसे ठीक नहीं करता।
* **iOS** — `ASWebAuthenticationSession`, या `SFSafariViewController`।
* **Android** — Chrome Custom Tabs।
क्योंकि native ऐप के पास events पोस्ट करने के लिए कोई ब्राउज़र विंडो नहीं होती, परिणाम इसके बजाय
[Link Session प्राप्त करें](/docs/apis/profiles/get-link-session) से पाएँ। `origin` को अपनी custom
scheme (`myapp://connected`) पर सेट करें ताकि पेज के पास आपके ऐप में वापस लौटने का रास्ता हो।
मोबाइल कोड उदाहरण
`linkingURL` को [Link Session बनाएँ](/docs/apis/profiles/create-link-session) से लौटाए गए `url` से
बदलें।
```swift Swift theme={"system"}
import UIKit
import SafariServices
class ViewController: UIViewController, SFSafariViewControllerDelegate {
var linkingURL = "https://profile.ayrshare.com?session=ayr_ls_kJ8mQ2vX9pLnR4tYwZ6aBcD1eFgH3iJkLmN0oPqRsTu&domain=acme"
override func viewDidLoad() {
super.viewDidLoad()
setupButton()
}
func setupButton() {
let button = UIButton(type: .system)
button.frame = CGRect(x: (view.bounds.width - 200) / 2, y: (view.bounds.height - 50) / 2, width: 200, height: 50)
button.setTitle("Open URL", for: .normal)
button.addTarget(self, action: #selector(buttonTapped), for: .touchUpInside)
view.addSubview(button)
}
@objc func buttonTapped() {
openURLInInAppBrowser()
}
func openURLInInAppBrowser() {
if let url = URL(string: linkingURL) {
let safariVC = SFSafariViewController(url: url)
safariVC.delegate = self
present(safariVC, animated: true, completion: nil)
}
}
// Optional: If you want to handle when the in-app browser is closed
func safariViewControllerDidFinish(_ controller: SFSafariViewController) {
controller.dismiss(animated: true, completion: nil)
}
}
```
```dart Flutter theme={"system"}
/** yaml dependencies
dependencies:
flutter:
sdk: flutter
url_launcher: ^6.2.1
*/
import 'package:flutter/material.dart';
import 'package:url_launcher/url_launcher.dart';
void main() {
runApp(MyApp());
}
class MyApp extends StatelessWidget {
@override
Widget build(BuildContext context) {
return MaterialApp(
title: 'URL Launcher Example',
theme: ThemeData(
primarySwatch: Colors.blue,
),
home: MyHomePage(),
);
}
}
class MyHomePage extends StatelessWidget {
final String linkingURL = "https://profile.ayrshare.com?session=ayr_ls_kJ8mQ2vX9pLnR4tYwZ6aBcD1eFgH3iJkLmN0oPqRsTu&domain=acme";
@override
Widget build(BuildContext context) {
return Scaffold(
appBar: AppBar(
title: Text('URL Launcher Example'),
),
body: Center(
child: ElevatedButton(
onPressed: () {
openURLInBrowser(context);
},
child: Text('Open URL'),
),
),
);
}
void openURLInBrowser(BuildContext context) async {
if (await canLaunch(linkingURL)) {
await launch(linkingURL);
} else {
ScaffoldMessenger.of(context).showSnackBar(
SnackBar(
content: Text('Could not launch $linkingURL'),
),
);
}
}
}
```
```jsx React Native theme={"system"}
/**
• Using the API provided by expo-web-browser,
• which opens a URL in a modal browser window that shares cookies
• with the system browser.
• Learn more about expo: https://reactnative.dev/docs/environment-setup?guide=quickstart
• and running the following command:
• expo install expo-web-browser
*/
import React from 'react';
import { StyleSheet, Button, View } from 'react-native';
import * as WebBrowser from 'expo-web-browser';
export default function App() {
const linkingURL = 'https://profile.ayrshare.com?session=ayr_ls_kJ8mQ2vX9pLnR4tYwZ6aBcD1eFgH3iJkLmN0oPqRsTu&domain=acme';
const openURLInBrowser = async () => {
try {
await WebBrowser.openBrowserAsync(linkingURL);
// Optional: WebBrowser.openBrowserAsync returns a promise that resolves with an object containing
// 'type' that can be 'cancelled' or 'dismissed'. You can use this to handle when the browser is closed.
} catch (error) {
console.error(error);
}
};
return (
);
}
const styles = StyleSheet.create({
container: {
flex: 1,
justifyContent: 'center',
alignItems: 'center',
},
});
```
## परीक्षण
पहले [Postman](/docs/testing/postman) में लिंक बनाना **अनुशंसित** है। आपके Integration Package में —
डैशबोर्ड के Primary Profile API Key पेज पर — एक नमूना Postman कॉन्फ़िग शामिल है। इसे इम्पोर्ट
करें, `profileKey` *body* फ़ील्ड में अपनी Profile Key भरें, और *Send* पर क्लिक करें।
नमूना कॉन्फ़िग अब भी `privateKey` और `domain` पहले से भर देता है। `privateKey` नज़रअंदाज़ कर दिया
जाता है, और `domain` को आप खाली कर सकते हैं, बशर्ते आपके अकाउंट पर एक से ज़्यादा लिंकिंग domain न
हों।
आप [Postman से कोड जेनरेट](/docs/testing/postman#auto-generate-api-code-with-postman) भी कर सकते हैं।
### Bubble.io
## Legacy: generateJWT
[लिंकिंग URL बनाएँ](/docs/apis/profiles/generate-jwt) (`generateJWT`) वही काम करता है और
**deprecated** है — पूरी तरह समर्थित, कोई removal date नहीं, और आपके पहले से दिए हुए लिंक्स के
लिए अपरिवर्तित। उसके अपने पेज पर उसके पैरामीटर documented हैं, जिनमें वे तीन भी शामिल हैं जो अब
स्वीकार किए जाते हैं और नज़रअंदाज़ कर दिए जाते हैं।
दोनों एंडपॉइंट एक ही वैलिडेटर चलाते हैं, इसलिए इस पेज पर लिखा सब कुछ दोनों पर लागू होता है।
माइग्रेट करते समय जानने योग्य एकमात्र अंतर: `generateJWT` तीन चीज़ें बर्दाश्त करता है जिन्हें
Link Session बनाएँ अस्वीकार करता है — `allowedSocial` में अपरिचित नेटवर्क, X क्रेडेंशियल का केवल
एक हिस्सा, और गैर-स्ट्रिंग `redirect`।
This documentation is built and hosted on [Mintlify](https://mintlify.com), a developer documentation platform.
 ईमेल इस पते से आता है:
`Social Connect Hub
ईमेल इस पते से आता है:
`Social Connect Hub