> ## Documentation Index
> Fetch the complete documentation index at: https://www.ayrshare.com/docs/llms.txt
> Use this file to discover all available pages before exploring further.

# Notion

> Ayrshare API を Notion アプリに統合して、ユーザーのソーシャルメディアアカウントを管理します

## 概要

[Notion](https://notion.so) は、ノート作成、プロジェクト管理、Wiki、カスタマイズ可能なデータベースを GUI インターフェースに統合したワークスペースアプリです。

Notion から、Ayrshare のソーシャルメディア API を使ってユーザーのソーシャルメディアアカウントを管理するインターフェースを構築でき、投稿、分析の取得、コメント管理を行えます。

## チュートリアル

Notion から直接ソーシャルメディアネットワークに投稿する方法についての動画チュートリアルです。
[Notion API 解説ガイド](https://www.ayrshare.com/blog/schedule-social-media-posts-from-notion/)もご参照ください。

<div class="video-container">
  <iframe width="560" height="315" src="https://www.youtube.com/embed/OeGGiG7SmVY" title="Notion Social Posting Integration" frameborder="0" allow="accelerometer; autoplay; clipboard-write; encrypted-media; gyroscope; picture-in-picture" allowfullscreen />
</div>

Notion ソーシャル投稿統合の Github コード:

<Card title="GitHub: Ayrshare Notion Integration" icon="github" href="https://github.com/ayrshare/notion" horizontal>
  Notion から直接ソーシャルメディアネットワークに投稿する
</Card>

### Notion データベースを作成する

Notion で、以下のカラム名とカラムタイプを持つテーブルビューのデータベースを作成します:

<ul class="custom-bullets">
  <li>`Post` を *Title カラム* タイプに (このカラムタイプは選択肢がありません)</li>

  <li>
    `Platforms` を *Multi Select カラム* タイプに、値: `facebook`、`instagram`、`twitter`、
    `linkedin`、`tiktok`、および/または `telegram`。
  </li>

  <li>`Images` を *Files & Media カラム* タイプに。</li>
  <li>`Profile Keys` を *Text カラム* タイプに。</li>
  <li>`Status` を *Text カラム* タイプに。</li>

  <li>
    `Schedule Date` を *Date カラム* タイプに、Date Format は Month/Day/Year、Time Format は 24 Hours、
    時刻を含める
  </li>
</ul>

<img src="https://mintcdn.com/ayrshare-docs/6mPR4kmwNEz1kMbX/images/packages-guides/notion-db.webp?fit=max&auto=format&n=6mPR4kmwNEz1kMbX&q=85&s=b83093c27f4fae7e7d3d406eed353f63" alt="Notion Database Examples" width="1536" height="277" data-path="images/packages-guides/notion-db.webp" />

これらのフィールドは、このページの後で説明するスクリプトで使用されます。ソーシャルネットワークの「platforms」の一部は画像または動画を必要とする点にご注意ください。たとえば、Instagram は画像または動画を必要とし、TikTok は動画を必要とします。各ネットワークについては[エンドポイント](/apis/post/social-networks/facebook)をご参照ください。

[ライブの Notion サンプルを見る](https://ayrshare-example.notion.site/607c15ce7872456a879adbb0a5f17fdf?v=ee9f65a4afb24033813f245a45bc9e83)

### テスト投稿データを入力する

投稿をテストするためのサンプルデータが必要です。以下は提案例です:
<ul class="custom-bullets">
  <li>`Post`: 「Happy New Year!」と入力</li>

  <li>
    `Platforms`: リンク済みのネットワークを 1 つ以上選択します。名前が小文字であることを確認してください。
  </li>

  <li>`Images`: [画像](https://img.ayrshare.com/012/gb.jpg)または動画を添付します。</li>
</ul>

<Info>**画像を Notion にアップロードする必要があります。** 画像 URL は使用できません。</Info>

<ul class="custom-bullets">
  <li>
    `Profile Keys`: Business Plan または Launch Plan を利用していて、クライアントのプロファイルに投稿したい場合は、
    その Profile Key を入力します。それ以外の場合は空白のままにします。
  </li>

  <li>
    `Status`: 「pending」と入力します。このスクリプトは「pending」に設定されているレコードのみを取得します。
    「pending」が小文字であることを確認してください。
  </li>

  <li>
    `Schedule Date`: ここでは即時投稿をテストするだけなので空白のままにします。後で
    未来の日付を選択して投稿をスケジュールできます。
  </li>
</ul>

### Notion で Internal Integration を作成する

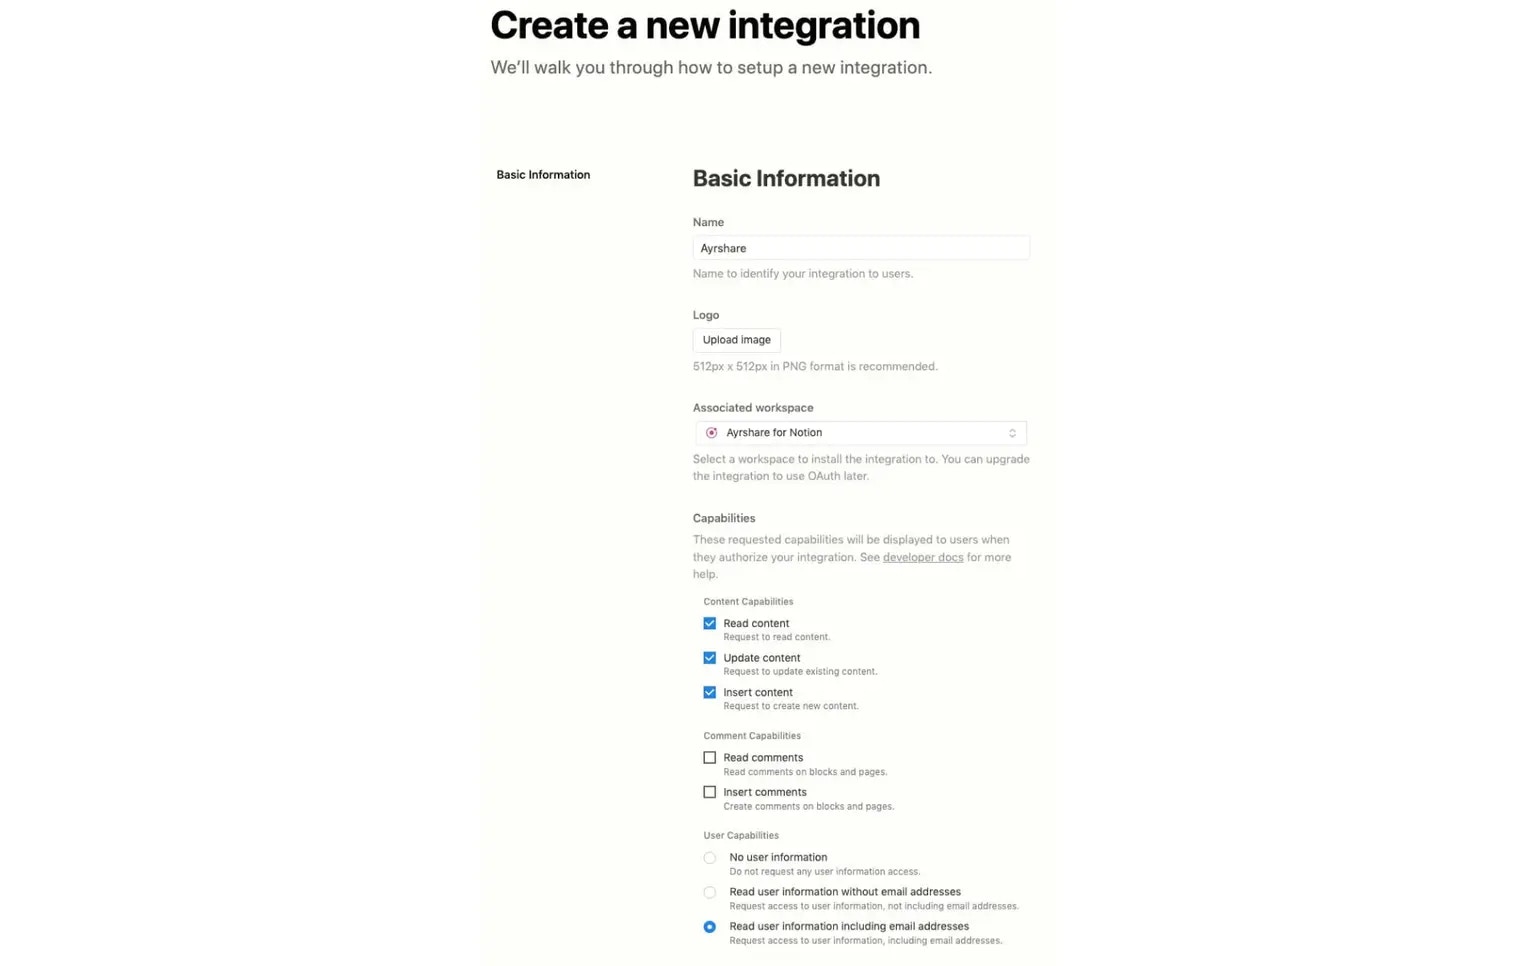
Notion の [My Integrations ページ](https://www.notion.so/my-integrations)に移動し、New Integration をクリックします。

[Notion Integrations の詳細](https://developers.notion.com/docs/getting-started#utilizing-notions-public-api-for-integrations)。

識別しやすいように統合の名前を「Ayrshare」とし、投稿データを持つ適切なワークスペースを選択できます。

最後に、既定で選択されているデフォルトの機能で十分です。Submit して統合を作成します。

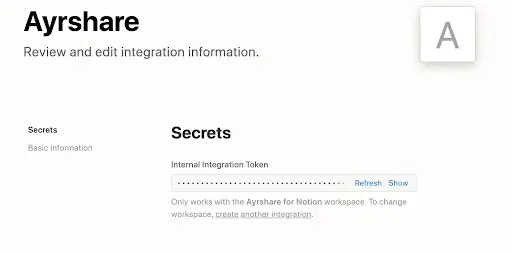
成功すると、内部統合トークンが利用可能になります。このページの以降のステップのためにメモしておいてください。

<img src="https://mintcdn.com/ayrshare-docs/6mPR4kmwNEz1kMbX/images/packages-guides/create%20notion.webp?fit=max&auto=format&n=6mPR4kmwNEz1kMbX&q=85&s=48dce27786caad8a12c99f04f31a10d4" alt="Create a Notion Integration" width="1536" height="966" data-path="images/packages-guides/create notion.webp" />

そして Notion 統合トークンを取得します。

<img src="https://mintcdn.com/ayrshare-docs/6mPR4kmwNEz1kMbX/images/packages-guides/notion%20token.webp?fit=max&auto=format&n=6mPR4kmwNEz1kMbX&q=85&s=32b0f4d69eeabdc55409e801c6dbf9a7" alt="Get a Notion Secret" width="512" height="253" data-path="images/packages-guides/notion token.webp" />

### Notion データベースを Internal Integration に接続する

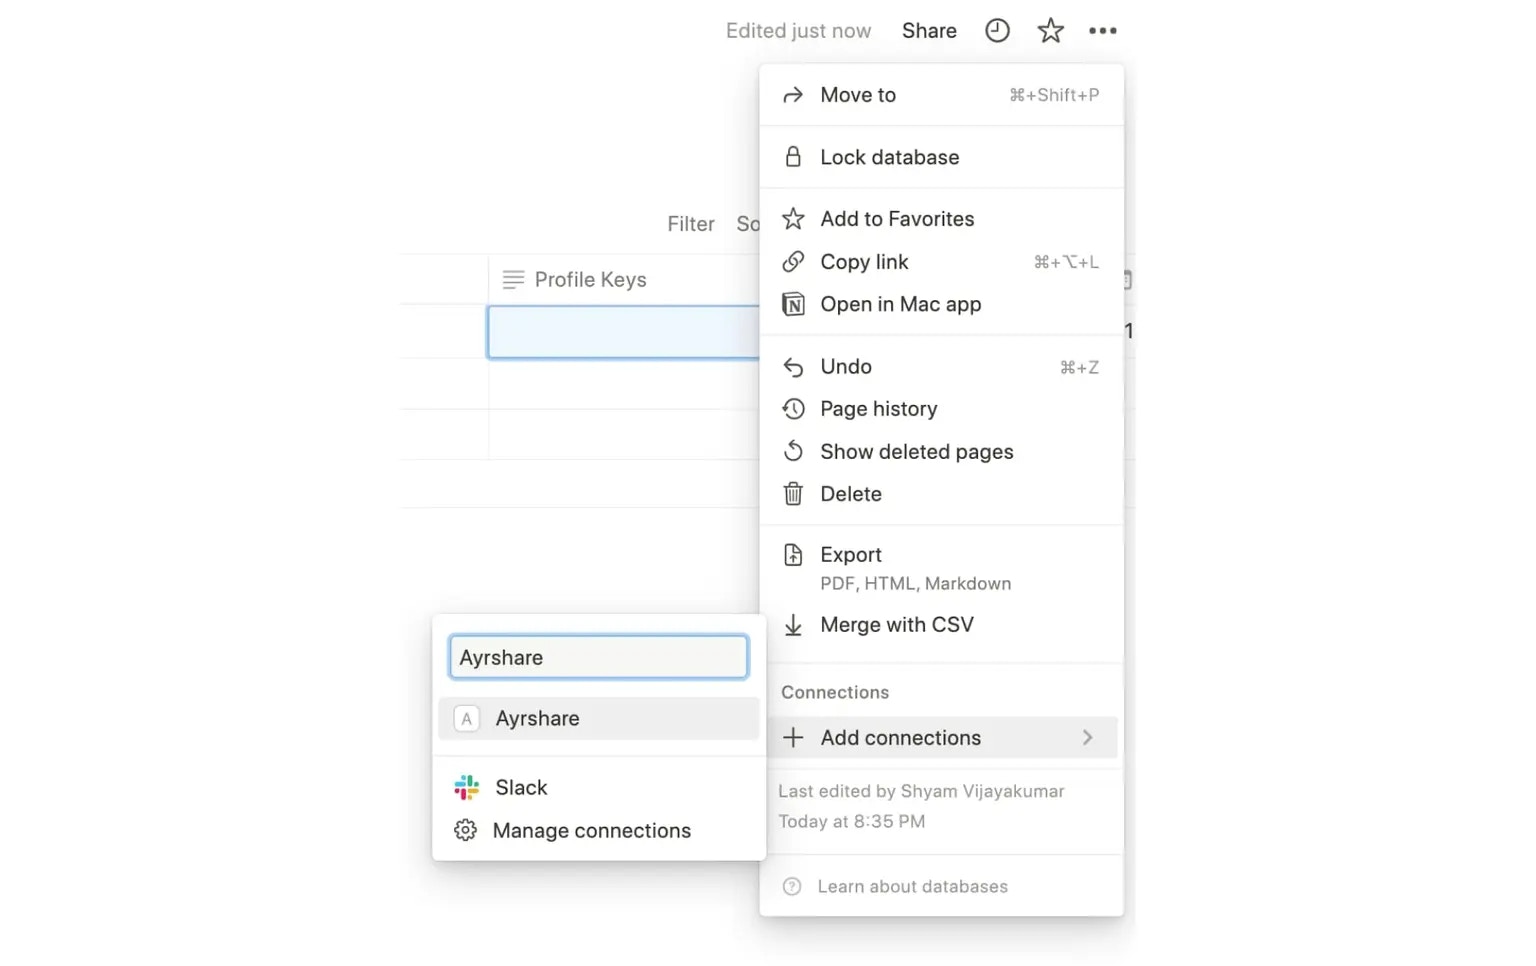
先ほど作成した Notion データベースを開きます。ページ右上の省略記号 (…) をクリックし、**Add Connection** に進みます。

ここで、前のステップで作成した内部統合を、選択した名前で検索できます。

内部統合をクリックすると、この Notion データベースがその統合に接続されました。
<img src="https://mintcdn.com/ayrshare-docs/6mPR4kmwNEz1kMbX/images/packages-guides/connect%20to%20ayrshare.webp?fit=max&auto=format&n=6mPR4kmwNEz1kMbX&q=85&s=318c31733bb8920c5d5765648f6cca80" alt="Connect the Notion Database" width="1536" height="966" data-path="images/packages-guides/connect to ayrshare.webp" />

### スクリプトを実行して Notion から投稿を送信する

これで、ローカル環境でスクリプトを実行して Notion データベースからデータを読み取り、「pending」ステータスの各行について Ayrshare API 経由で投稿を行えるようになりました。

スクリプトで使用される以下の環境変数を設定してください:

<ul class="custom-bullets">
  <li>
    `API_KEY`: Ayrshare から取得する `API Key` です。これは Ayrshare の
    primary profile 用の primary API Key です。
  </li>

  <li>
    `NOTION_DATABASE_ID`: このページで先ほど作成したデータベースを開き、URL からデータベース ID を取得します。
  </li>
</ul>

<Info>データベース ID はデータベースページの URL の ?v= の前の値になります。</Info>

```html theme={"system"}
https://www.notion.so/company/<NOTION_DATABASE_ID>?v=aaee9f</NOTION_DATABASE_ID>
```

<ul class="custom-bullets">
  <li>`NOTION_KEY`: 先ほどの内部統合トークン。</li>
</ul>

Node.js 環境で以下の JavaScript を実行します:

<ul class="custom-bullets">
  <li>リポジトリをクローンします:</li>
</ul>

```bash theme={"system"}
git clone https://github.com/ayrshare/notion
```

<ul class="custom-bullets">
  <li>**notion** ディレクトリに cd し、`npm install` を実行します。</li>

  <li>
    `.env` ファイルを Ayrshare の `API_KEY`、Notion の `NOTION_KEY`、および
    `NOTION_DATABASE_ID` で更新します。
  </li>

  <li>`node index.js` を実行します。</li>
</ul>

本番環境では [Heroku](https://www.heroku.com/)、[Digital Ocean](https://www.digitalocean.com/)、または [Vercel](https://vercel.com/) で実行できます。

成功すると、すべての `pending` ステータスのカラムが `success` に変更され、投稿が適切なソーシャルネットワークに公開されます。

<Card title="Github: Ayrshare Notion Integration" icon="github" href="https://github.com/ayrshare/notion" horizontal>
  Notion から直接ソーシャルメディアネットワークに投稿する
</Card>