> ## Documentation Index
> Fetch the complete documentation index at: https://www.ayrshare.com/docs/llms.txt
> Use this file to discover all available pages before exploring further.
# 社群連結概覽
> 你的使用者如何連結他們的社群帳號——三種介面、支撐這一切的 link session,以及它們共用的選項。
export const PlansAvailable = ({plans = [], maxPackRequired}) => {
let displayPlans = plans;
if (plans && plans.length === 1) {
const lowerCasePlan = plans[0].toLowerCase();
if (lowerCasePlan === "business") {
displayPlans = ["Launch", "Business", "Enterprise"];
} else if (lowerCasePlan === "premium") {
displayPlans = ["Premium", "Launch", "Business", "Enterprise"];
}
}
return
Available on {displayPlans.length === 1 ? "the " : ""}
{displayPlans.join(", ").replace(/\b\w/g, l => l.toUpperCase())}{" "}
{displayPlans.length > 1 ? "plans" : "plan"}.
{maxPackRequired && window.open('https://www.ayrshare.com/docs/additional/maxpack', '_self')} className="flex items-center mt-2 cursor-pointer">
Max Pack required
}
;
};
你的使用者會自行連結他們的社群帳號——他們直接向每個社群網路進行驗證,你永遠不會看到或儲存他們的憑證。本頁的所有內容,都是關於如何讓他們走到那一刻,以及如何得知結果。
所有路徑都有一個共同點:一個 **link session**,由你的 API Key 與 `Profile-Key` 透過
[建立 Link Session](/docs/apis/profiles/create-link-session) 建立。你這一側不需要簽署任何內容,流程中也沒有 private key。
## 三種連結方式
三種形態,而前兩種是同一個整合。依流程挑選即可——它們並不互斥,許多整合會在導入階段使用代管頁面,之後在應用程式內改用小工具。
| 介面 | 你的使用者看到 | 白牌化 | 適用情境 |
| ------------------------------------------------------------------------------------------------- | ---------------------------------------- | ------------------------------------ | --------------------------------------------- |
| **小工具——內嵌框架**([mount](/docs/multiple-users/connect-widget#mount-a-slot)) | 我們的按鈕內嵌在你自己的版面中;在社群網路自身的彈出視窗之前不會出現任何彈出視窗 | \*\*最強。\*\*你的頁面、你的字型與顏色,你的使用者從不離開 | 你的儀表板為每個網路各有一列,且希望連結就地完成。需要 Max Pack。 |
| **小工具——你自己的按鈕**([popup](/docs/multiple-users/connect-widget#your-own-button)) | 你的按鈕,接著是該網路的一個彈出視窗 | \*\*強。\*\*彈出視窗是我們的,但很短暫,且會繼承你的外觀設定 | 你想使用自己的按鈕與樣式,且不想在版面中放入框架。需要 Max Pack。 |
| **代管連結頁面**([做法](/docs/multiple-users/api-integration-business#single-sign-on-with-jwt-authentication)) | 一個由我們代管、帶有你的 logo、顏色與自訂 CSS 的頁面 | \*\*最弱。\*\*它是我們的頁面,你的使用者需要離開你的頁面來使用它 | 你想要一個可以直接發出的連結,或是透過電子郵件導入。無需建置,也不需要 Max Pack。 |
兩個小工具列是**同一個整合**,不是兩個。單一 `init` 便同時提供兩者:在你想放我們按鈕的位置掛載框架,
並在其他任何地方從你自己的按鈕呼叫 `popup()`。它們共用同一個工作階段,並在相同的處理常式上回報。
[直接模式(Direct Mode)](/docs/multiple-users/connect-direct-mode)是**不使用**我們指令碼的同一個彈出視窗——
適用於帶有嚴格 Content-Security-Policy 的頁面、伺服器端渲染的頁面,或原生應用程式。在那裡,
你自行開啟並監看彈出視窗。
\*\*不確定該選哪個?\*\*先從代管連結頁面開始。它不需要 Max Pack,也不需要額外參數,
是最快看到成果的路徑——之後改用小工具時,建立工作階段的方式並不會改變。
## 建立連結
在標頭中帶上使用者的 `Profile-Key`,呼叫[建立 Link Session](/docs/apis/profiles/create-link-session)。
對代管頁面而言,這就是完整的請求:
```bash cURL theme={"system"}
curl -X POST https://api.ayrshare.com/api/profiles/link-sessions \
-H "Authorization: Bearer $AYRSHARE_API_KEY" \
-H "Profile-Key: $PROFILE_KEY" \
-H "Content-Type: application/json" \
-d '{}'
```
你會取得一個帶有短效、不透明 token 的 `url`:
```javascript Linking URL theme={"system"}
https://profile.ayrshare.com?session=ayr_ls_kJ8mQ2vX9pLnR4tYwZ6aBcD1eFgH3iJkLmN0oPqRsTu&domain=YOUR_DOMAIN
```
你也可以[查看連結是否已被開啟](/docs/apis/profiles/get-link-session),並在過期前
[撤銷它](/docs/apis/profiles/revoke-link-session)。
這支 1 分鐘影片示範了如何建立連結。它錄製於 link sessions 之前,因此仍會顯示傳送 Private Key
的步驟——該步驟已不再需要,其餘示範內容則沒有改變。
傳送連結 URL
連結 URL 會讓你的使用者登入到他們的 profile,因此請像對待密碼一樣對待它。透過你信任的管道傳送,不要
記錄到日誌中,也不要轉交給第三方。它在整個有效期內都可以使用,因此重新載入或重試 OAuth 都沒問題,
但每個連結只發給一位使用者,並為每個人單獨建立連結。
### 開啟連結 URL
在新的瀏覽器分頁、瀏覽器視窗或 view controller 中開啟它。你可以控制該視窗的
[關閉或轉向](/docs/multiple-users/api-integration-business#opening-and-closing-the-social-linking-url)。
社群網路不允許在 iFrame 中開啟代管連結頁面,也不允許遮蔽已核准的合作夥伴來源網域
`profile.ayrshare.com`。如果你希望連結在你自己的頁面內完成,
[內嵌小工具](/docs/multiple-users/connect-widget)正是為此而生:它的框架由 Ayrshare 的來源網域提供,
是受支援的做法。
### 得知連結完成
兩種訊號,兩者皆可使用:
* **[連結完成事件](/docs/multiple-users/link-completion-events)**——建立連結時設定 `origin`,
連結視窗就會在事情發生的當下向你的頁面傳送 `connect:success`、`connect:error` 與
`connect:cancelled`。無需輪詢。
* **[取得 Link Session](/docs/apis/profiles/get-link-session)**——回報 `completedAt`、
`lastCompletedAt` 與 `completedNetworks`。這是原生應用程式使用的訊號,也是 Telegram 唯一的訊號——
Telegram 的連結在頻外完成。
連結有效期
連結預設有效 **5 分鐘**。之後請建立新的連結。
搭配 Max Pack,以分鐘為單位設定 `expiresIn` 即可延長有效期——最長 **2880 分鐘(48 小時)**,
這是 API 接受的上限:
```json Expires In theme={"system"}
{
"expiresIn": 30
}
```
較長的有效期正是讓[以電子郵件寄送連結](#connect-accounts-email)變得實際可行的關鍵——需要重新連結
帳號的使用者可以直接從你的電子郵件前往社群網路,而不必先造訪你的應用程式。
請與你的資安團隊確認連結應保持有效多久。較長的有效期,意味著被攔截的連結可用的時間也更長。
如果連結外洩,你可以[撤銷它](/docs/apis/profiles/revoke-link-session),而不必等它過期。
## Profile Key
`Profile-Key` 指明連結對應哪一個 User Profile。在 Ayrshare 開發者控制台切換到該 profile 即可找到它。
\*\*Private Key 已不再使用。\*\*連結不再簽署,因此無需從檔案讀取任何內容,也無需貼到程式碼中。
舊的 `privateKey` 參數仍會被接受並忽略,所以現有整合繼續運作,Integration Package 中的
`private.key` 檔案可以不再使用。
## 切換 Profile
如果某個 profile 已登入,開啟另一個 profile 的連結不會切換 profile——這是刻意的設計,
能讓已登入使用者的體驗更快速。若要強制切換,請參閱
[自動登出 Profile 工作階段](/docs/multiple-users/api-integration-business#automatic-logout-of-a-profile-session)。
Instagram 連結方式
Instagram 帳號可以透過[兩種方式](/docs/dashboard/connect-social-accounts/instagram)連結:直接使用
**Instagram Login**,或透過**已連結的 Facebook 粉絲專頁**。當使用者點擊 Instagram 按鈕時會啟動
哪一種流程,通常由帳號層級的
[Instagram Login](/docs/multiple-users/manage-user-profiles#instagram-login) 設定控制。
`instagramLinkMethod` body 參數可針對單一連結覆寫該設定:
| 值 | Instagram 連結流程 |
| ----------- | ------------------------------------- |
| `instagram` | 直接的 Instagram Login,不需 Facebook 粉絲專頁。 |
| `facebook` | 透過已連結的 Facebook 粉絲專頁連結。 |
```json Instagram Link Method theme={"system"}
{
"instagramLinkMethod": "instagram"
}
```
此覆寫在該連結的整個生命週期內都有效,包含跨越 Instagram/Facebook 授權轉址的過程。幾點須知:
* 它不會改變你的帳號層級設定,也不會影響任何其他連結。
* 若省略此欄位,會沿用帳號層級設定,與之前一致。
* 若傳入無效值,將回傳 `400` 並列出有效值(`instagram`、`facebook`)。
* 在選擇之前,請先參閱兩種流程的
[功能差異](/docs/multiple-users/manage-user-profiles#direct-instagram-login-vs-facebook-page-authentication)
——部分 Instagram 功能,例如 hashtag 搜尋與 collaborations(協作),僅支援 Facebook 粉絲專頁驗證。
Connect Accounts 電子郵件
Ayrshare 可以替你將連結以電子郵件寄給使用者,讓他們不必造訪你的應用程式即可前往連結頁面。
請搭配較長的 [`expiresIn`](#jwt-expires-in) 使用——預設的 5 分鐘通常撐不過收件匣。
### Connect Accounts JSON
\*\*`email` 內的每個欄位都是必填。\*\*缺少任何一個都會導致寄送失敗。
```json Example Contact Email Request theme={"system"}
{
"expiresIn": 60,
"email": {
"to": "john@user.com",
"contactEmail": "support@mycompany.com",
"company": "ACME",
"termsUrl": "https://www.ayrshare.com/terms",
"privacyUrl": "https://www.ayrshare.com/privacy"
}
}
```
`expiresIn` 是**頂層**參數,不屬於 `email` 物件。若巢狀放在 `email` 內會被忽略,
你的使用者會拿到一個 5 分鐘後就過期的連結。
回應會在 `emailSent` 中回報寄送結果:
```json Example Contact Email Response theme={"system"}
{
"status": "success",
"sessionId": "c7a2434e72e91bde27579efde0fd6dd0b74ceee29a471fd368407f273708c2e8",
"url": "https://profile.ayrshare.com?session=ayr_ls_kJ8mQ2vX9pLnR4tYwZ6aBcD1eFgH3iJkLmN0oPqRsTu&domain=YOUR_DOMAIN",
"expiresAt": "2026-09-02T09:03:26.838Z",
"emailSent": true,
"title": "Acme Client"
}
```
寄送**失敗**不會以 `emailSent: false` 回報——而是回傳 `code: 333`。因此 `false` 代表
沒有請求寄送電子郵件。
### Connect Accounts 電子郵件範例
以下是可開啟社群連結頁面的電子郵件範例:
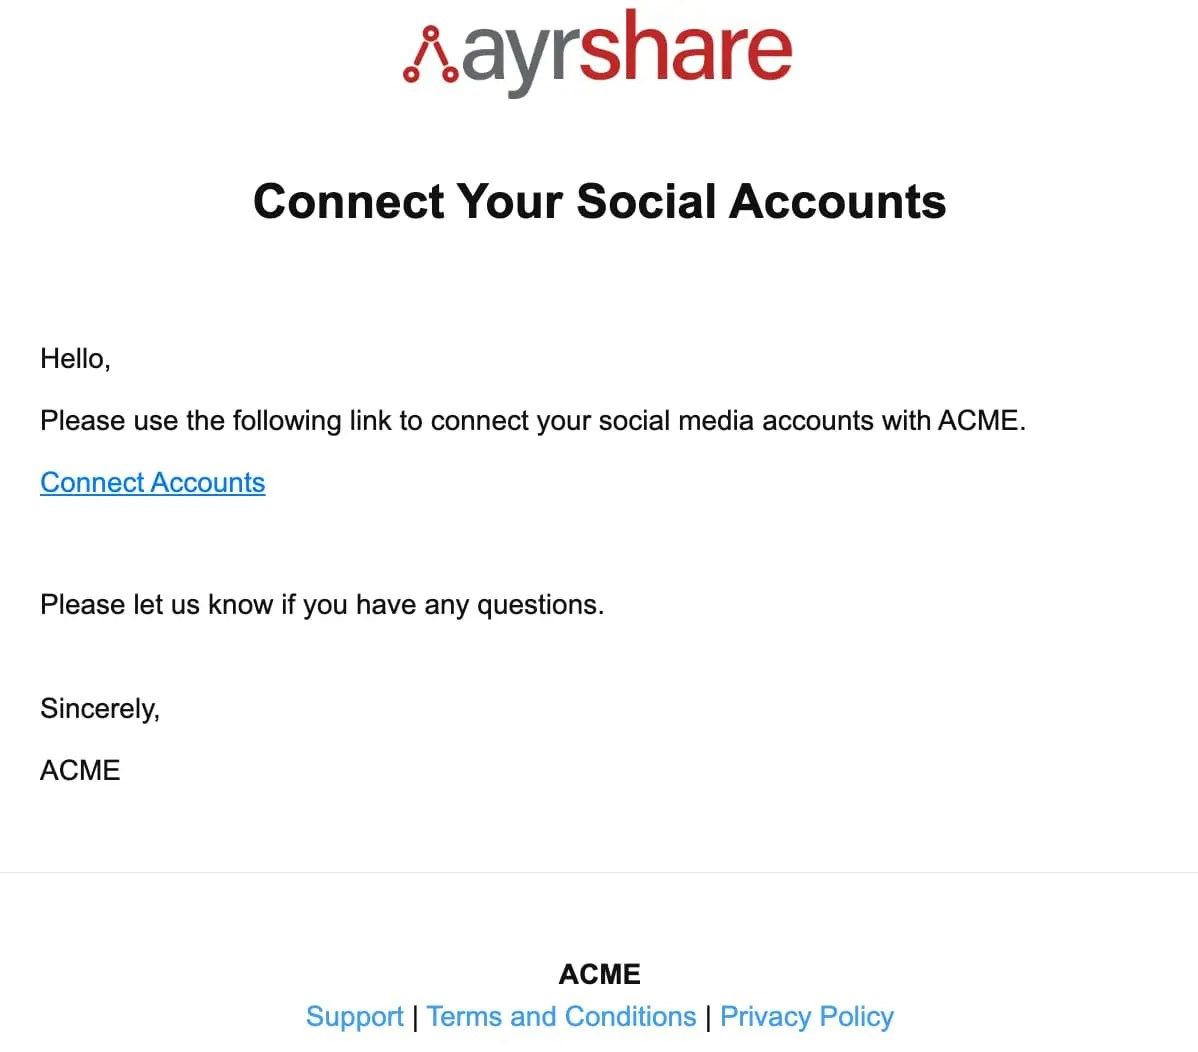 該電子郵件將由以下地址寄出:
`Social Connect Hub `
該電子郵件將由以下地址寄出:
`Social Connect Hub `
行動應用程式
請在**系統瀏覽器**中開啟連結 URL,切勿使用內嵌 webview:Google 會以 `disallowed_useragent`
拒絕登入,Meta 則會直接封鎖。你的使用者會看到社群網路自己的錯誤頁面,而你這一側沒有任何辦法可以修正。
* **iOS**——`ASWebAuthenticationSession` 或 `SFSafariViewController`。
* **Android**——Chrome Custom Tabs。
由於原生應用程式沒有可接收事件的瀏覽器視窗,請改由
[取得 Link Session](/docs/apis/profiles/get-link-session) 取得結果。將 `origin` 設為你的自訂 scheme
(`myapp://connected`),讓頁面有辦法返回你的應用程式。
行動端程式碼範例
請將 `linkingURL` 替換為
[建立 Link Session](/docs/apis/profiles/create-link-session) 所回傳的 `url`。
```swift Swift theme={"system"}
import UIKit
import SafariServices
class ViewController: UIViewController, SFSafariViewControllerDelegate {
var linkingURL = "https://profile.ayrshare.com?session=ayr_ls_kJ8mQ2vX9pLnR4tYwZ6aBcD1eFgH3iJkLmN0oPqRsTu&domain=acme"
override func viewDidLoad() {
super.viewDidLoad()
setupButton()
}
func setupButton() {
let button = UIButton(type: .system)
button.frame = CGRect(x: (view.bounds.width - 200) / 2, y: (view.bounds.height - 50) / 2, width: 200, height: 50)
button.setTitle("Open URL", for: .normal)
button.addTarget(self, action: #selector(buttonTapped), for: .touchUpInside)
view.addSubview(button)
}
@objc func buttonTapped() {
openURLInInAppBrowser()
}
func openURLInInAppBrowser() {
if let url = URL(string: linkingURL) {
let safariVC = SFSafariViewController(url: url)
safariVC.delegate = self
present(safariVC, animated: true, completion: nil)
}
}
// Optional: If you want to handle when the in-app browser is closed
func safariViewControllerDidFinish(_ controller: SFSafariViewController) {
controller.dismiss(animated: true, completion: nil)
}
}
```
```dart Flutter theme={"system"}
/** yaml dependencies
dependencies:
flutter:
sdk: flutter
url_launcher: ^6.2.1
*/
import 'package:flutter/material.dart';
import 'package:url_launcher/url_launcher.dart';
void main() {
runApp(MyApp());
}
class MyApp extends StatelessWidget {
@override
Widget build(BuildContext context) {
return MaterialApp(
title: 'URL Launcher Example',
theme: ThemeData(
primarySwatch: Colors.blue,
),
home: MyHomePage(),
);
}
}
class MyHomePage extends StatelessWidget {
final String linkingURL = "https://profile.ayrshare.com?session=ayr_ls_kJ8mQ2vX9pLnR4tYwZ6aBcD1eFgH3iJkLmN0oPqRsTu&domain=acme";
@override
Widget build(BuildContext context) {
return Scaffold(
appBar: AppBar(
title: Text('URL Launcher Example'),
),
body: Center(
child: ElevatedButton(
onPressed: () {
openURLInBrowser(context);
},
child: Text('Open URL'),
),
),
);
}
void openURLInBrowser(BuildContext context) async {
if (await canLaunch(linkingURL)) {
await launch(linkingURL);
} else {
ScaffoldMessenger.of(context).showSnackBar(
SnackBar(
content: Text('Could not launch $linkingURL'),
),
);
}
}
}
```
```jsx React Native theme={"system"}
/**
• Using the API provided by expo-web-browser,
• which opens a URL in a modal browser window that shares cookies
• with the system browser.
• Learn more about expo: https://reactnative.dev/docs/environment-setup?guide=quickstart
• and running the following command:
• expo install expo-web-browser
*/
import React from 'react';
import { StyleSheet, Button, View } from 'react-native';
import * as WebBrowser from 'expo-web-browser';
export default function App() {
const linkingURL = 'https://profile.ayrshare.com?session=ayr_ls_kJ8mQ2vX9pLnR4tYwZ6aBcD1eFgH3iJkLmN0oPqRsTu&domain=acme';
const openURLInBrowser = async () => {
try {
await WebBrowser.openBrowserAsync(linkingURL);
// Optional: WebBrowser.openBrowserAsync returns a promise that resolves with an object containing
// 'type' that can be 'cancelled' or 'dismissed'. You can use this to handle when the browser is closed.
} catch (error) {
console.error(error);
}
};
return (
);
}
const styles = StyleSheet.create({
container: {
flex: 1,
justifyContent: 'center',
alignItems: 'center',
},
});
```
## 測試
**建議**先在 [Postman](/docs/testing/postman) 中建立連結。你的 Integration Package——位於控制台
Primary Profile 的 API Key 頁面——包含一個範例 Postman 設定。匯入後,在 `profileKey` *body*
欄位填入你的 Profile Key,然後點擊 *Send*。
範例設定仍會預先填入 `privateKey` 和 `domain`。`privateKey` 會被忽略;除非你的帳戶擁有多個
連結網域,否則可以清空 `domain`。
你也可以[從 Postman 產生程式碼](/docs/testing/postman#auto-generate-api-code-with-postman)。
### Bubble.io
## 舊版:generateJWT
[產生連結 URL](/docs/apis/profiles/generate-jwt)(`generateJWT`)執行相同的工作,且**已棄用**——
仍完整支援、沒有移除日期,對你已發出的連結也沒有任何改變。它自己的頁面記載了它的參數,
包括三個現在會被接受並忽略的參數。
兩個端點使用同一個驗證器,因此本頁的所有內容對兩者皆適用。遷移時值得知道的唯一差異:
`generateJWT` 容許三件建立 Link Session 會拒絕的事——`allowedSocial` 中無法識別的網路、
只提供一半的 X 憑證,以及非字串的 `redirect`。