> ## Documentation Index
> Fetch the complete documentation index at: https://www.ayrshare.com/docs/llms.txt
> Use this file to discover all available pages before exploring further.
# 設定自有 X API 金鑰
> 將你自己的 X(Twitter)API 憑證連結到 Ayrshare 的逐步指南
2026 年 3 月 31 日起,X 變更了第三方平台存取其 API 的方式。因此,透過 Ayrshare 發布到 X 的每個 Ayrshare 帳戶都必須註冊自己的 X Developer App,並在每個請求上使用其 API Key 與 API Secret。
這是 X 強制推行的全平台變更,會影響所有第三方工具。
**BYO 金鑰是以每個平台(全帳戶)設定一次,而不是每位客戶或每個子個人資料。** 你在自己的 X 帳戶下建立**一個 X Developer App**,同一組 **API Key + API Secret** 會在 X 平台上以全帳戶方式套用——它們會用於在你的 Ayrshare 帳戶下連結 X 的**每個**子個人資料/終端使用者。若你的 Business 或 Enterprise 方案有數百個子個人資料,你**不**需要為每一個都重複此設定。你只要為 X 平台設定一次,然後在每個請求上傳送相同的兩個標頭即可。
我們已簡化設定流程,讓其盡可能簡單,完成應該不到 10 分鐘。請依照以下逐步指南操作;若過程中需要任何協助,我們的團隊會提供支援。
## 步驟 1:建立你的 X Developer 帳戶
前往 [console.x.com](https://console.x.com) 並使用你的 X 帳戶登入。如需協助,請參閱 [X 的入門指南](https://docs.x.com/x-api/getting-started/getting-access)。
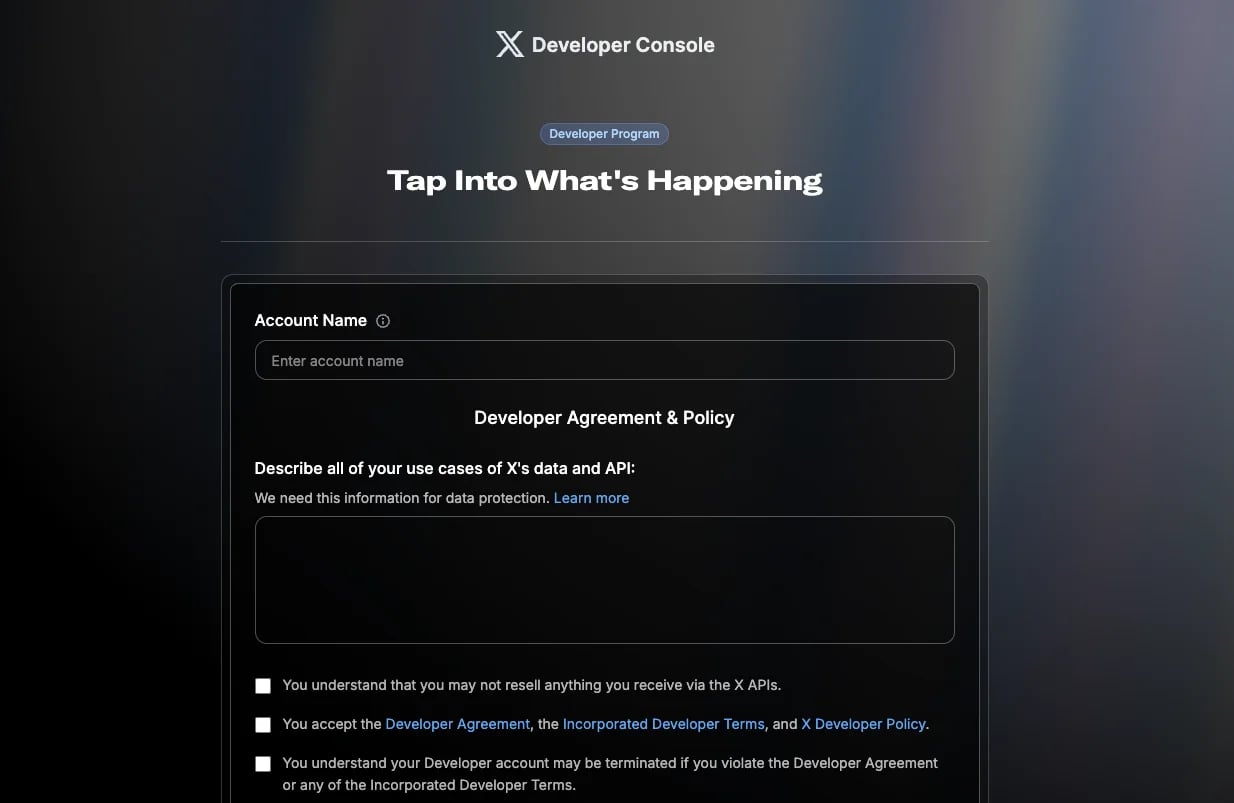 完成開發者入門流程,並接受 Developer Agreement 及相關政策。
你現在已進入 X Developer Console。
## 步驟 2:建立 App
你只需要為**每個 Ayrshare 帳戶建立一個 X Developer App**。同一個 app 及其 API Key + API Secret 會被重複用於你日後在 Ayrshare 帳戶下連結的每個子個人資料/終端使用者。你不需要為每個客戶建立新 app。
在 Developer Console 中前往 **Apps**。
完成開發者入門流程,並接受 Developer Agreement 及相關政策。
你現在已進入 X Developer Console。
## 步驟 2:建立 App
你只需要為**每個 Ayrshare 帳戶建立一個 X Developer App**。同一個 app 及其 API Key + API Secret 會被重複用於你日後在 Ayrshare 帳戶下連結的每個子個人資料/終端使用者。你不需要為每個客戶建立新 app。
在 Developer Console 中前往 **Apps**。
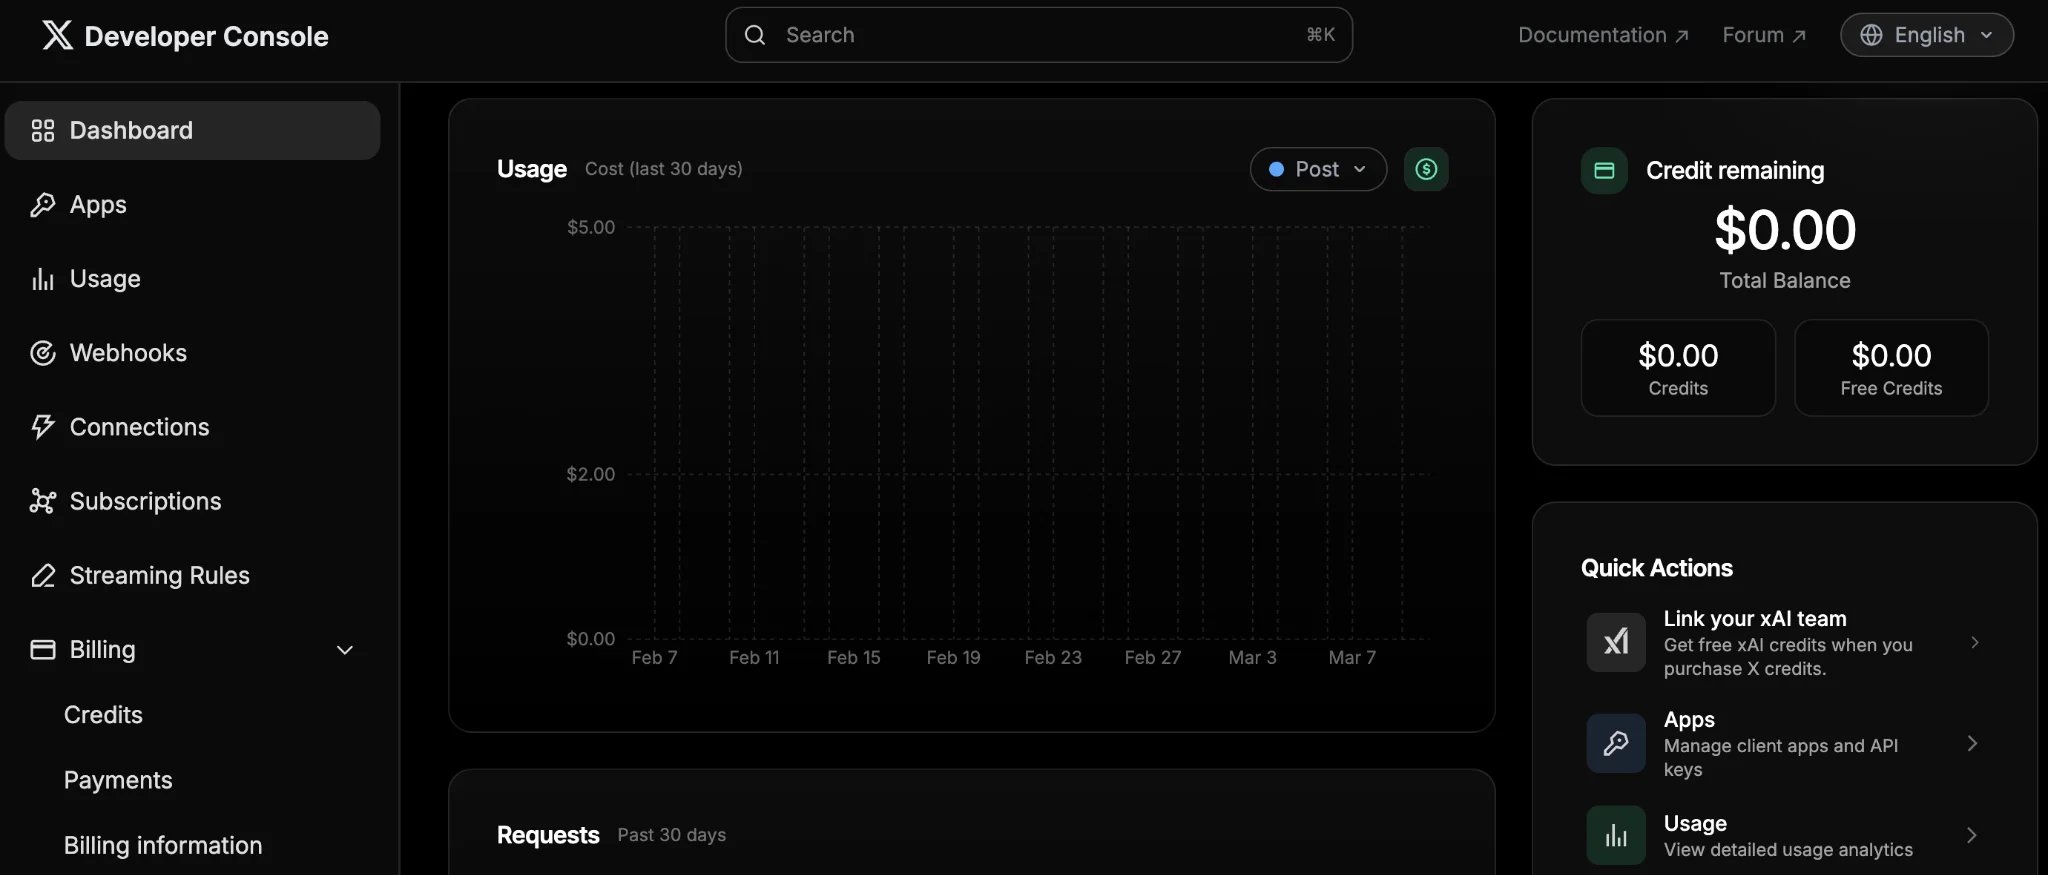 在 App 儀表板中,點擊 **Create App**(詳情請參閱 [X 的 App 設定文件](https://docs.x.com/fundamentals/developer-apps))。輸入 app 名稱(通常是你的品牌名稱)。此名稱會在使用者連結其 X 帳戶時的 OAuth 授權畫面中顯示。
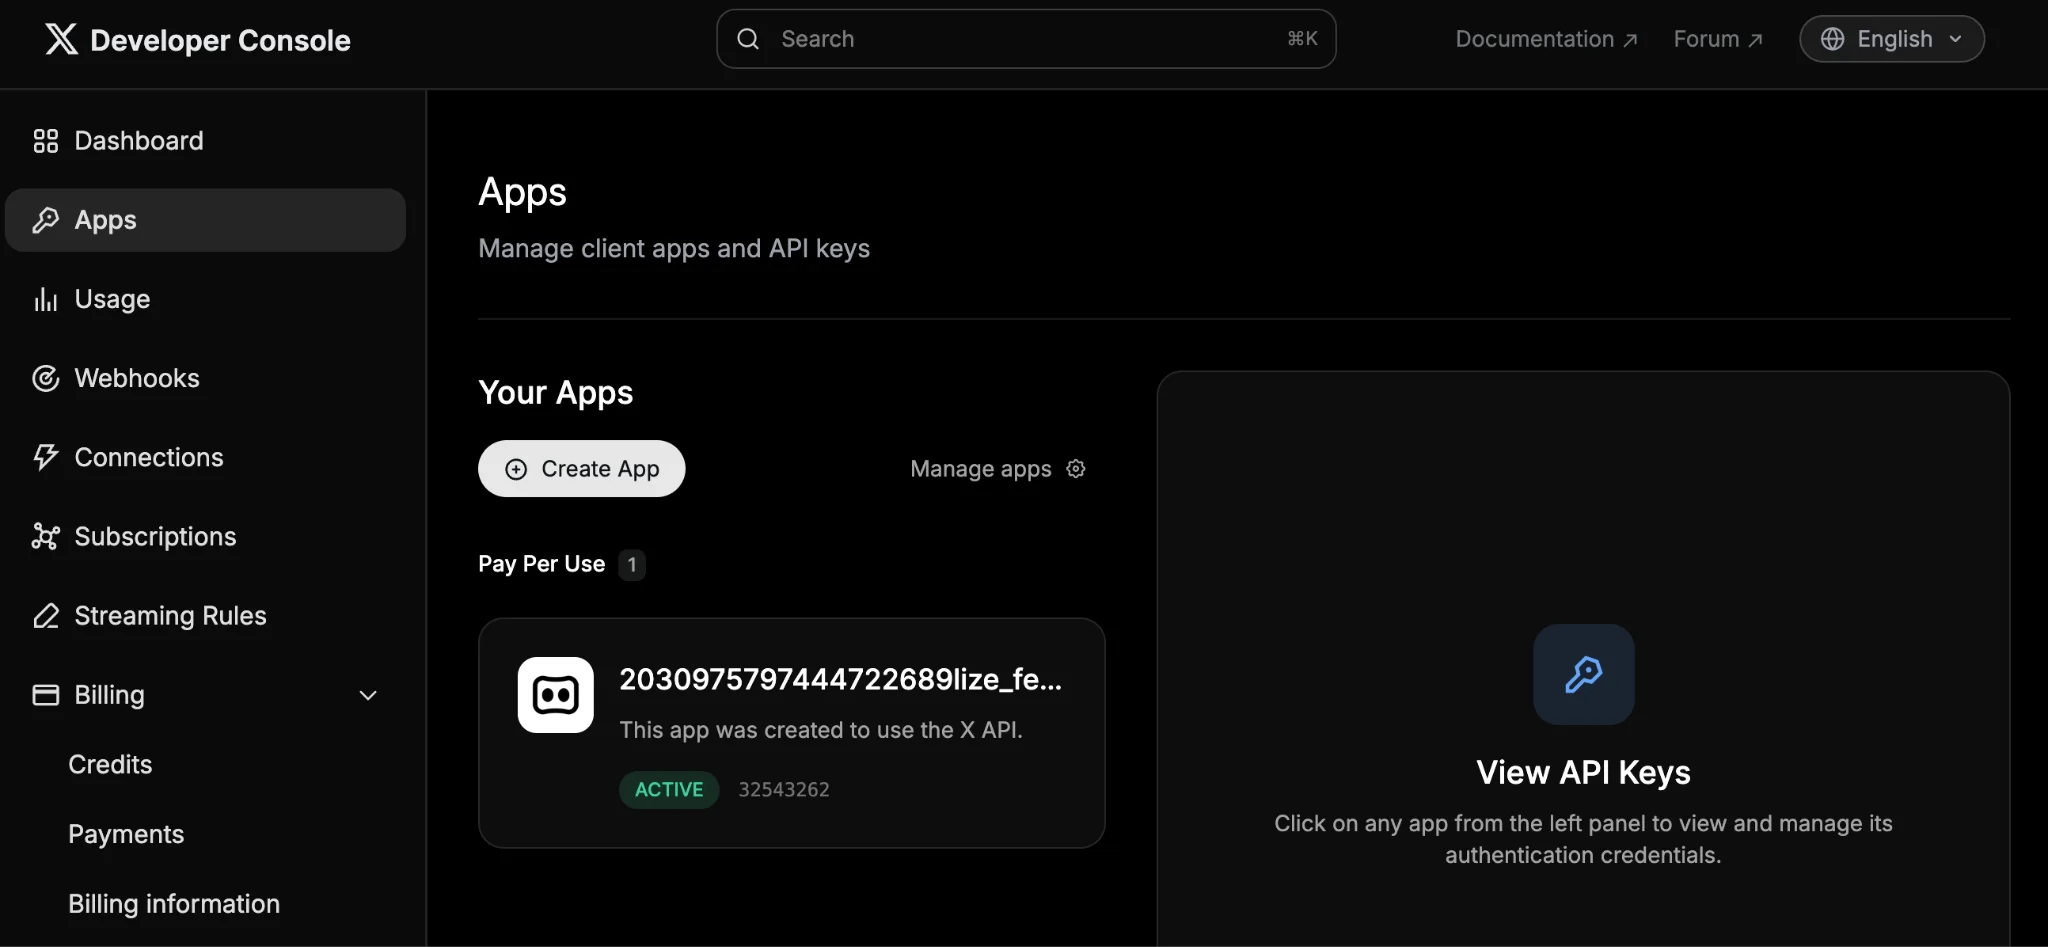 在下拉式選單中選擇 **Production** 環境。
 X 會產生數個憑證。**請忽略這些憑證並關閉此視窗。**
## 步驟 3:設定 App 權限
在「Apps」下方找到剛建立的 app(若未出現請重新整理頁面),點擊它以檢視詳細資訊。
X 會產生數個憑證。**請忽略這些憑證並關閉此視窗。**
## 步驟 3:設定 App 權限
在「Apps」下方找到剛建立的 app(若未出現請重新整理頁面),點擊它以檢視詳細資訊。
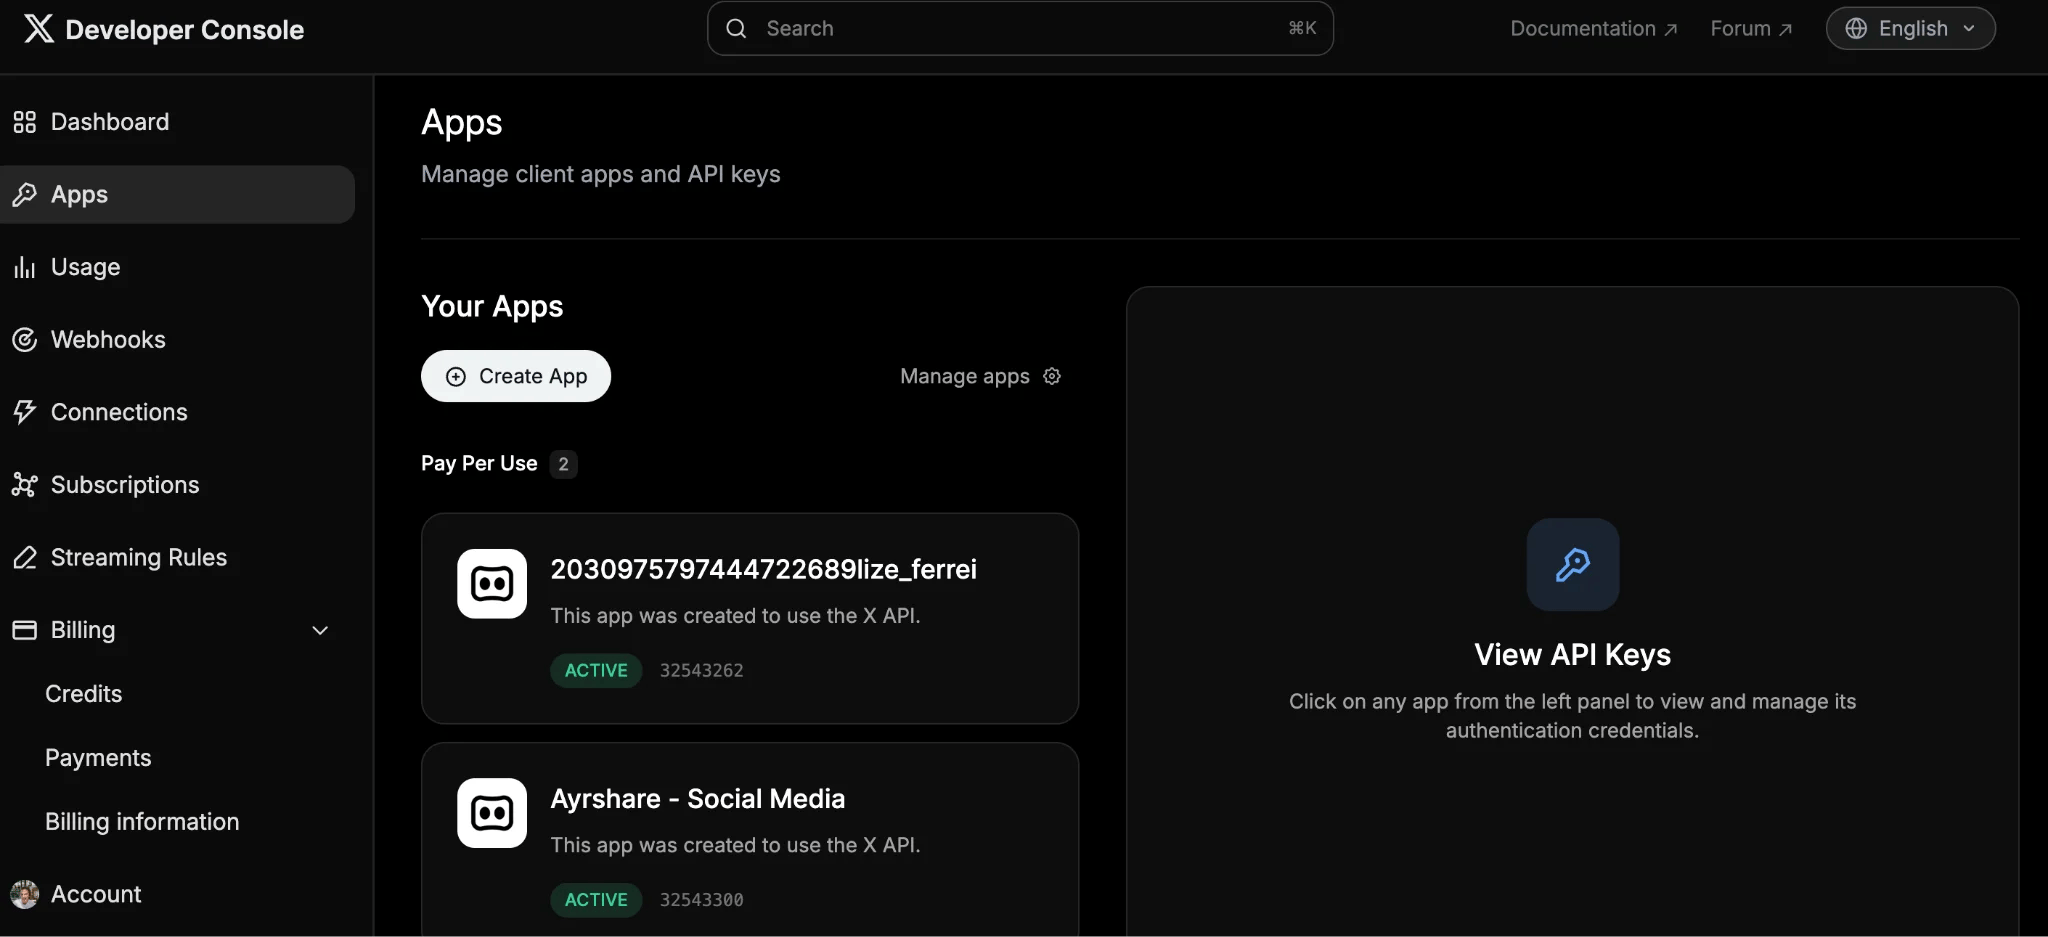 在 **User authentication settings** 下方點擊 **Set up**。
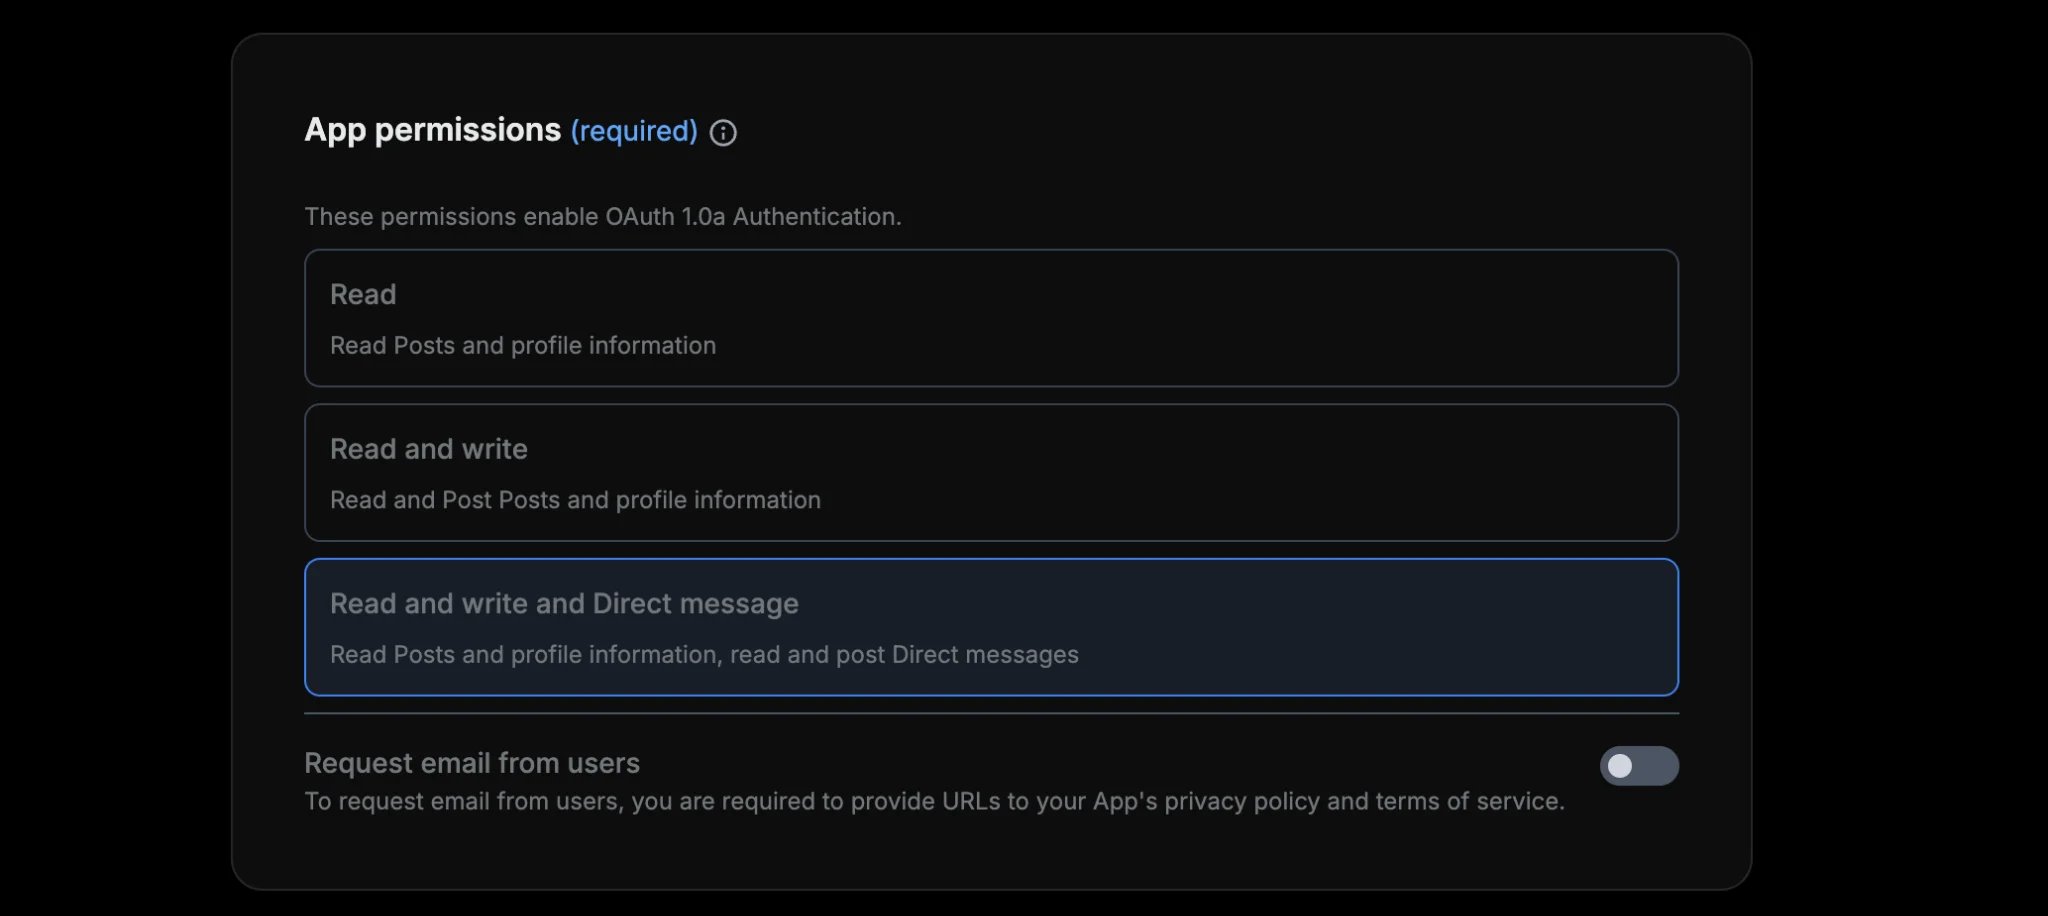
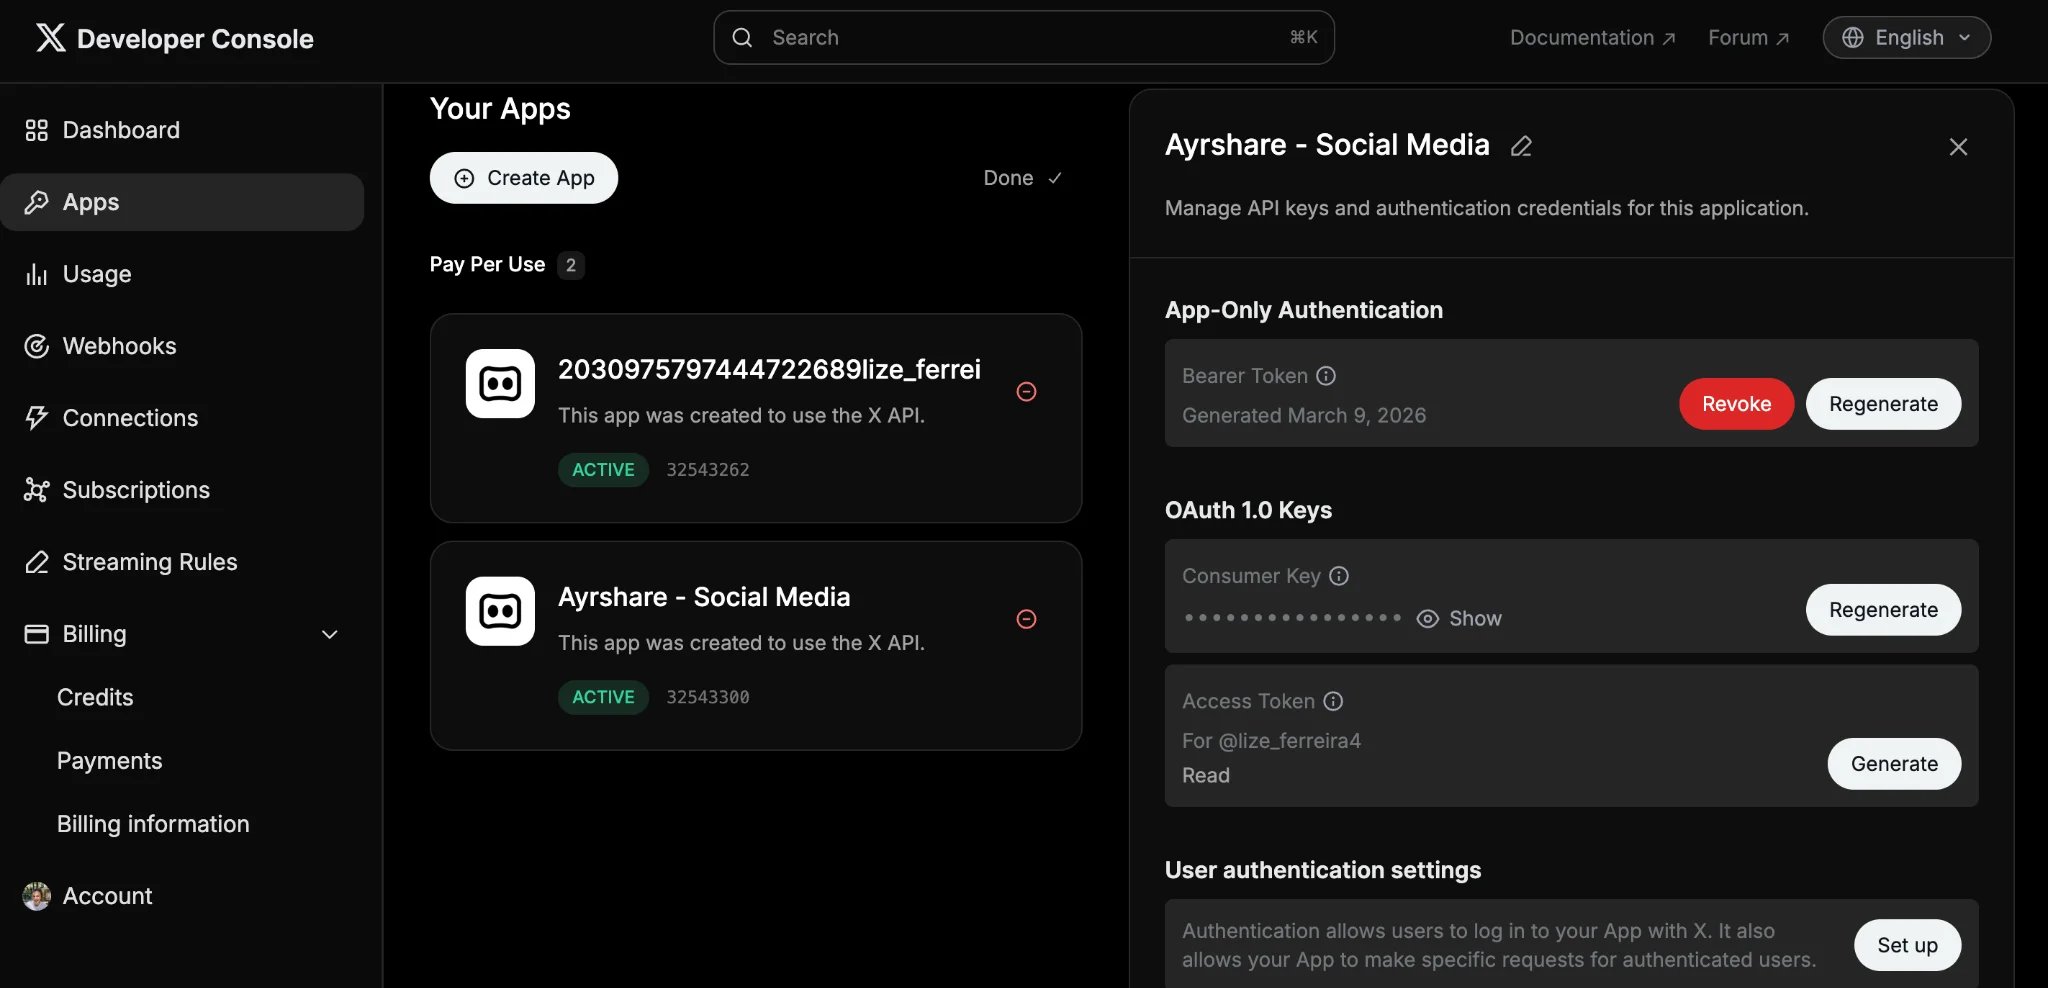 在 **App permissions** 下方,選擇 **Read and write and Direct message**。這是完整功能支援(包括發布與 DM)所必需的。
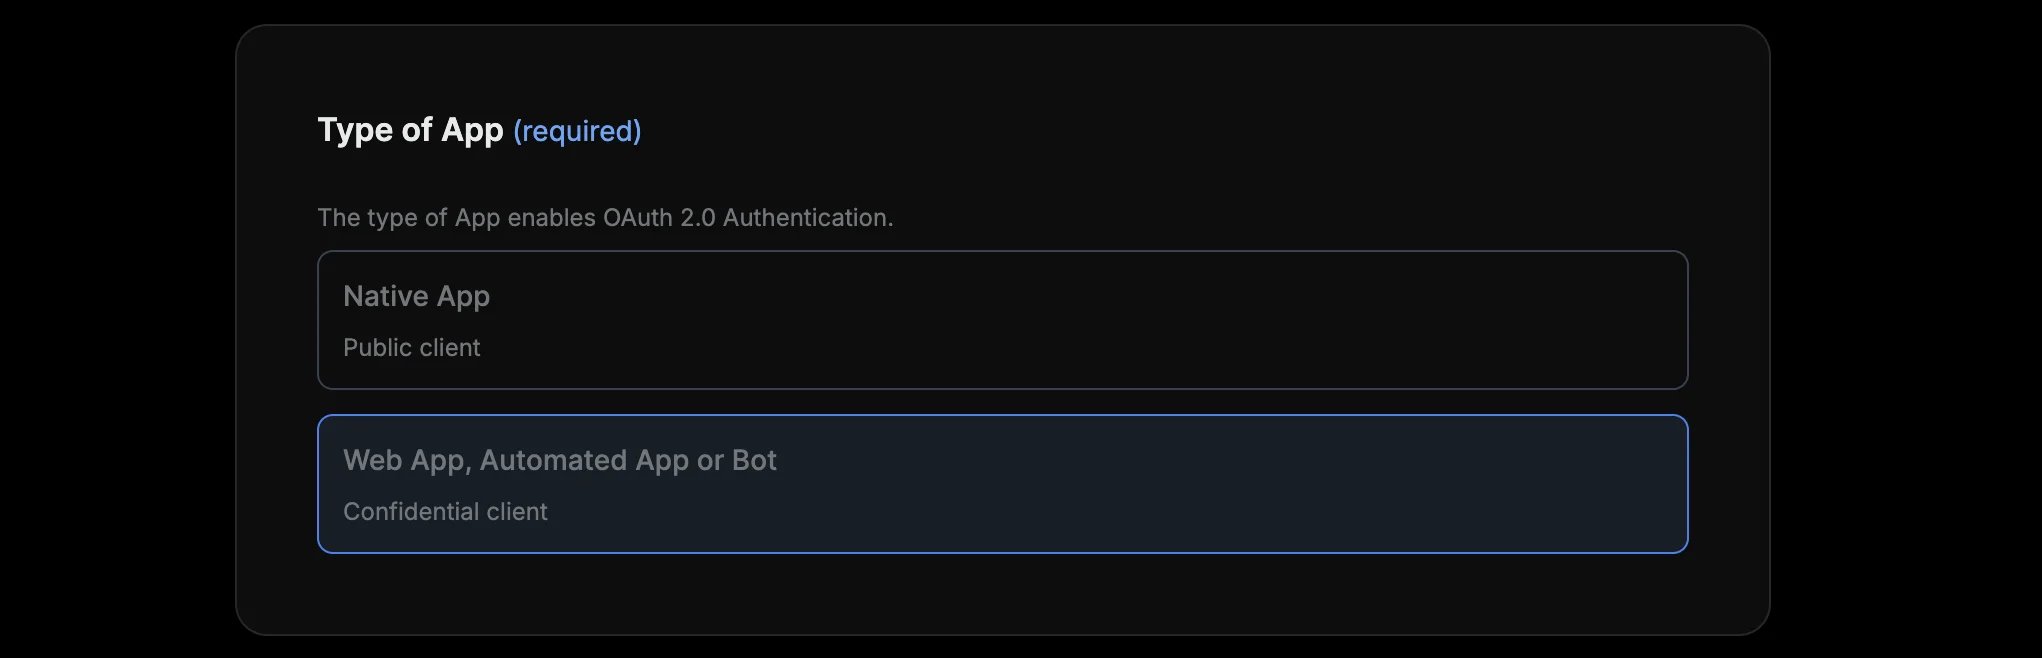
 在 **Type of App** 下方,選擇 **Web App, Automated App or Bot**。這是像 Ayrshare 這類伺服器端整合的正確選項。
 在 **App info** 下:
* **Callback URL:** 加入以下兩個 callback URL:
* `https://profile.ayrshare.com/social-accounts`
* `https://app.ayrshare.com/social-accounts`
* **Website URL:** `https://app.ayrshare.com`
**請勿跳過此步驟。** 這些 callback URL 為 OAuth 連結流程所必需。當你的終端使用者授權 X 連線時,X 會將他們重新導向到其中一個 URL 以完成連結流程。若缺少這些 URL,OAuth 流程將以 `403 Callback URL not approved` 錯誤失敗。
在 **App info** 下:
* **Callback URL:** 加入以下兩個 callback URL:
* `https://profile.ayrshare.com/social-accounts`
* `https://app.ayrshare.com/social-accounts`
* **Website URL:** `https://app.ayrshare.com`
**請勿跳過此步驟。** 這些 callback URL 為 OAuth 連結流程所必需。當你的終端使用者授權 X 連線時,X 會將他們重新導向到其中一個 URL 以完成連結流程。若缺少這些 URL,OAuth 流程將以 `403 Callback URL not approved` 錯誤失敗。
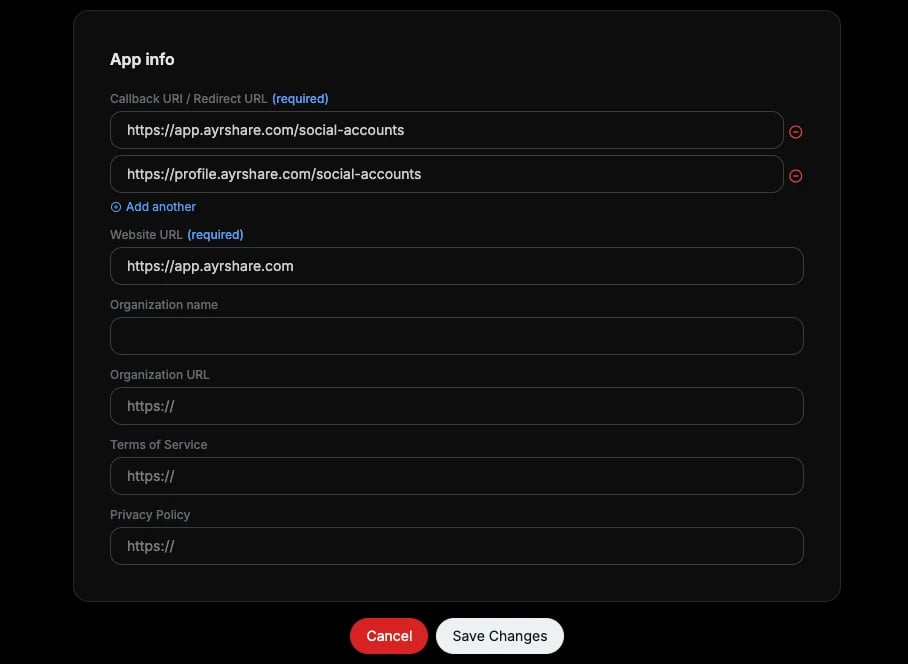 點擊 **Save**。你可以忽略 OAuth 2.0 彈窗,因為你只會用到 OAuth 1.0 金鑰中的兩個(API Key 與 API Secret)。
**重要:請在連結前設定權限。** 你在此選擇的權限決定了你的 app 可執行的操作。若你在透過 OAuth 連結 X 帳戶後才變更權限,你需要重新連結,讓新的 Access Token 繼承更新後的權限。
點擊 **Save**。你可以忽略 OAuth 2.0 彈窗,因為你只會用到 OAuth 1.0 金鑰中的兩個(API Key 與 API Secret)。
**重要:請在連結前設定權限。** 你在此選擇的權限決定了你的 app 可執行的操作。若你在透過 OAuth 連結 X 帳戶後才變更權限,你需要重新連結,讓新的 Access Token 繼承更新後的權限。
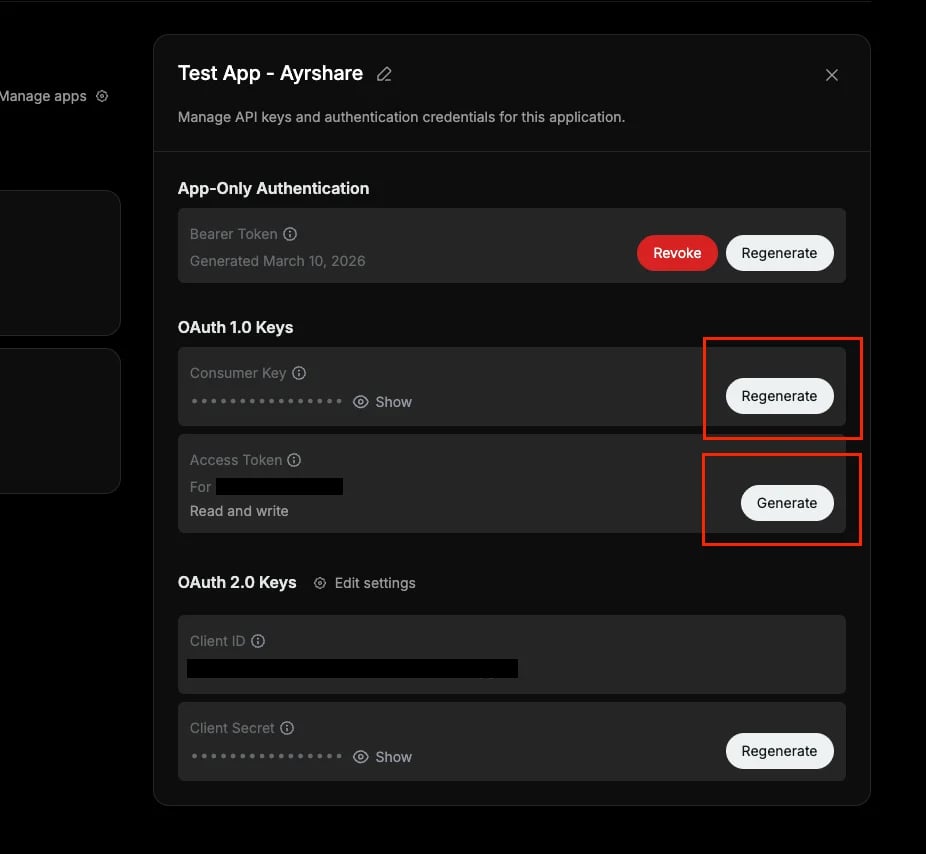 請務必儲存以下兩把金鑰:
1. **API Key**(又稱 Consumer Key,X app 識別碼)
2. **API Secret**(又稱 Consumer Secret)
你**不需要**手動產生 Access Token。當你透過 OAuth 連結 X 帳戶時,Ayrshare 會自動處理。
## 步驟 4:購買 X API 額度
X 現在採用透過開發者控制台購買的額度制 API 計費。
在 Developer Console 中,點擊左側邊欄的 **Billing → Credits**。
請務必儲存以下兩把金鑰:
1. **API Key**(又稱 Consumer Key,X app 識別碼)
2. **API Secret**(又稱 Consumer Secret)
你**不需要**手動產生 Access Token。當你透過 OAuth 連結 X 帳戶時,Ayrshare 會自動處理。
## 步驟 4:購買 X API 額度
X 現在採用透過開發者控制台購買的額度制 API 計費。
在 Developer Console 中,點擊左側邊欄的 **Billing → Credits**。
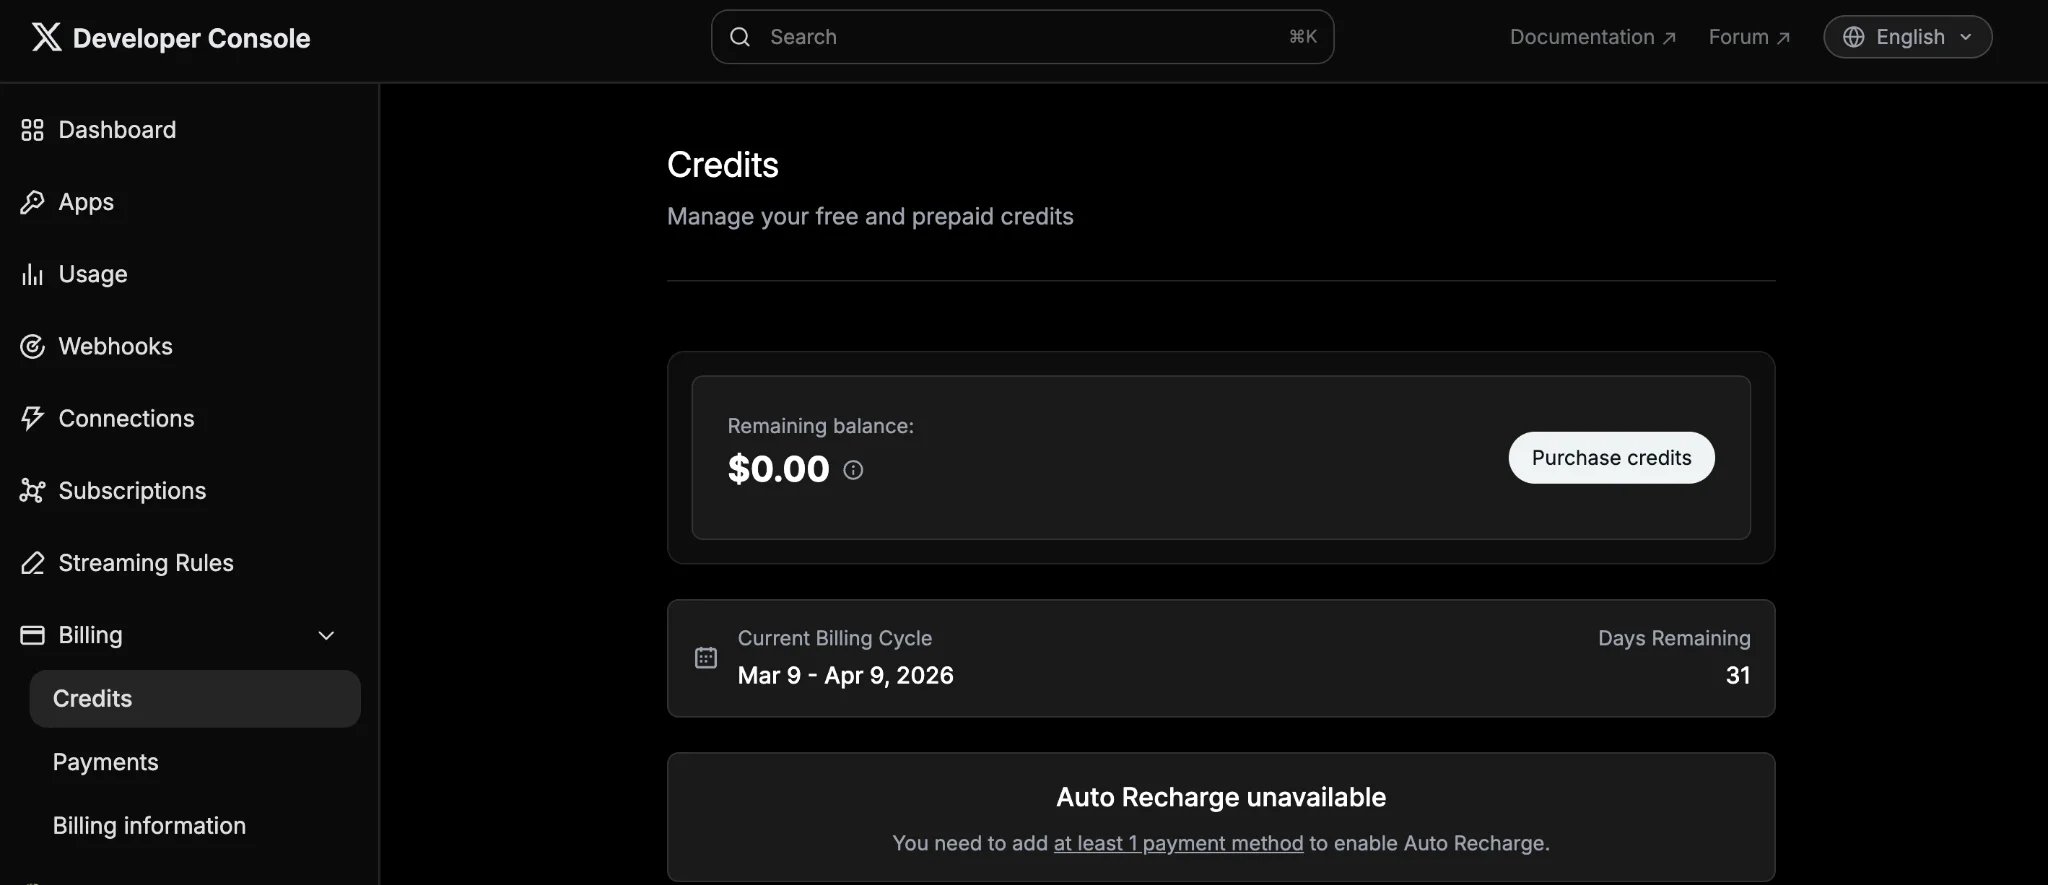 購買額度(最低 \$5,足夠數百次 API 呼叫)。每次 API 呼叫僅需極少的美分,因此對大多數使用者而言成本應該很低。
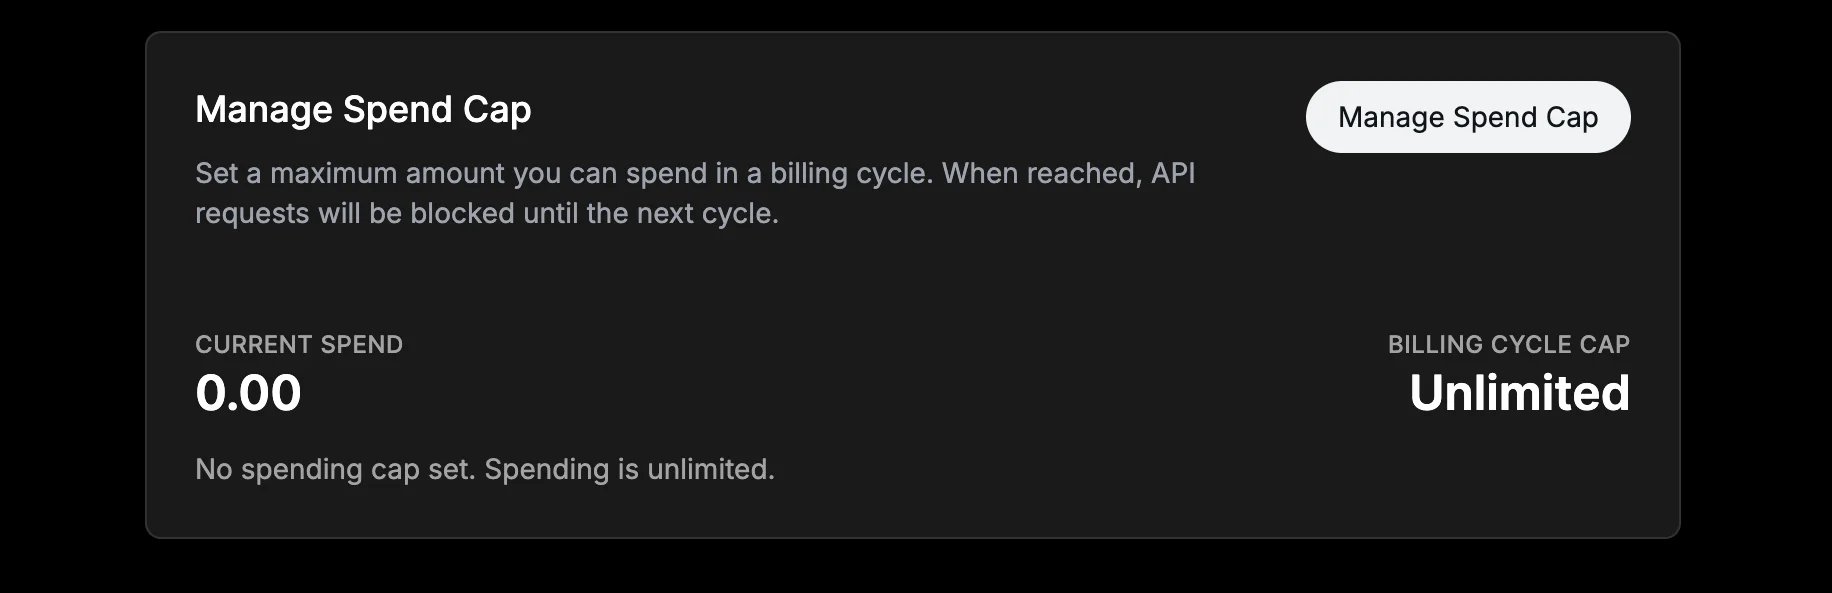
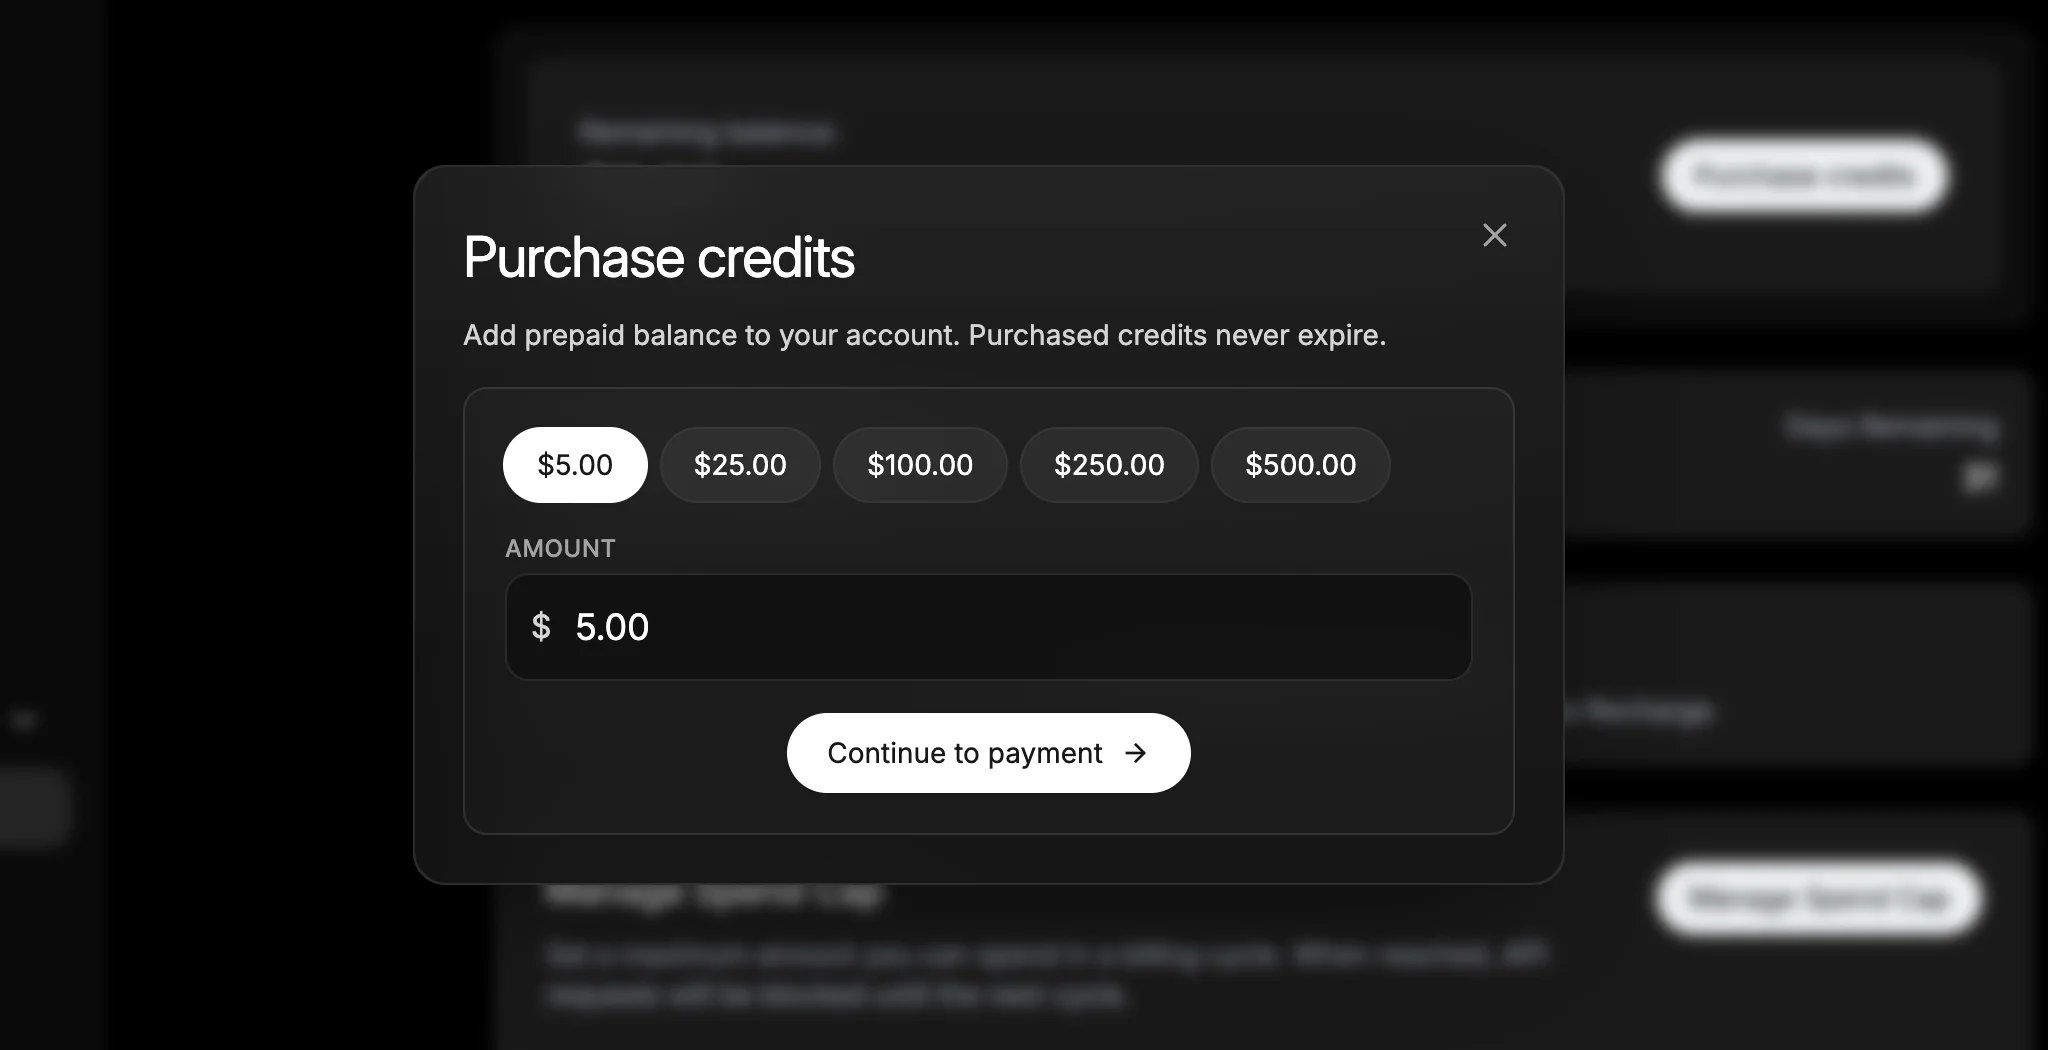 你可以啟用 **auto-recharge** 以避免服務中斷,並透過設定計費週期內可花費的最高金額來管理支出上限。
 **沒有額度時 API 呼叫會失敗。** X 的 API 採用按次計費。若你的額度餘額為零,所有 API 請求都會回傳 `402 CreditsDepleted` 錯誤,訊息為「Your enrolled account does not have any credits to fulfill this request.」。這包括發布、讀取推文與使用者查詢。請在測試整合前儲值。X 的完整定價資訊請參閱下方 [X API 計費方式](#how-x-api-pricing-works) 段落。
## 步驟 5:更新你的 Ayrshare API 呼叫
在步驟 3 中,你已將以下兩項安全地儲存在你自己的環境變數、設定檔或機密管理工具中:
1. **API Key**(又稱 Consumer Key,X app 識別碼)
2. **API Secret**(又稱 Consumer Secret)
現在,將你的 X 憑證加入到 Ayrshare API 呼叫的標頭中。
**你的金鑰保持私密。** 你的 API Key 與 API Secret 不會被 Ayrshare 儲存。
### 標頭參考
| 標頭 | 值 |
| ----------------------------- | ------------------------------- |
| `X-Twitter-OAuth1-Api-Key` | API Key(Consumer Key) |
| `X-Twitter-OAuth1-Api-Secret` | API Key Secret(Consumer Secret) |
**如何判斷權限是否錯誤:**
* 若你的 app 權限設定錯誤,API 請求可能會回傳 `403 Forbidden` 錯誤,訊息為:「Your client app is not configured with the appropriate OAuth1 app permissions.」。
若你看到此錯誤,請在 X Developer Console 中將 app 權限更新為 **Read and write and Direct message**,然後透過 OAuth 重新連結你的 X 帳戶,讓新的 Access Token 繼承更新後的權限。
### 程式碼範例
```bash cURL theme={"system"}
curl -X POST https://api.ayrshare.com/api/post \
-H "Authorization: Bearer YOUR_AYRSHARE_API_KEY" \
-H "X-Twitter-OAuth1-Api-Key: your_api_key" \
-H "X-Twitter-OAuth1-Api-Secret: your_api_secret" \
-H "Content-Type: application/json" \
-d '{"post": "Hello from my own X App!", "platforms": ["twitter"]}'
```
```javascript Node.js theme={"system"}
const response = await fetch("https://api.ayrshare.com/api/post", {
method: "POST",
headers: {
"Authorization": "Bearer YOUR_AYRSHARE_API_KEY",
"Content-Type": "application/json",
"X-Twitter-OAuth1-Api-Key": process.env.X_API_KEY,
"X-Twitter-OAuth1-Api-Secret": process.env.X_API_SECRET,
},
body: JSON.stringify({
post: "Hello from my own X App!",
platforms: ["twitter"],
}),
});
```
```python Python theme={"system"}
import os
import requests
headers = {
"Authorization": "Bearer YOUR_AYRSHARE_API_KEY",
"Content-Type": "application/json",
"X-Twitter-OAuth1-Api-Key": os.environ["X_API_KEY"],
"X-Twitter-OAuth1-Api-Secret": os.environ["X_API_SECRET"],
}
response = requests.post(
"https://api.ayrshare.com/api/post",
headers=headers,
json={"post": "Hello from my own X App!", "platforms": ["twitter"]},
)
```
只要你在每個以 X 為目標的請求中都包含 API Key 與 API Secret 標頭,你既有的自動化流程與工作流程都會繼續運作。
### 遷移現有個人資料(Business 與 Enterprise)
若你有已透過 Ayrshare 連結 X 的子個人資料,在你切換到 BYO 金鑰後,這些個人資料需要重新連結其 X 帳戶。這是因為既有的 access token 是在 Ayrshare 的 X app 下發出的,無法搭配你自己的 consumer 金鑰使用(OAuth 1.0a 簽章會綁定發出 token 的 app)。
將 `twitterApiKey` 與 `twitterApiSecret` 加入你的 [generateJWT](/apis/profiles/generate-jwt#body-parameters-13) 呼叫 body 中。這些會在嵌入 JWT 之前先加密,不會暴露給你的終端使用者。
```json theme={"system"}
{
"domain": "your-domain",
"profileKey": "...",
"privateKey": "...",
"twitterApiKey": "YOUR_X_CONSUMER_KEY",
"twitterApiSecret": "YOUR_X_CONSUMER_SECRET"
}
```
這是唯一一個將 consumer 金鑰放在 body 中的請求。所有其他 X 請求都使用上述標頭。
在產生含金鑰的 JWT 之後,你的使用者需要透過個人資料連結頁面重新連接他們的 X 帳戶。OAuth 同意畫面現在會顯示你的 app 名稱,而不是 Ayrshare 的。
為簡化此流程,你可以:
* 透過 [Unlink API](/apis/profiles/unlink-social-network#unlink-a-social-network) 以程式化方式解除連結帳戶,然後讓使用者重新授權
* 使用 generateJWT 中的 [`logout` 參數](/apis/profiles/generate-jwt#param-logout) 強制重新登入
* 使用 [`allowedSocial`](/apis/profiles/generate-jwt#param-allowed-social) 讓連結頁面在遷移流程期間僅顯示 X
重新連結後,請在每個 API 呼叫(發布、分析、留言等)中持續包含 `X-Twitter-OAuth1-Api-Key` 與 `X-Twitter-OAuth1-Api-Secret` 標頭。
一旦某個個人資料在你的 X app 下重新連結,該個人資料後續的所有貼文都會使用你的憑證。你可以透過檢查 [X Developer Console](https://console.x.com) 中的 Usage 頁面來驗證。
### 驗證你的設定
使用你新加入的標頭透過 Ayrshare API 進行測試呼叫,以確認一切運作正常。[/analytics/social](/apis/analytics/social) 端點是一個很好的輕量測試,因為它不會建立任何貼文。
## X API 計費方式
先前,Ayrshare 代表你承擔 X 的 API 使用費用。在 X 目前的模式下,每位 Ayrshare 客戶都會維護自己的 X Developer 帳戶,並直接向 X 支付其應用發出的 API 請求費用。(每個 Ayrshare 帳戶一個 X Developer 帳戶,而不是每位終端使用者。你所有的子個人資料共用同一個 X Developer 帳戶與額度餘額。)
X 的計費模式為按次付費:你在 X Developer Console 中購買額度,隨著 API 請求的發出而扣除。不需要合約或訂閱。
一般操作費用不高。例如:
| 操作 | 大約成本 |
| ------------- | --------------------------- |
| 建立貼文(僅文字) | 每則約 \$0.01 |
| 建立含媒體的貼文 | 每則約 \$0.02(媒體上傳與貼文建立為分開的請求) |
| 讀取貼文 | 每次約 \$0.005 |
| 使用者查詢 | 每次約 \$0.01 |
| 傳送 DM | 每則訊息約 \$0.01 |
| 讀取 DM 事件 | 每個事件約 \$0.01 |
| 使用者互動(追蹤、按讚等) | 每次請求約 \$0.015 |
作為參考,若你每月發布約 100 次貼文,你直接支付給 X 的成本大約為 \$1,含媒體的貼文則大約為每月 \$2。
X 的按次付費計費目前處於試行階段。費率可能會變動,也可能引入額外成本。請務必在 Developer Console 中查看最新的定價。請參閱 [X 的定價資訊細分](https://docs.x.com/x-api/fundamentals/pricing)。
我們了解這引入了先前不存在的成本,我們希望對此保持透明。同時,此模式也解鎖了在先前共用金鑰設定下無法實現的多項益處。
## 使用自己的 X API 金鑰的好處
使用自己的 X API 憑證比先前共用金鑰的模式提供更多控制與可靠性。包括:
* **具品牌感的 OAuth 體驗:** 使用者在授權 X 存取時會看到你的 app 名稱與品牌。
* **獨立的速率限制:** 你的 API 使用量會依你自己的 X Developer 帳戶限制管理,與其他 Ayrshare 使用者分開。你可以在 [X Developer Console](https://console.x.com) 中監控使用量,並參閱 [X API 速率限制文件](https://developer.x.com/en/docs/x-api/rate-limits)。
* **憑證控制:** 你的 API Key 與 Secret 保存在你自己的 X Developer 帳戶中。Ayrshare 不會儲存你的機密金鑰。
* **可攜性:** 因為使用者是透過你的 X App 進行驗證,你的整合完全在你的控制之下。
* **使用量可見性:** 你的 X Developer 儀表板會顯示 API 請求、速率限制與額度使用情形。
X 是第一個要求此模式的平台,但更多平台正朝向「自帶 API 金鑰」發展。我們正在將此能力擴展到 Ayrshare 的整體,讓開發者在所有社群平台上都能擁有相同的控制與獨立性。
## 安全性
* 你的 API Key 與 API Secret 不會被 Ayrshare 儲存。
* 一般安全性最佳做法請參閱 [X 的驗證安全指南](https://docs.x.com/resources/fundamentals/authentication)。
## 常見問題
**不需要。** 你在自己的 X 帳戶下設定**一個** X Developer App,同一組 **API Key + API Secret** 會被重複用於你在 Ayrshare 帳戶下連結的每個子個人資料/終端使用者。
* 你**只需要**建立一次 X Developer App。
* 你在每個 Ayrshare API 呼叫中都傳送相同的兩個標頭(`X-Twitter-OAuth1-Api-Key` 與 `X-Twitter-OAuth1-Api-Secret`),無論該呼叫屬於哪個子個人資料。
* 你的終端使用者仍然要各自完成 OAuth 連結流程來授權自己的 X 帳戶,但他們**不**需要自己的 X Developer App 或 API 金鑰。他們透過你的 app 進行連接。
* 所有子個人資料共用同一個 X Developer 帳戶、同一組速率限制與同一個額度餘額。
唯一你會處理每個個人資料金鑰的時機是在遷移期間的 [generateJWT](/apis/profiles/generate-jwt) body 中,這仍然是你的同兩把金鑰,只是傳送到連結頁面,讓終端使用者可以在你的 app 下重新授權。
是的。自 2026 年 3 月 31 日起,透過 Ayrshare 進行的所有 X 操作都需要你自己的 X API 憑證。若你還未設定 X Developer 帳戶,請依照上述步驟操作。
透過 Ayrshare 發布到 X 需要你自己的 X API 憑證。未附有效 BYO 憑證的請求會被拒絕。發布到其他平台(Instagram、LinkedIn、Facebook、TikTok 等)不受影響。
X 按 API 呼叫次數計費。建立一則貼文約 \$0.01,讀取一則貼文約 \$0.005。舉例來說,每月發布 100 則貼文大約需要 \$1。完整資訊請參閱 [X 的定價頁面](https://docs.x.com/x-api/fundamentals/pricing)。
不會。你的 Ayrshare 訂閱價格維持不變。唯一額外的成本是由 X 透過你的 developer 帳戶直接計費的 X API 使用費用。
不會。你的 API Key 與 API Secret 不會被 Ayrshare 儲存。一般安全性最佳做法請參閱 [X 的驗證安全指南](https://docs.x.com/resources/fundamentals/authentication)。
可以。只要你的既有 X App 已啟用「Read and write」權限(若使用 DM 功能則需 Direct Messages),你都可以使用。
你需要從 X Developer Console 的 Keys and tokens 區段取得 API Key(Consumer Key)與 API Secret(Consumer Secret)。透過 OAuth 連結你的 X 帳戶,然後在你的 Ayrshare API 請求中包含這兩個標頭。
若你在初始設定後變更了 app 權限,請重新連結你的 X 帳戶,讓 Access Token 繼承更新後的權限。
你需要 API Key(Consumer Key)與 API Secret(Consumer Secret)。請參閱上方 [標頭參考表](#header-reference),了解每個對應到哪一個 Ayrshare 標頭。你可以忽略 Client ID、Client Secret、Bearer Token、Access Token 與 Access Token Secret。
它們是用於不同驗證方式的完全不同憑證:
* **API Key**(又稱「Consumer Key」)用於 OAuth 1.0a。API Key(Consumer Key)+ API Secret 就是 Ayrshare 使用的組合。它適用於所有 X 功能,token 永不過期,也不需要重新整理邏輯。
* **Client ID** 用於 OAuth 2.0。你**不**需要它來使用 Ayrshare。OAuth 2.0 token 會在短時間後過期,並需要管理 refresh token。
對於 Ayrshare,你只需要你的 API Key 與 API Secret。你可以忽略 Client ID、Client Secret 與 Bearer Token。
OAuth 2.0 access token 每 2 小時過期,且 X 的 refresh token 是一次性的(每次重新整理都會使舊的 token 失效)。這使得無法支援無狀態的 BYO 模式,尤其是排程貼文。OAuth 1.0a token 永不過期、適用所有 X 功能,且不需管理 token。
需要。若你的使用者是在你設定 BYO 金鑰之前透過 Ayrshare 連結 X 的,他們需要重新連接。既有的 access token 是在 Ayrshare 的 X app 下發出的,無法搭配你的 consumer 金鑰使用。逐步流程請參閱上方 [遷移現有個人資料](#migrating-existing-profiles-business--enterprise)。
不會。此變更僅影響發布到 X。Ayrshare 中所有其他平台整合會繼續照常運作。
RSS 自動發布到 X 已不再支援。RSS 摘要會依排程自動執行,但自帶 API 金鑰的模式要求每次 API 請求都提供憑證。因此,RSS 摘要在發送貼文時無法進行驗證。
若你先前使用 RSS 發布到 X,我們建議改用 [排程貼文](/apis/post/overview#schedule-posts) 或包含你憑證的直接 API 呼叫。RSS 自動發布到其他所有平台則維持不變。
這表示你的 X Developer 帳戶沒有可用的 API 額度。前往 [console.x.com](https://console.x.com) → **Billing → Credits** 並購買額度。即使 \$5 也足夠數百次 API 呼叫。額度儲值後,重試你的請求。
你的 Access Token 沒有正確的權限。這通常表示以下兩種情況之一:
1. **你的 app 權限被設為「Read」而非「Read and write」。** 前往 Developer Console 中你 app 的 Settings,將其變更為 **Read and write and Direct message**。
2. **你在連結 X 帳戶後變更了權限。** Access Token 會保留其建立時的權限。透過 OAuth 重新連結你的 X 帳戶,讓新的 token 繼承更新後的權限。
我們的支援團隊樂於協助。若你在設定過程中有任何問題或遇到困難,請透過 [support@ayrshare.com](mailto:support@ayrshare.com) 聯絡我們,我們會引導你完成整個流程。
## 疑難排解
請確認你已傳送兩個必要標頭:
* `X-Twitter-OAuth1-Api-Key`
* `X-Twitter-OAuth1-Api-Secret`
若你看到成對不匹配的錯誤(例如:「You provided Api-Key but not Api-Secret」),這表示兩者其中之一缺少。兩者必須同時提供。
錯誤訊息會告訴你具體缺少哪個標頭。
若你在嘗試連結 X 帳戶時看到此錯誤,請確認你已將必要的 callback URL 加入你的 X Developer App 設定(於 Authentication settings > Callback URI / Redirect URL 下):
* `https://profile.ayrshare.com/social-accounts`
* `https://app.ayrshare.com/social-accounts`
請參閱上方 [Callback URL 設定步驟](#step-3-configure-app-permissions)。
你的 X Developer 帳戶沒有儲值 API 額度。前往 [console.x.com](https://console.x.com) → **Billing → Credits** 並購買額度。即使 \$5 也足夠數百次 API 呼叫。
你的 Access Token 沒有正確的權限。這通常表示:
1. **你的 app 權限被設為「Read」而非「Read and write」。** 前往 Developer Console 中你 app 的 Settings,將其變更為 **Read and write and Direct message**。
2. **你在連結 X 帳戶後變更了權限。** Access Token 會保留其建立時的權限。透過 OAuth 重新連結你的 X 帳戶,讓新的 token 繼承更新後的權限。
## 需要協助嗎?
若你在設定 X API 金鑰時有任何問題或遇到困難,我們的工程團隊樂意提供協助。你隨時可以透過 [support@ayrshare.com](mailto:support@ayrshare.com) 聯絡我們。
**沒有額度時 API 呼叫會失敗。** X 的 API 採用按次計費。若你的額度餘額為零,所有 API 請求都會回傳 `402 CreditsDepleted` 錯誤,訊息為「Your enrolled account does not have any credits to fulfill this request.」。這包括發布、讀取推文與使用者查詢。請在測試整合前儲值。X 的完整定價資訊請參閱下方 [X API 計費方式](#how-x-api-pricing-works) 段落。
## 步驟 5:更新你的 Ayrshare API 呼叫
在步驟 3 中,你已將以下兩項安全地儲存在你自己的環境變數、設定檔或機密管理工具中:
1. **API Key**(又稱 Consumer Key,X app 識別碼)
2. **API Secret**(又稱 Consumer Secret)
現在,將你的 X 憑證加入到 Ayrshare API 呼叫的標頭中。
**你的金鑰保持私密。** 你的 API Key 與 API Secret 不會被 Ayrshare 儲存。
### 標頭參考
| 標頭 | 值 |
| ----------------------------- | ------------------------------- |
| `X-Twitter-OAuth1-Api-Key` | API Key(Consumer Key) |
| `X-Twitter-OAuth1-Api-Secret` | API Key Secret(Consumer Secret) |
**如何判斷權限是否錯誤:**
* 若你的 app 權限設定錯誤,API 請求可能會回傳 `403 Forbidden` 錯誤,訊息為:「Your client app is not configured with the appropriate OAuth1 app permissions.」。
若你看到此錯誤,請在 X Developer Console 中將 app 權限更新為 **Read and write and Direct message**,然後透過 OAuth 重新連結你的 X 帳戶,讓新的 Access Token 繼承更新後的權限。
### 程式碼範例
```bash cURL theme={"system"}
curl -X POST https://api.ayrshare.com/api/post \
-H "Authorization: Bearer YOUR_AYRSHARE_API_KEY" \
-H "X-Twitter-OAuth1-Api-Key: your_api_key" \
-H "X-Twitter-OAuth1-Api-Secret: your_api_secret" \
-H "Content-Type: application/json" \
-d '{"post": "Hello from my own X App!", "platforms": ["twitter"]}'
```
```javascript Node.js theme={"system"}
const response = await fetch("https://api.ayrshare.com/api/post", {
method: "POST",
headers: {
"Authorization": "Bearer YOUR_AYRSHARE_API_KEY",
"Content-Type": "application/json",
"X-Twitter-OAuth1-Api-Key": process.env.X_API_KEY,
"X-Twitter-OAuth1-Api-Secret": process.env.X_API_SECRET,
},
body: JSON.stringify({
post: "Hello from my own X App!",
platforms: ["twitter"],
}),
});
```
```python Python theme={"system"}
import os
import requests
headers = {
"Authorization": "Bearer YOUR_AYRSHARE_API_KEY",
"Content-Type": "application/json",
"X-Twitter-OAuth1-Api-Key": os.environ["X_API_KEY"],
"X-Twitter-OAuth1-Api-Secret": os.environ["X_API_SECRET"],
}
response = requests.post(
"https://api.ayrshare.com/api/post",
headers=headers,
json={"post": "Hello from my own X App!", "platforms": ["twitter"]},
)
```
只要你在每個以 X 為目標的請求中都包含 API Key 與 API Secret 標頭,你既有的自動化流程與工作流程都會繼續運作。
### 遷移現有個人資料(Business 與 Enterprise)
若你有已透過 Ayrshare 連結 X 的子個人資料,在你切換到 BYO 金鑰後,這些個人資料需要重新連結其 X 帳戶。這是因為既有的 access token 是在 Ayrshare 的 X app 下發出的,無法搭配你自己的 consumer 金鑰使用(OAuth 1.0a 簽章會綁定發出 token 的 app)。
將 `twitterApiKey` 與 `twitterApiSecret` 加入你的 [generateJWT](/apis/profiles/generate-jwt#body-parameters-13) 呼叫 body 中。這些會在嵌入 JWT 之前先加密,不會暴露給你的終端使用者。
```json theme={"system"}
{
"domain": "your-domain",
"profileKey": "...",
"privateKey": "...",
"twitterApiKey": "YOUR_X_CONSUMER_KEY",
"twitterApiSecret": "YOUR_X_CONSUMER_SECRET"
}
```
這是唯一一個將 consumer 金鑰放在 body 中的請求。所有其他 X 請求都使用上述標頭。
在產生含金鑰的 JWT 之後,你的使用者需要透過個人資料連結頁面重新連接他們的 X 帳戶。OAuth 同意畫面現在會顯示你的 app 名稱,而不是 Ayrshare 的。
為簡化此流程,你可以:
* 透過 [Unlink API](/apis/profiles/unlink-social-network#unlink-a-social-network) 以程式化方式解除連結帳戶,然後讓使用者重新授權
* 使用 generateJWT 中的 [`logout` 參數](/apis/profiles/generate-jwt#param-logout) 強制重新登入
* 使用 [`allowedSocial`](/apis/profiles/generate-jwt#param-allowed-social) 讓連結頁面在遷移流程期間僅顯示 X
重新連結後,請在每個 API 呼叫(發布、分析、留言等)中持續包含 `X-Twitter-OAuth1-Api-Key` 與 `X-Twitter-OAuth1-Api-Secret` 標頭。
一旦某個個人資料在你的 X app 下重新連結,該個人資料後續的所有貼文都會使用你的憑證。你可以透過檢查 [X Developer Console](https://console.x.com) 中的 Usage 頁面來驗證。
### 驗證你的設定
使用你新加入的標頭透過 Ayrshare API 進行測試呼叫,以確認一切運作正常。[/analytics/social](/apis/analytics/social) 端點是一個很好的輕量測試,因為它不會建立任何貼文。
## X API 計費方式
先前,Ayrshare 代表你承擔 X 的 API 使用費用。在 X 目前的模式下,每位 Ayrshare 客戶都會維護自己的 X Developer 帳戶,並直接向 X 支付其應用發出的 API 請求費用。(每個 Ayrshare 帳戶一個 X Developer 帳戶,而不是每位終端使用者。你所有的子個人資料共用同一個 X Developer 帳戶與額度餘額。)
X 的計費模式為按次付費:你在 X Developer Console 中購買額度,隨著 API 請求的發出而扣除。不需要合約或訂閱。
一般操作費用不高。例如:
| 操作 | 大約成本 |
| ------------- | --------------------------- |
| 建立貼文(僅文字) | 每則約 \$0.01 |
| 建立含媒體的貼文 | 每則約 \$0.02(媒體上傳與貼文建立為分開的請求) |
| 讀取貼文 | 每次約 \$0.005 |
| 使用者查詢 | 每次約 \$0.01 |
| 傳送 DM | 每則訊息約 \$0.01 |
| 讀取 DM 事件 | 每個事件約 \$0.01 |
| 使用者互動(追蹤、按讚等) | 每次請求約 \$0.015 |
作為參考,若你每月發布約 100 次貼文,你直接支付給 X 的成本大約為 \$1,含媒體的貼文則大約為每月 \$2。
X 的按次付費計費目前處於試行階段。費率可能會變動,也可能引入額外成本。請務必在 Developer Console 中查看最新的定價。請參閱 [X 的定價資訊細分](https://docs.x.com/x-api/fundamentals/pricing)。
我們了解這引入了先前不存在的成本,我們希望對此保持透明。同時,此模式也解鎖了在先前共用金鑰設定下無法實現的多項益處。
## 使用自己的 X API 金鑰的好處
使用自己的 X API 憑證比先前共用金鑰的模式提供更多控制與可靠性。包括:
* **具品牌感的 OAuth 體驗:** 使用者在授權 X 存取時會看到你的 app 名稱與品牌。
* **獨立的速率限制:** 你的 API 使用量會依你自己的 X Developer 帳戶限制管理,與其他 Ayrshare 使用者分開。你可以在 [X Developer Console](https://console.x.com) 中監控使用量,並參閱 [X API 速率限制文件](https://developer.x.com/en/docs/x-api/rate-limits)。
* **憑證控制:** 你的 API Key 與 Secret 保存在你自己的 X Developer 帳戶中。Ayrshare 不會儲存你的機密金鑰。
* **可攜性:** 因為使用者是透過你的 X App 進行驗證,你的整合完全在你的控制之下。
* **使用量可見性:** 你的 X Developer 儀表板會顯示 API 請求、速率限制與額度使用情形。
X 是第一個要求此模式的平台,但更多平台正朝向「自帶 API 金鑰」發展。我們正在將此能力擴展到 Ayrshare 的整體,讓開發者在所有社群平台上都能擁有相同的控制與獨立性。
## 安全性
* 你的 API Key 與 API Secret 不會被 Ayrshare 儲存。
* 一般安全性最佳做法請參閱 [X 的驗證安全指南](https://docs.x.com/resources/fundamentals/authentication)。
## 常見問題
**不需要。** 你在自己的 X 帳戶下設定**一個** X Developer App,同一組 **API Key + API Secret** 會被重複用於你在 Ayrshare 帳戶下連結的每個子個人資料/終端使用者。
* 你**只需要**建立一次 X Developer App。
* 你在每個 Ayrshare API 呼叫中都傳送相同的兩個標頭(`X-Twitter-OAuth1-Api-Key` 與 `X-Twitter-OAuth1-Api-Secret`),無論該呼叫屬於哪個子個人資料。
* 你的終端使用者仍然要各自完成 OAuth 連結流程來授權自己的 X 帳戶,但他們**不**需要自己的 X Developer App 或 API 金鑰。他們透過你的 app 進行連接。
* 所有子個人資料共用同一個 X Developer 帳戶、同一組速率限制與同一個額度餘額。
唯一你會處理每個個人資料金鑰的時機是在遷移期間的 [generateJWT](/apis/profiles/generate-jwt) body 中,這仍然是你的同兩把金鑰,只是傳送到連結頁面,讓終端使用者可以在你的 app 下重新授權。
是的。自 2026 年 3 月 31 日起,透過 Ayrshare 進行的所有 X 操作都需要你自己的 X API 憑證。若你還未設定 X Developer 帳戶,請依照上述步驟操作。
透過 Ayrshare 發布到 X 需要你自己的 X API 憑證。未附有效 BYO 憑證的請求會被拒絕。發布到其他平台(Instagram、LinkedIn、Facebook、TikTok 等)不受影響。
X 按 API 呼叫次數計費。建立一則貼文約 \$0.01,讀取一則貼文約 \$0.005。舉例來說,每月發布 100 則貼文大約需要 \$1。完整資訊請參閱 [X 的定價頁面](https://docs.x.com/x-api/fundamentals/pricing)。
不會。你的 Ayrshare 訂閱價格維持不變。唯一額外的成本是由 X 透過你的 developer 帳戶直接計費的 X API 使用費用。
不會。你的 API Key 與 API Secret 不會被 Ayrshare 儲存。一般安全性最佳做法請參閱 [X 的驗證安全指南](https://docs.x.com/resources/fundamentals/authentication)。
可以。只要你的既有 X App 已啟用「Read and write」權限(若使用 DM 功能則需 Direct Messages),你都可以使用。
你需要從 X Developer Console 的 Keys and tokens 區段取得 API Key(Consumer Key)與 API Secret(Consumer Secret)。透過 OAuth 連結你的 X 帳戶,然後在你的 Ayrshare API 請求中包含這兩個標頭。
若你在初始設定後變更了 app 權限,請重新連結你的 X 帳戶,讓 Access Token 繼承更新後的權限。
你需要 API Key(Consumer Key)與 API Secret(Consumer Secret)。請參閱上方 [標頭參考表](#header-reference),了解每個對應到哪一個 Ayrshare 標頭。你可以忽略 Client ID、Client Secret、Bearer Token、Access Token 與 Access Token Secret。
它們是用於不同驗證方式的完全不同憑證:
* **API Key**(又稱「Consumer Key」)用於 OAuth 1.0a。API Key(Consumer Key)+ API Secret 就是 Ayrshare 使用的組合。它適用於所有 X 功能,token 永不過期,也不需要重新整理邏輯。
* **Client ID** 用於 OAuth 2.0。你**不**需要它來使用 Ayrshare。OAuth 2.0 token 會在短時間後過期,並需要管理 refresh token。
對於 Ayrshare,你只需要你的 API Key 與 API Secret。你可以忽略 Client ID、Client Secret 與 Bearer Token。
OAuth 2.0 access token 每 2 小時過期,且 X 的 refresh token 是一次性的(每次重新整理都會使舊的 token 失效)。這使得無法支援無狀態的 BYO 模式,尤其是排程貼文。OAuth 1.0a token 永不過期、適用所有 X 功能,且不需管理 token。
需要。若你的使用者是在你設定 BYO 金鑰之前透過 Ayrshare 連結 X 的,他們需要重新連接。既有的 access token 是在 Ayrshare 的 X app 下發出的,無法搭配你的 consumer 金鑰使用。逐步流程請參閱上方 [遷移現有個人資料](#migrating-existing-profiles-business--enterprise)。
不會。此變更僅影響發布到 X。Ayrshare 中所有其他平台整合會繼續照常運作。
RSS 自動發布到 X 已不再支援。RSS 摘要會依排程自動執行,但自帶 API 金鑰的模式要求每次 API 請求都提供憑證。因此,RSS 摘要在發送貼文時無法進行驗證。
若你先前使用 RSS 發布到 X,我們建議改用 [排程貼文](/apis/post/overview#schedule-posts) 或包含你憑證的直接 API 呼叫。RSS 自動發布到其他所有平台則維持不變。
這表示你的 X Developer 帳戶沒有可用的 API 額度。前往 [console.x.com](https://console.x.com) → **Billing → Credits** 並購買額度。即使 \$5 也足夠數百次 API 呼叫。額度儲值後,重試你的請求。
你的 Access Token 沒有正確的權限。這通常表示以下兩種情況之一:
1. **你的 app 權限被設為「Read」而非「Read and write」。** 前往 Developer Console 中你 app 的 Settings,將其變更為 **Read and write and Direct message**。
2. **你在連結 X 帳戶後變更了權限。** Access Token 會保留其建立時的權限。透過 OAuth 重新連結你的 X 帳戶,讓新的 token 繼承更新後的權限。
我們的支援團隊樂於協助。若你在設定過程中有任何問題或遇到困難,請透過 [support@ayrshare.com](mailto:support@ayrshare.com) 聯絡我們,我們會引導你完成整個流程。
## 疑難排解
請確認你已傳送兩個必要標頭:
* `X-Twitter-OAuth1-Api-Key`
* `X-Twitter-OAuth1-Api-Secret`
若你看到成對不匹配的錯誤(例如:「You provided Api-Key but not Api-Secret」),這表示兩者其中之一缺少。兩者必須同時提供。
錯誤訊息會告訴你具體缺少哪個標頭。
若你在嘗試連結 X 帳戶時看到此錯誤,請確認你已將必要的 callback URL 加入你的 X Developer App 設定(於 Authentication settings > Callback URI / Redirect URL 下):
* `https://profile.ayrshare.com/social-accounts`
* `https://app.ayrshare.com/social-accounts`
請參閱上方 [Callback URL 設定步驟](#step-3-configure-app-permissions)。
你的 X Developer 帳戶沒有儲值 API 額度。前往 [console.x.com](https://console.x.com) → **Billing → Credits** 並購買額度。即使 \$5 也足夠數百次 API 呼叫。
你的 Access Token 沒有正確的權限。這通常表示:
1. **你的 app 權限被設為「Read」而非「Read and write」。** 前往 Developer Console 中你 app 的 Settings,將其變更為 **Read and write and Direct message**。
2. **你在連結 X 帳戶後變更了權限。** Access Token 會保留其建立時的權限。透過 OAuth 重新連結你的 X 帳戶,讓新的 token 繼承更新後的權限。
## 需要協助嗎?
若你在設定 X API 金鑰時有任何問題或遇到困難,我們的工程團隊樂意提供協助。你隨時可以透過 [support@ayrshare.com](mailto:support@ayrshare.com) 聯絡我們。