> ## Documentation Index
> Fetch the complete documentation index at: https://www.ayrshare.com/docs/llms.txt
> Use this file to discover all available pages before exploring further.

# Notion

> 將 Ayrshare API 整合到你的 Notion 應用程式，管理使用者的社群媒體帳號

## 概觀

[Notion](https://notion.so) 是一個 workspace 應用程式，結合了筆記、專案管理、wiki，以及可自訂資料庫的 GUI 介面。

從 Notion，你可以建置介面，透過 Ayrshare 的社群媒體 API 管理使用者的社群媒體帳號，包括發文、取得分析與管理留言。

## 教學

以下影片教學示範如何直接從 Notion 發文到你的社群媒體網路。
也可參閱我們的 [Notion API 完整指南](https://www.ayrshare.com/blog/schedule-social-media-posts-from-notion/)。

<div class="video-container">
  <iframe width="560" height="315" src="https://www.youtube.com/embed/OeGGiG7SmVY" title="Notion Social Posting Integration" frameborder="0" allow="accelerometer; autoplay; clipboard-write; encrypted-media; gyroscope; picture-in-picture" allowfullscreen />
</div>

Notion 社群發文整合的 GitHub 程式碼：

<Card title="GitHub：Ayrshare Notion Integration" icon="github" href="https://github.com/ayrshare/notion" horizontal>
  直接從 Notion 發布到你的社群媒體網路
</Card>

### 建立 Notion 資料庫

在 Notion 中，建立一個 table view 的資料庫，並使用以下欄位名稱與欄位類型：

<ul class="custom-bullets">
  <li>`Post` 設為 *Title column* 類型（此欄位類型無法選擇）</li>

  <li>
    `Platforms` 設為 *Multi Select column* 類型，值為：`facebook`、`instagram`、`twitter`、
    `linkedin`、`tiktok` 和／或 `telegram`。
  </li>

  <li>`Images` 設為 *Files & Media column* 類型。</li>
  <li>`Profile Keys` 設為 *Text column* 類型。</li>
  <li>`Status` 設為 *Text column* 類型。</li>

  <li>
    `Schedule Date` 設為 *Date column* 類型，日期格式 Month/Day/Year、時間格式 24 小時，並
    包含時間
  </li>
</ul>

<img src="https://mintcdn.com/ayrshare-docs/6mPR4kmwNEz1kMbX/images/packages-guides/notion-db.webp?fit=max&auto=format&n=6mPR4kmwNEz1kMbX&q=85&s=b83093c27f4fae7e7d3d406eed353f63" alt="Notion Database Examples" width="1536" height="277" data-path="images/packages-guides/notion-db.webp" />

這些欄位將用於本頁面稍後指定的指令碼。請注意，某些社群網路「平台」需要圖片或影片。例如 Instagram 需要圖片或影片，TikTok 則需要影片。各網路的規範請參閱 [端點](/apis/post/social-networks/facebook)。

[參見實際 Notion 範例](https://ayrshare-example.notion.site/607c15ce7872456a879adbb0a5f17fdf?v=ee9f65a4afb24033813f245a45bc9e83)

### 輸入測試貼文資料

我們需要一些範例資料來測試發文。以下是建議內容：

<ul class="custom-bullets">
  <li>`Post`：輸入 "Happy New Year!"</li>

  <li>
    `Platforms`：選擇一個或多個你已連結的網路。請確認名稱為小寫。
  </li>

  <li>`Images`：附加一張 [圖片](https://img.ayrshare.com/012/gb.jpg) 或一部影片。</li>
</ul>

<Info>**你必須將圖片上傳到 Notion。** 不能使用圖片 URL。</Info>

<ul class="custom-bullets">
  <li>
    `Profile Keys`：如果你使用 Business 方案或 Launch 方案，並希望發布到客戶的設定檔，請輸入
    他們的 Profile Key。否則請留空。
  </li>

  <li>
    `Status`：輸入 "pending"。指令碼只會擷取狀態設為 "pending" 的記錄。請
    確認 "pending" 為小寫。
  </li>

  <li>
    `Schedule Date`：目前先留空，因為我們只會測試立即發文。之後你可以
    選擇未來日期以排程發文。
  </li>
</ul>

### 在 Notion 中建立內部整合

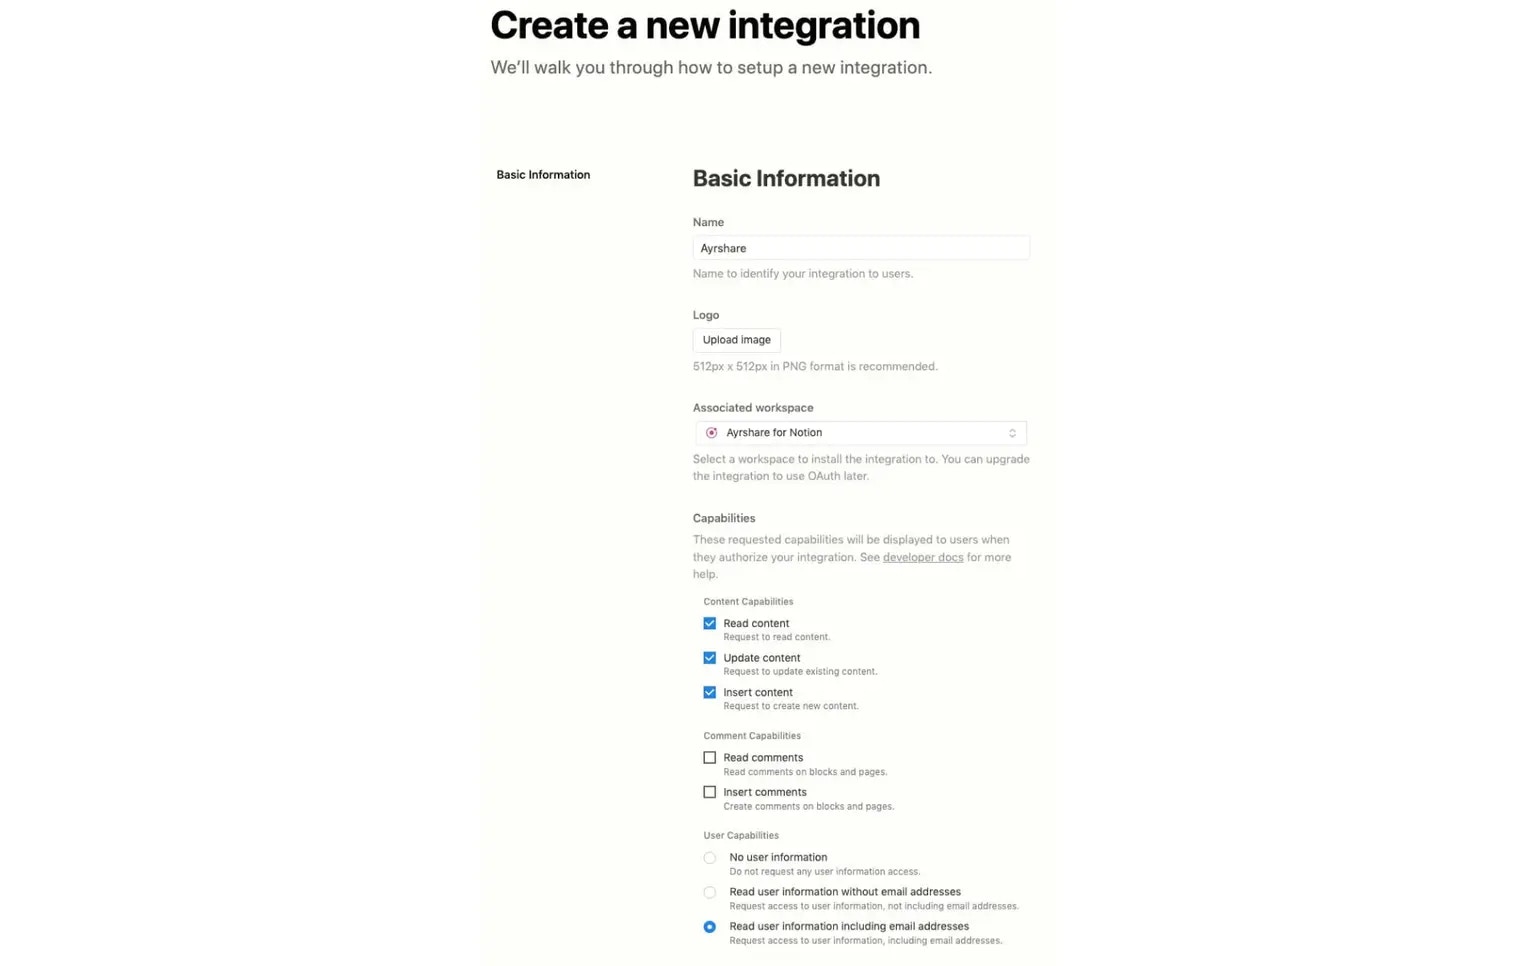
前往 Notion 的 [My Integrations 頁面](https://www.notion.so/my-integrations) 並點選 New Integration。

[進一步了解 Notion Integrations](https://developers.notion.com/docs/getting-started#utilizing-notions-public-api-for-integrations)。

你可以將整合命名為「Ayrshare」以方便識別，並選擇擁有貼文資料的適當 workspace。

最後，預設為你選取的功能已足夠。點選 Submit 建立整合。

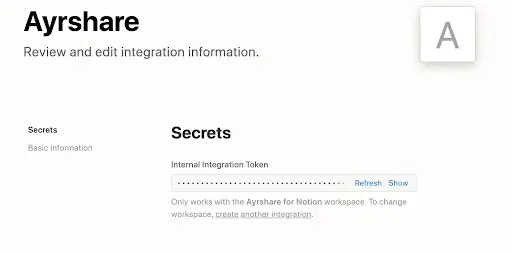
若成功，你會取得一個內部整合權杖。請記下此權杖，本頁面後續步驟會用到。

<img src="https://mintcdn.com/ayrshare-docs/6mPR4kmwNEz1kMbX/images/packages-guides/create%20notion.webp?fit=max&auto=format&n=6mPR4kmwNEz1kMbX&q=85&s=48dce27786caad8a12c99f04f31a10d4" alt="Create a Notion Integration" width="1536" height="966" data-path="images/packages-guides/create notion.webp" />

並取得你的 Notion 整合權杖。

<img src="https://mintcdn.com/ayrshare-docs/6mPR4kmwNEz1kMbX/images/packages-guides/notion%20token.webp?fit=max&auto=format&n=6mPR4kmwNEz1kMbX&q=85&s=32b0f4d69eeabdc55409e801c6dbf9a7" alt="Get a Notion Secret" width="512" height="253" data-path="images/packages-guides/notion token.webp" />

### 將 Notion 資料庫連結到內部整合

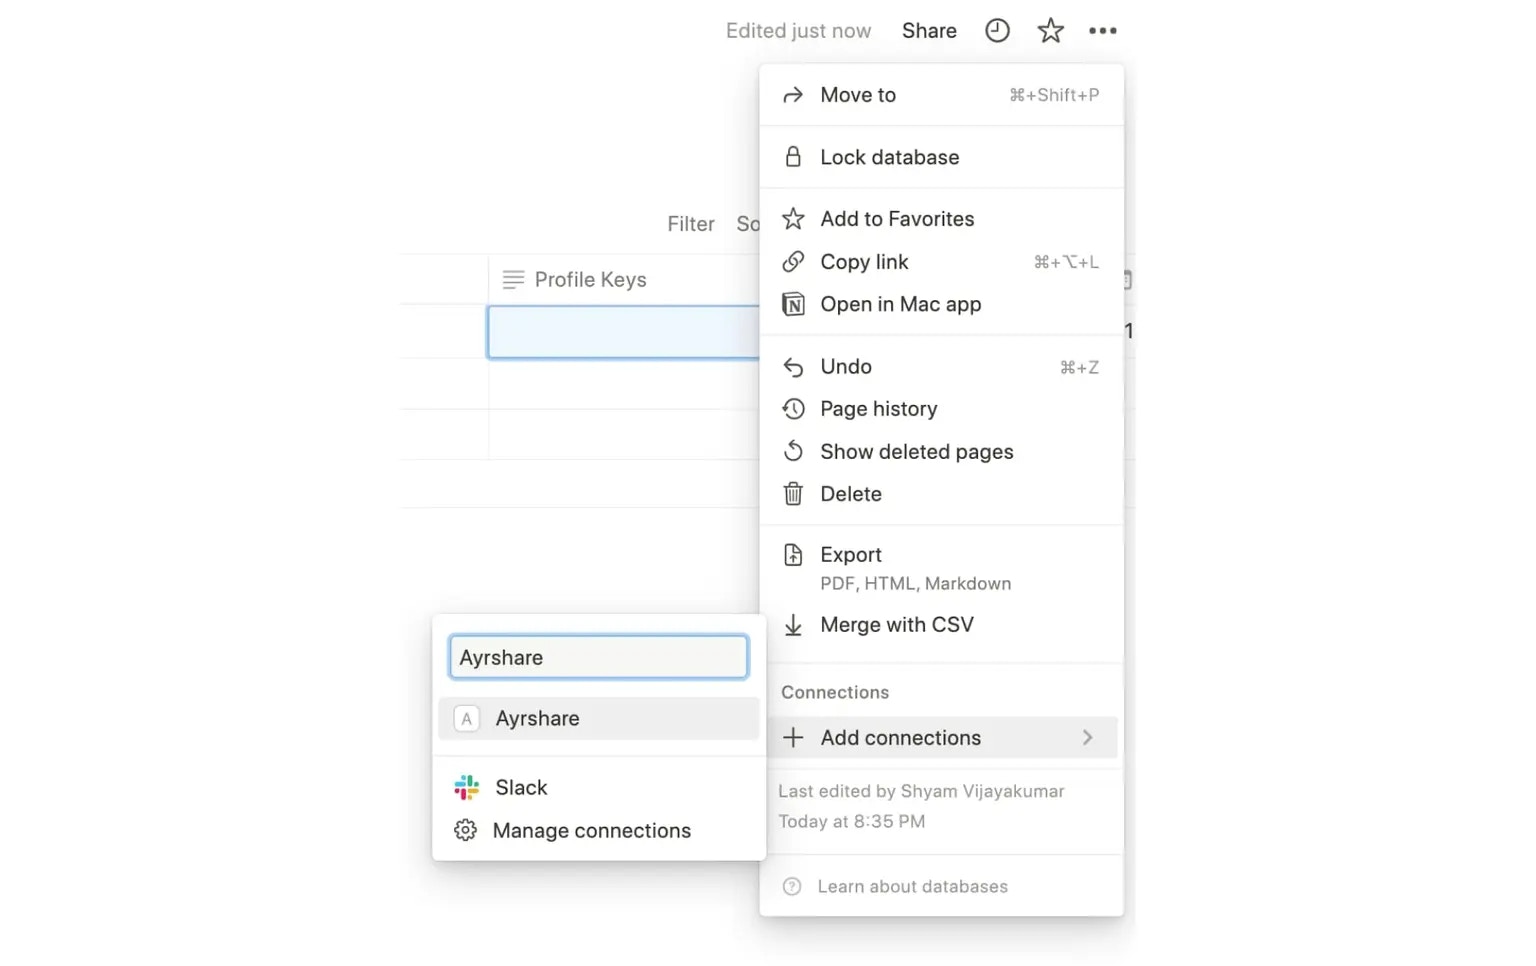
開啟你先前建立的 Notion 資料庫。點選頁面右上角的省略符號，前往 **Add Connection**。

在這裡，你可以透過先前為整合設定的名稱，搜尋到你剛建立的內部整合。

點選該內部整合後，你就將此 Notion 資料庫連結到該整合了。

<img src="https://mintcdn.com/ayrshare-docs/6mPR4kmwNEz1kMbX/images/packages-guides/connect%20to%20ayrshare.webp?fit=max&auto=format&n=6mPR4kmwNEz1kMbX&q=85&s=318c31733bb8920c5d5765648f6cca80" alt="Connect the Notion Database" width="1536" height="966" data-path="images/packages-guides/connect to ayrshare.webp" />

### 執行指令碼從 Notion 發送貼文

你現在可以在本機環境執行指令碼，它會從 Notion 資料庫讀取資料，並對每個狀態為 "pending" 的資料列，透過 Ayrshare API 發布貼文。

請務必設定指令碼中使用的下列環境變數：

<ul class="custom-bullets">
  <li>
    `API_KEY`：這是你從 Ayrshare 取得的 `API Key`。這是你 Ayrshare
    主要設定檔的主要 API Key。
  </li>

  <li>
    `NOTION_DATABASE_ID`：開啟本頁先前建立的資料庫，從 URL 取得資料庫 ID。
  </li>
</ul>

<Info>資料庫 ID 是資料庫頁面 URL 中 ?v= 之前的值。</Info>

```html theme={"system"}
https://www.notion.so/company/<NOTION_DATABASE_ID>?v=aaee9f</NOTION_DATABASE_ID>
```

<ul class="custom-bullets">
  <li>`NOTION_KEY`：先前取得的內部整合權杖。</li>
</ul>

在 Node.js 環境中執行下列 JavaScript：

<ul class="custom-bullets">
  <li>複製儲存庫：</li>
</ul>

```bash theme={"system"}
git clone https://github.com/ayrshare/notion
```

<ul class="custom-bullets">
  <li>cd 進入 **notion** 目錄並執行 `npm install`。</li>

  <li>
    使用你的 Ayrshare `API_KEY`、Notion `NOTION_KEY` 與
    `NOTION_DATABASE_ID` 更新 `.env` 檔案。
  </li>

  <li>執行 `node index.js`</li>
</ul>

在正式環境中，你可以在 [Heroku](https://www.heroku.com/)、[Digital Ocean](https://www.digitalocean.com/) 或 [Vercel](https://vercel.com/) 上執行。

若成功，所有 `pending` 狀態欄位都會變更為 `success`，且對應的社群網路都會發布貼文。

<Card title="Github：Ayrshare Notion Integration" icon="github" href="https://github.com/ayrshare/notion" horizontal>
  直接從 Notion 發布到你的社群媒體網路
</Card>