Build A Social Media Posting Mobile App With No Code
July 22, 2021
9 min read
Author: Ayrshare Team
Article content
Share Article
Ask AI about this article
Opens your AI assistant in a new tab with this article preloaded.

Tutorial: Build A Social Media Posting Mobile App With No Code Using AppGyver and Ayrshare
If you have a company or actively manage your social brand, you probably post your beautiful, thought-provoking social media posts to multiple networks, such as Instagram, Facebook, LinkedIn, YouTube, or Twitter. However, re-typing or re-uploading image and videos for each social network is a real pain.
You are probably aware of mobile social media scheduling apps, like Buffer or Hootsuite, which solve this problem. Manually enter your post and upload an image/video, click a button, and your post is sent to every social network.
In this tutorial, we show you how to make your own mobile social media posting app using the no-code platform AppGyver and the Ayrshare API. Both have free tiers to get you started. While this tutorial is focused on building an app that connects and post to a single set of social profiles, the Ayrshare API does support multiple profiles if have a platform and need to manage multiple users.
Before you get started, make sure you have AppGyver and Ayrshare accounts set up and have read some of the documentation to get familiar with their respective platforms.
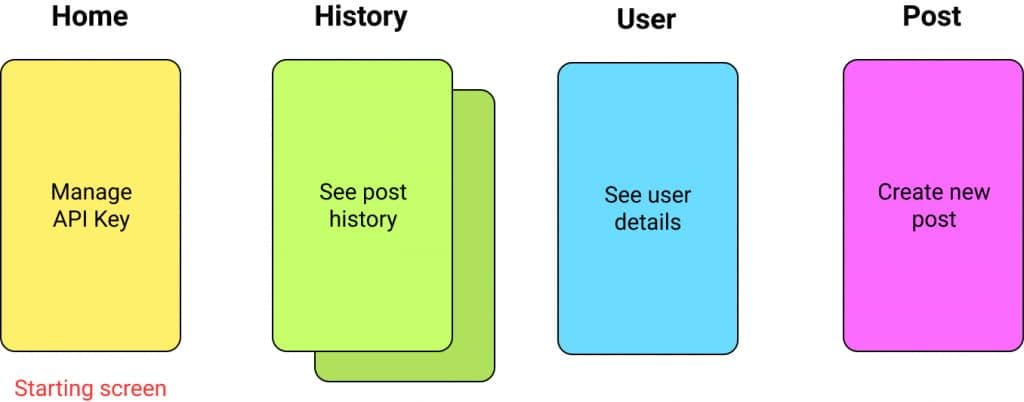
Planning the App Screens
We will build out four tabs encompassing five screens.
- The Home screen will be the starting screen when the user enters the app. In this screen, the user will enter the Ayrshare API Key which identifies the user’s profiles on the Ayrshare system. For the purposes of this tutorial, we will use the API Key in place of an authentication system, although in a production app, you will want to use a proper authentication flow.
- The History screen will show the full list of all posts created by the user. Tapping a single post will go to a post detail screen.
- The User screen will show some basic data on the user.
- The Post screen will allow the user to create a new post and send it to the social networks.
Get Started With AppGyver
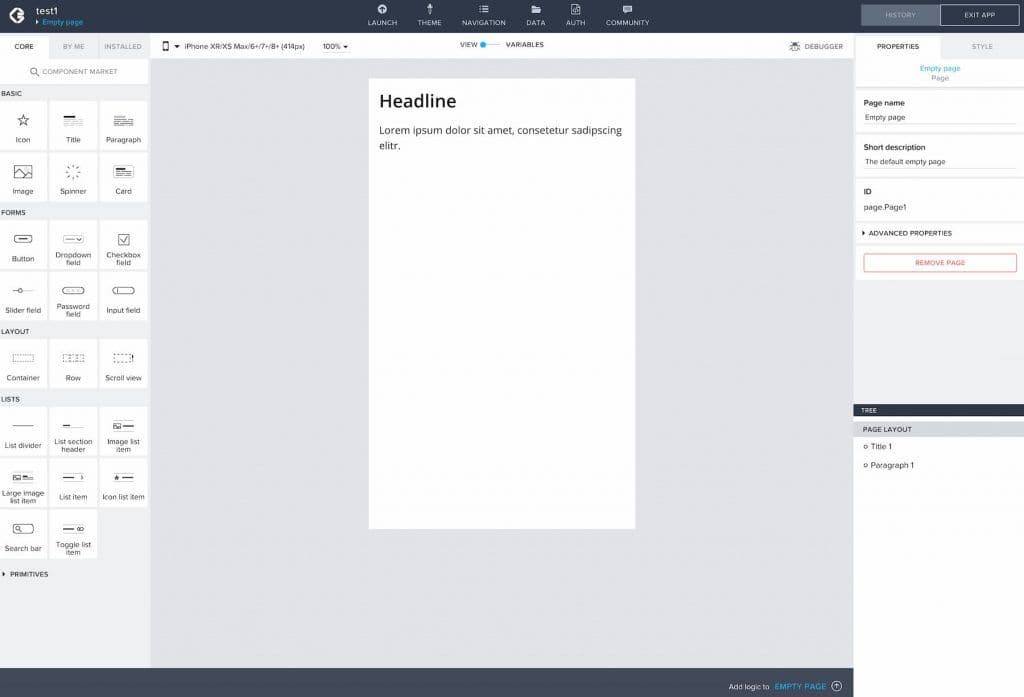
Go to appgyver.com and set up a free account. Then click the CREATE NEW button to start a new app. Give the app a name.
AppGyver will get you started with an app with a single starting screen.
Setting Up The API Calls
Tip: If you have not yet created a post via Ayrshare, then go to the Ayrshare web dashboard and create a post. This will give you some history to use in your API call setup.
AppGyver has a powerful Data Configurator system which lets you connect to APIs for data connectivity. Click the DATA section in the top navigation bar of AppGyver.
We chose to set up four separate Data Resources, one for each of the API calls: ayrshareHistory, ayrshareHistorySingleID, ayrsharePost, and ayrshareUser.
In addition, there is one local Data Resource to store the API key, myApiKey, that the user enters into the app.
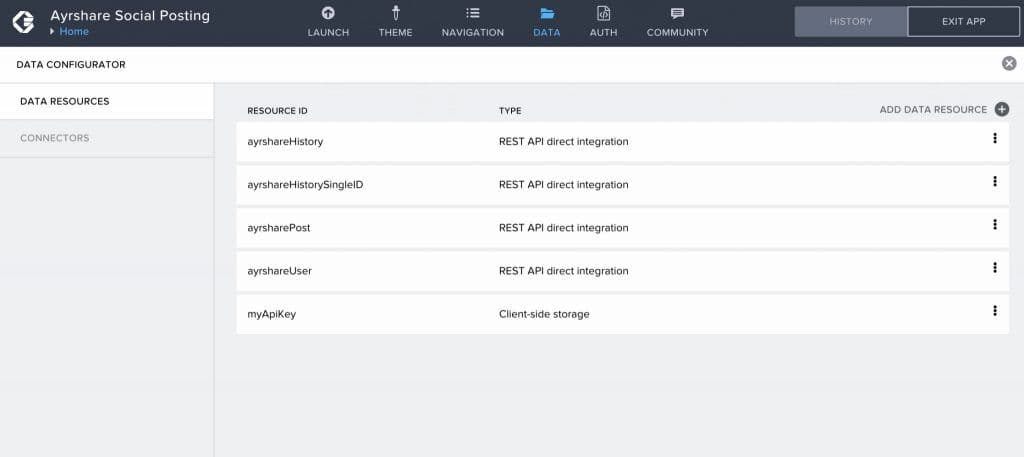
The History, Post, and User API call settings are all similar. Let’s take a closer look at the ayrshareUser Resource that we created.
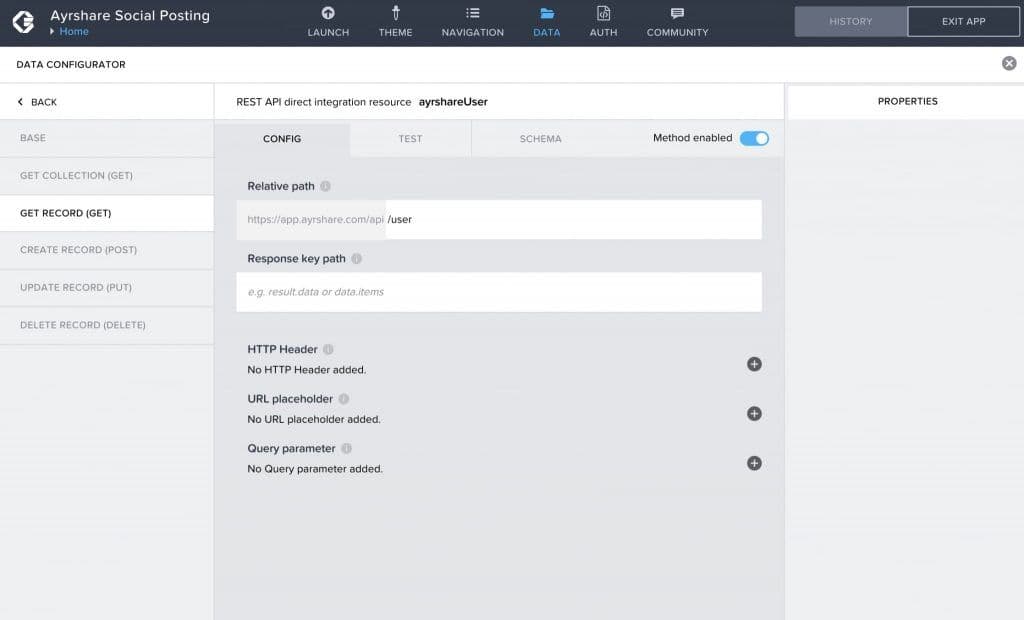
Start with the settings in the BASE section. Give it a Resource ID and description. The Resource URL is the base URL for the Ayrshare API. Add two HTTP headers, one for Authorization and one for Content-Type. You should leave the value for Authorization blank. The value for Content-Type is application/json.

The next step is to set up the GET RECORD section. In the CONFIG tab, add a relative path of /user to the base URL.
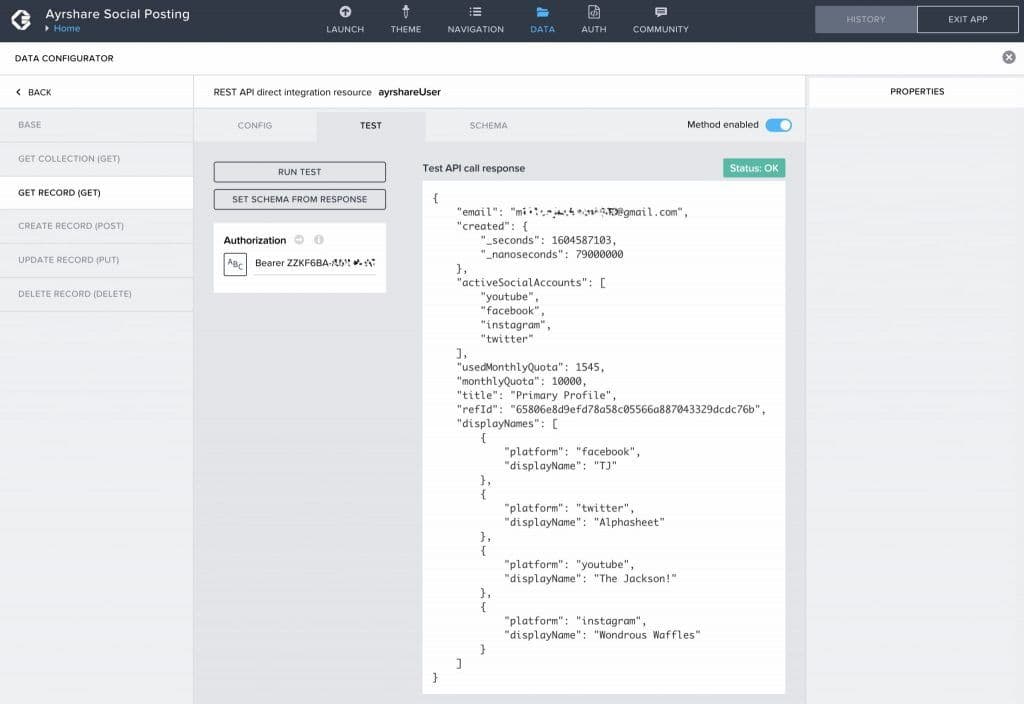
The TEST tab, enter the API Key from the Ayrshare API Dashboard. Remember to put the word “Bearer” and a space before the API Key. Click the RUN TEST button and when you get the response, click the SET SCHEMA FROM RESPONSE button. This will save the schema which you see in the third tab.
We will not walk through the ayrshareHistory and ayrshareHistorySingleID. You can set them up similarly with their respective endpoints.
The final API call that we need to configure is the ayrsharePost. This requires the same BASE settings. Since this is a POST call, we need to set up the SCHEMA properties for the request.
We need to add three properties:
mediaUrls– a list of texts and will contain and images or videos for the post.platforms– a list of texts and will contain the social networks that we want the post to be sent to.post– a text and is the body of the post.
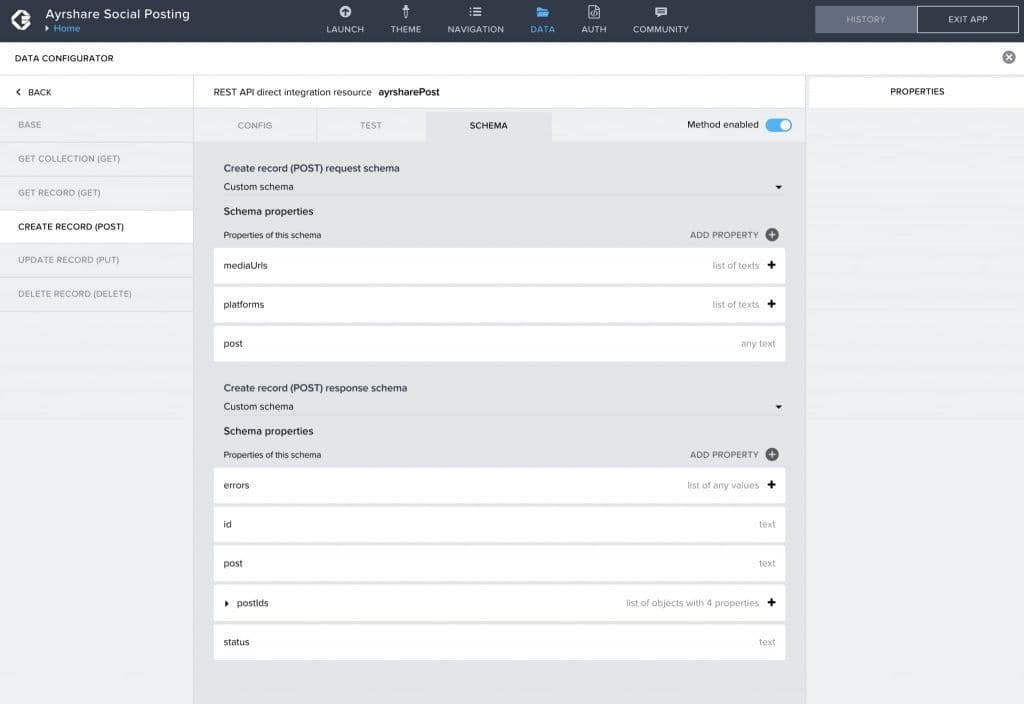
Once this is configured you can send a post in the TEST tab and then click the SET SCHEMA FROM RESPONSE to save the response schema which will now show in the SCHEMA tab.
The Home Screen
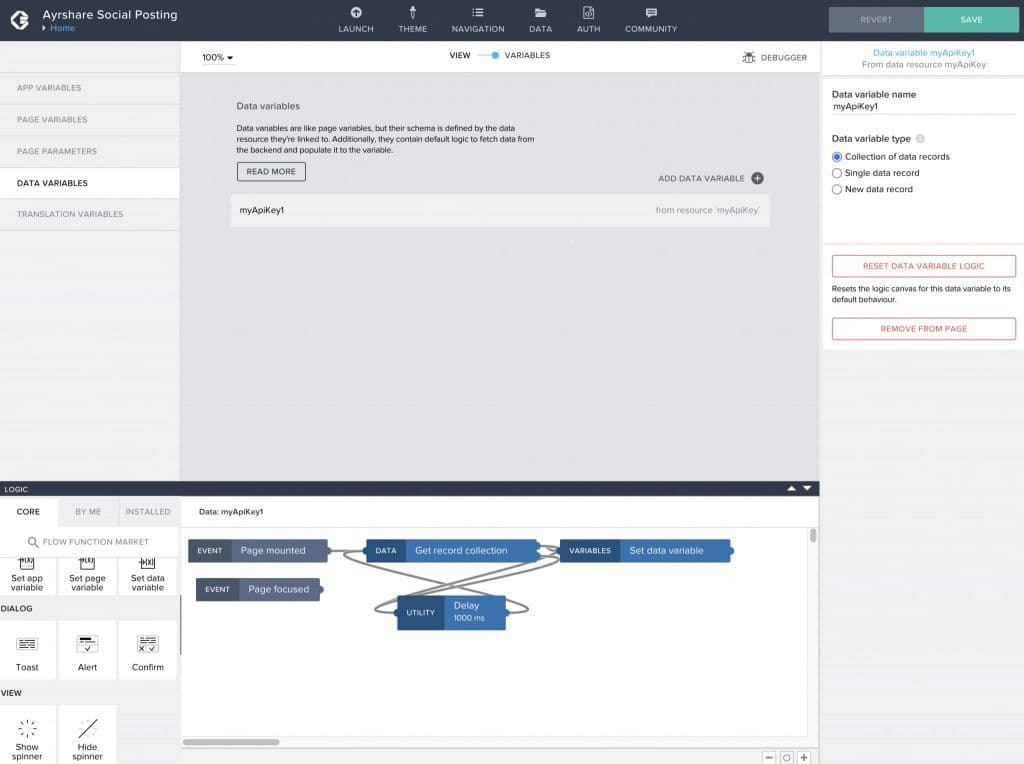
For the Home screen, we created two variables.
- A Data variable called
myApiKey1which pulls the API Key frommyApiKeyevery second on a loop. - A Page variable called
varApiKeyEntered, which will be the value that the user enters.
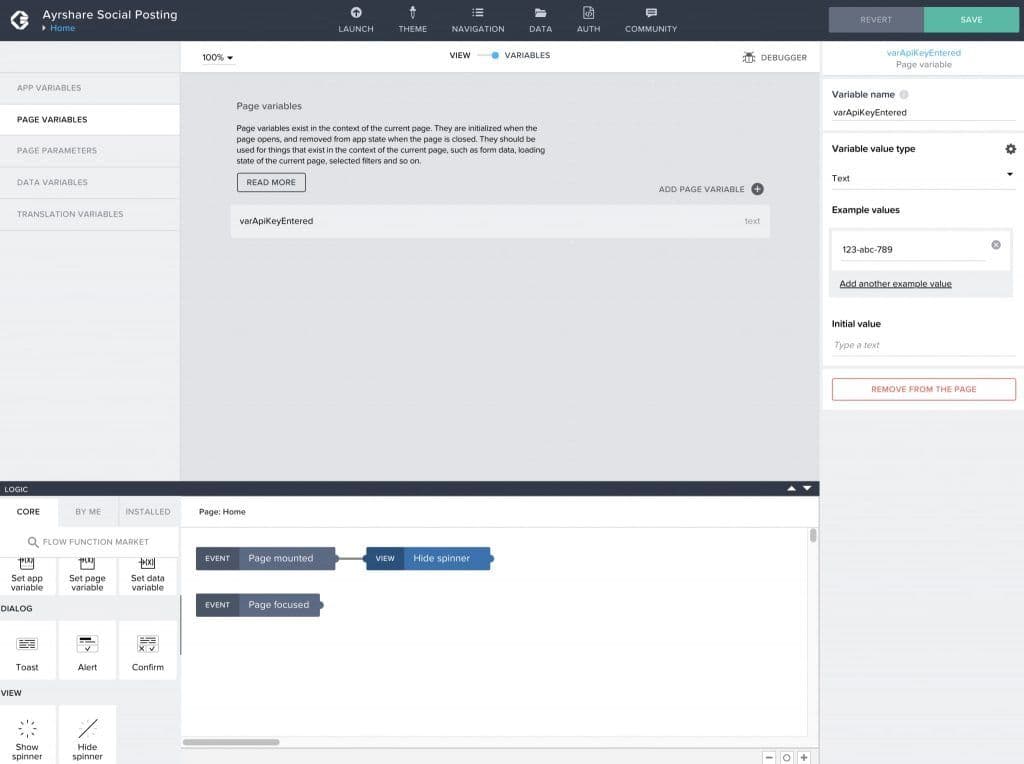
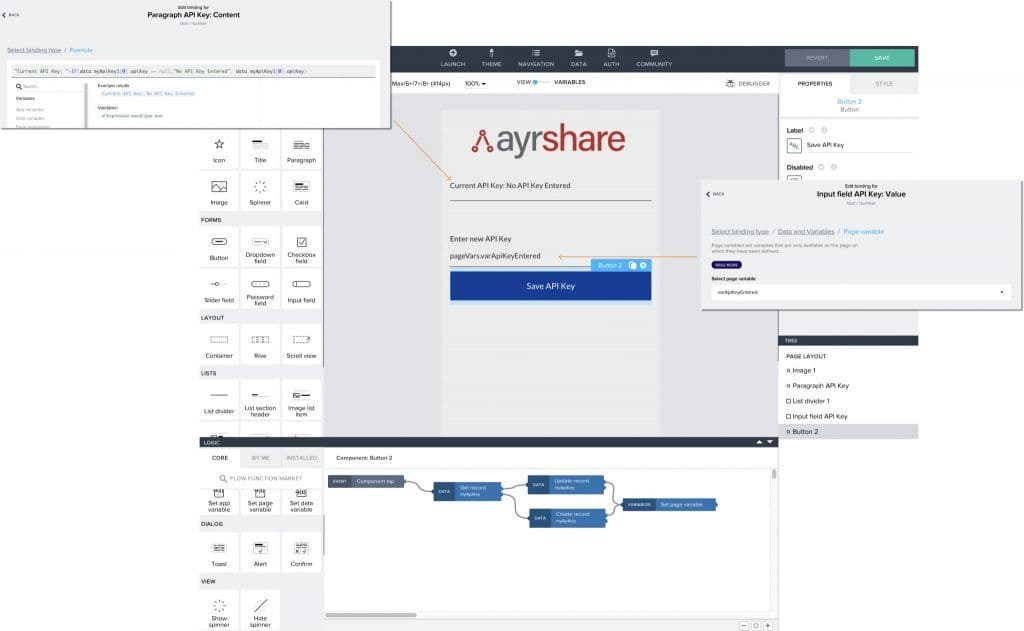
The Home screen displays the saved API Key and lets the user enter a new API key. We have controls on the screen.
- A paragraph for displaying the saved API Key. We created a formula to check if there is a value to display, otherwise show “No API Key Entered.”
- An input field for entering in a new API Key. This is bound to the Page variable
myApiKeyEntered. - A button to save the API Key entered in the input field. The logic flow checks if there is already an API Key record. If not, it creates one and saves the value in the Page variable. Otherwise, it updates the existing record for the Page variable.
The History and Post Detail Screens
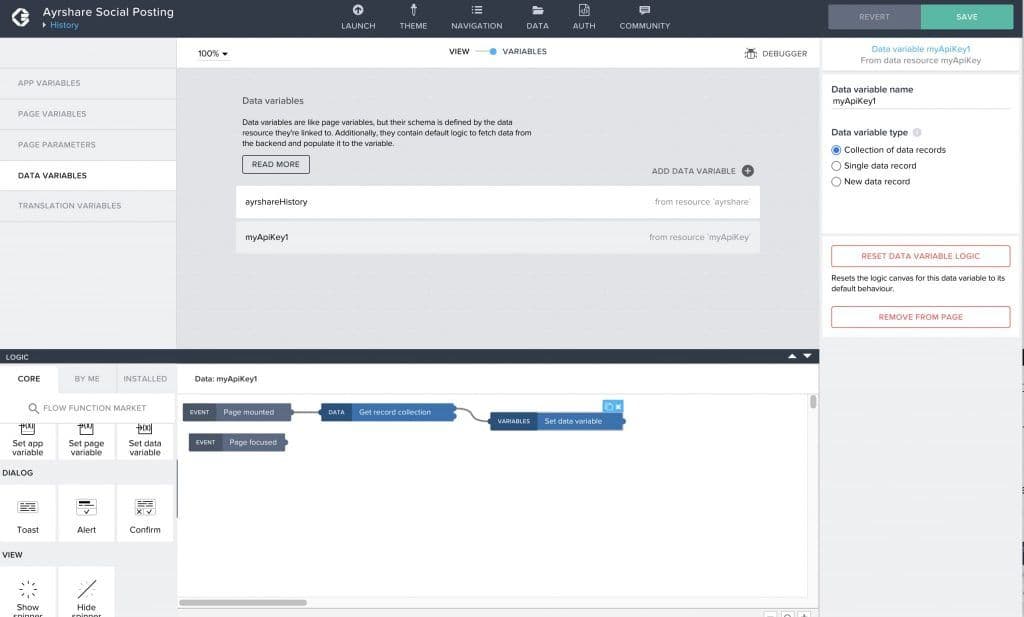
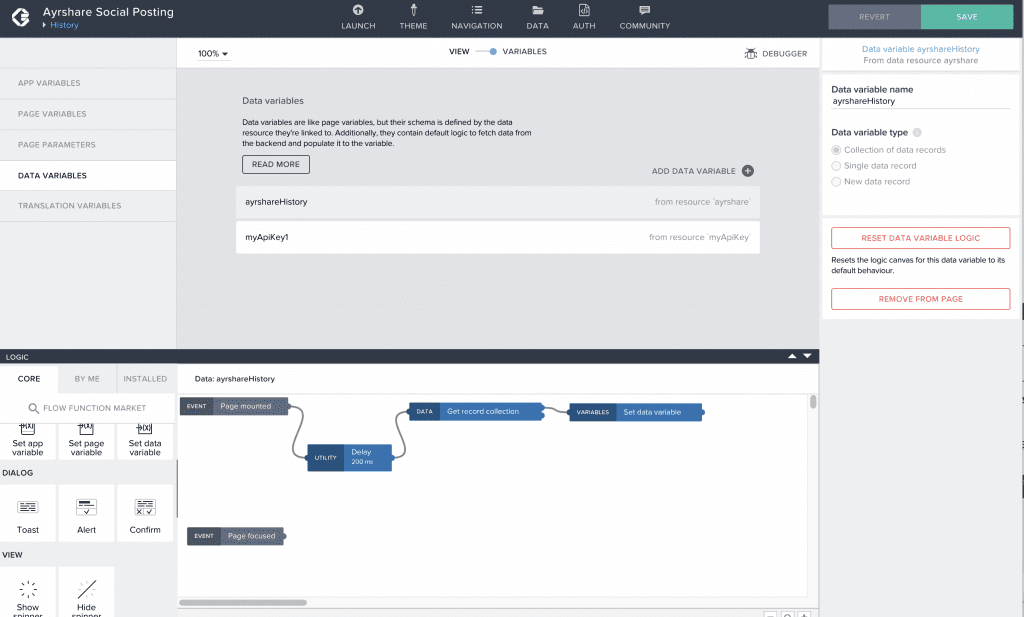
The History screen has two Data variables:
- The myApiKey1 Data variable is from the resource
myApiKey. When the page is mounted, it pulls the API Key and sets the data variable. - The
ayrshareHistoryvariable connects to the API and pulls the history. We put in a 200 ms delay to ensure that the local API Key is loaded and ready for the API call.
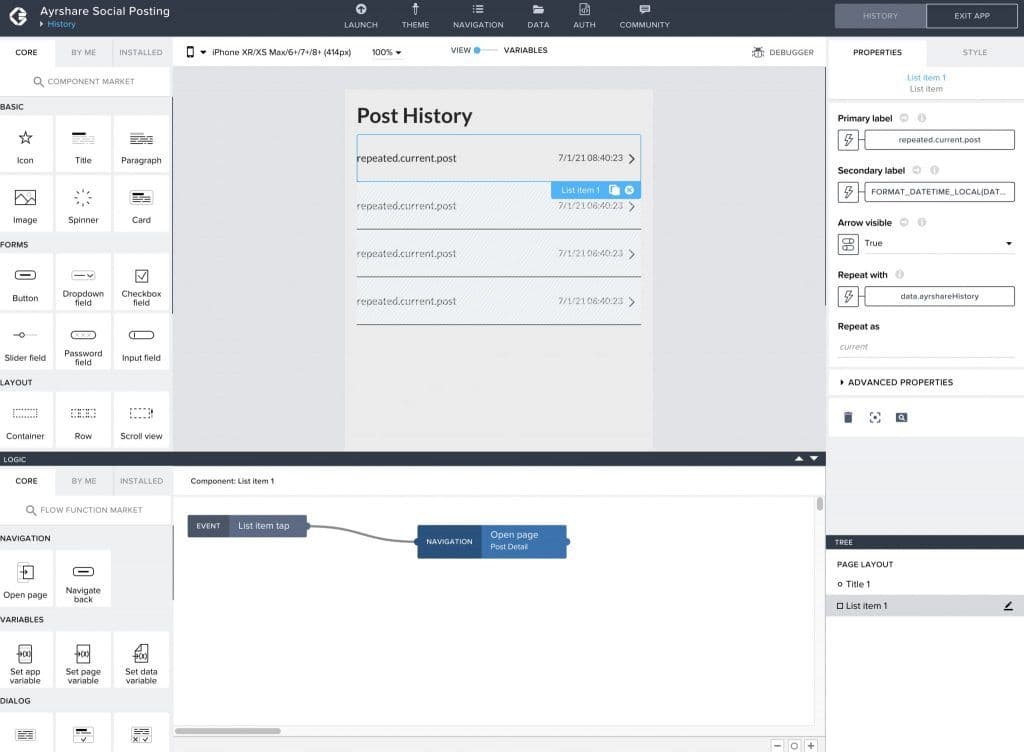
The History screen has two controls:
- The Title control with “Post History” as the text.
- The List item control is connected to a formula set to equal the data.ayrshareHistory as the binding for the repeating source. We put the repeated.current.post as the Primary label and a formatted version of the timestamp as the Secondary label.
We also added a pull-to-refresh on the entire screen. Tapping one of the list items navigates to the Post Detail screen and sends the current.id as the page parameter.
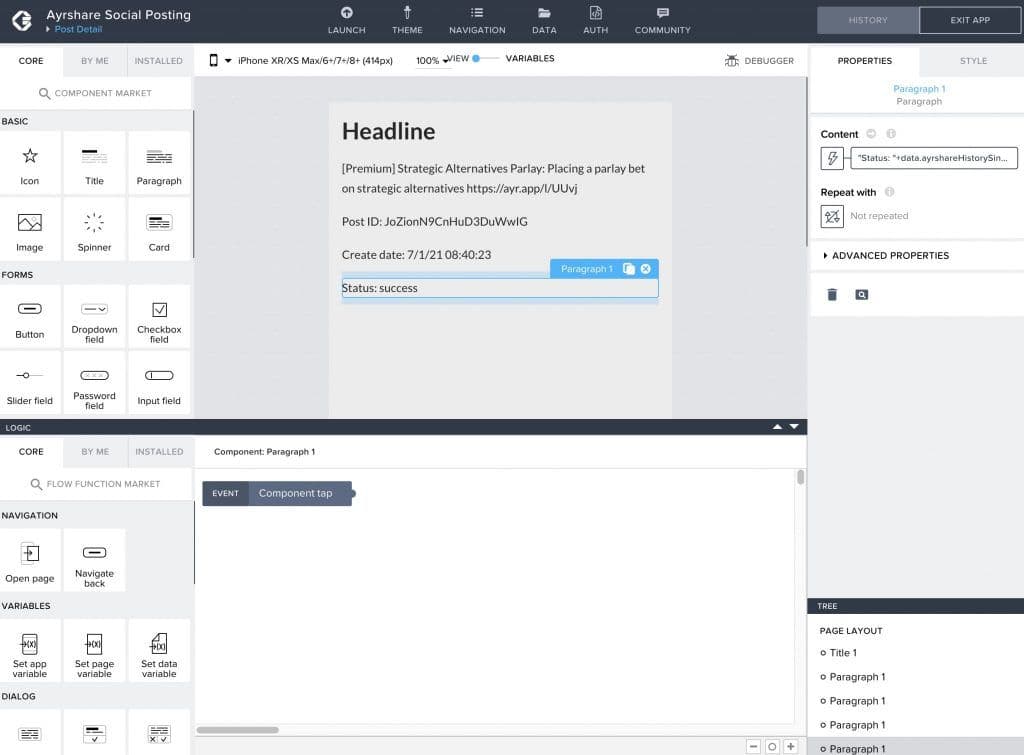
The Post Detail screen takes in a value that we set to a parameterPostID Page Parameter. This is the value of the post ID which we send to the Ayrshare API to get the post details.
We created two Data Variables ayrshareHistorySingleID1 which connects to the ayrshareHistorySingleID, and myApiKey1 which gets the API key value from myApiKey.
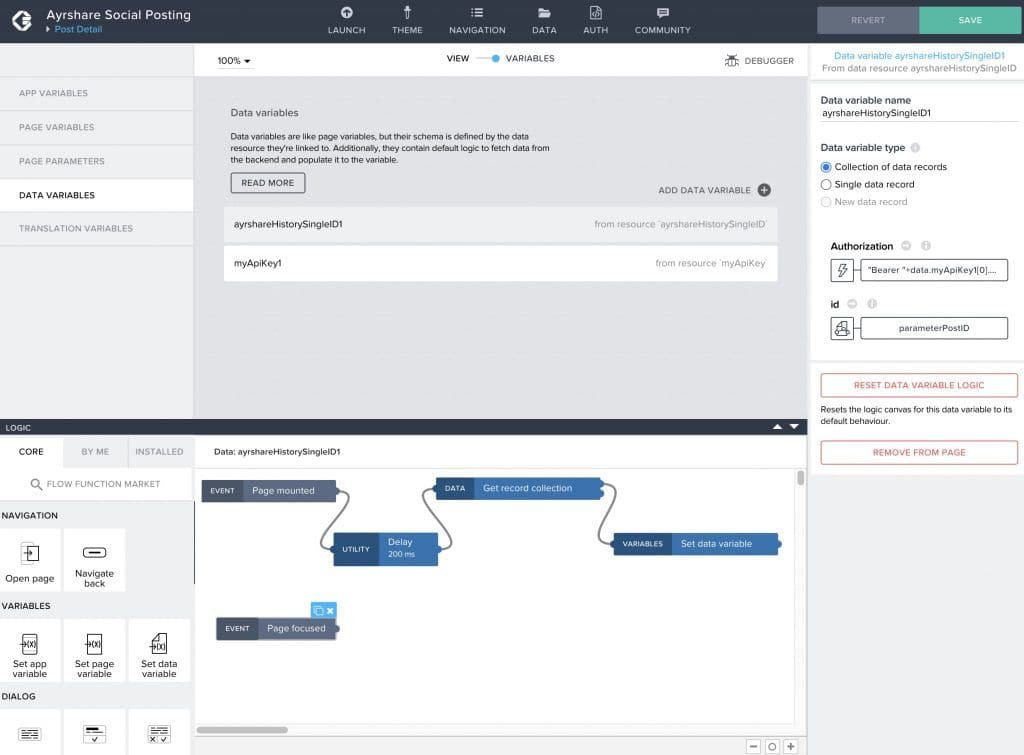
The controls on the Page Detail screen are mapped to fields from the ayrshareHistorySingleID1 Data variables.
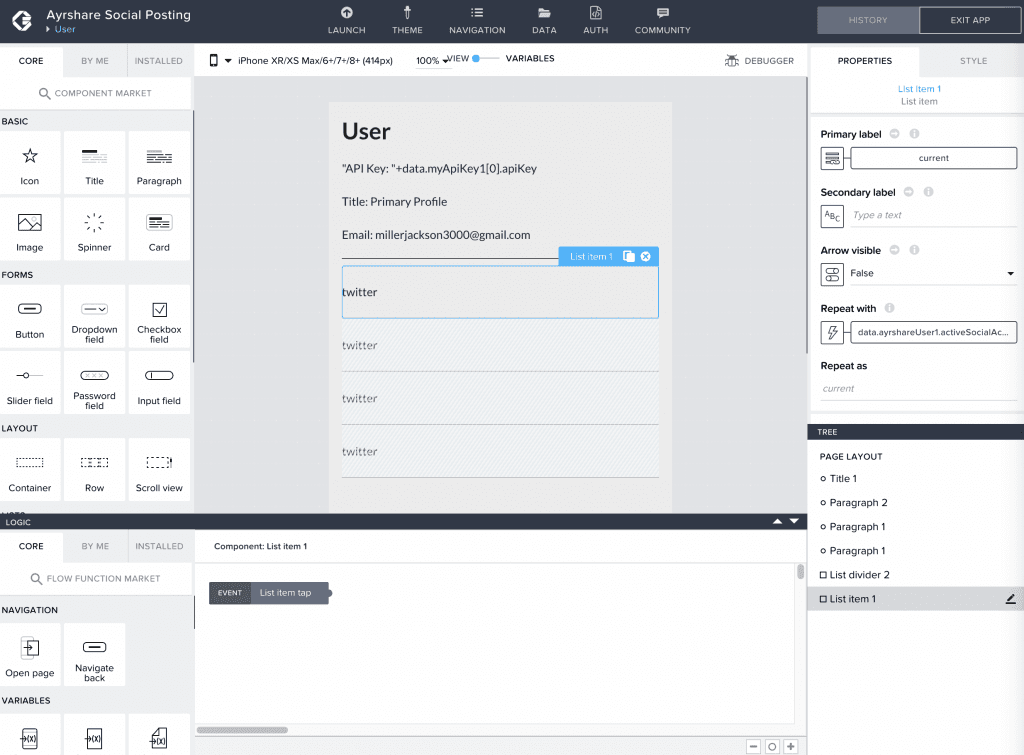
The User Screen
The User Screen is set up similarly to the History Screen. There are two Data variables. One for ayrshareUser1 which connects to the ayrshareUser API call via the Data Resource. The other variable is the myApiKey1, which connects to myApiKey.
This screen connects to the Ayrshare API /user endpoint and pulls some data for the user connected to the API Key. We display the API Key, profile title, email, and the list of the active social networks for that user.
The Post Screen
The Post screen is where the user can create a new post and send it to several social networks at the same time.
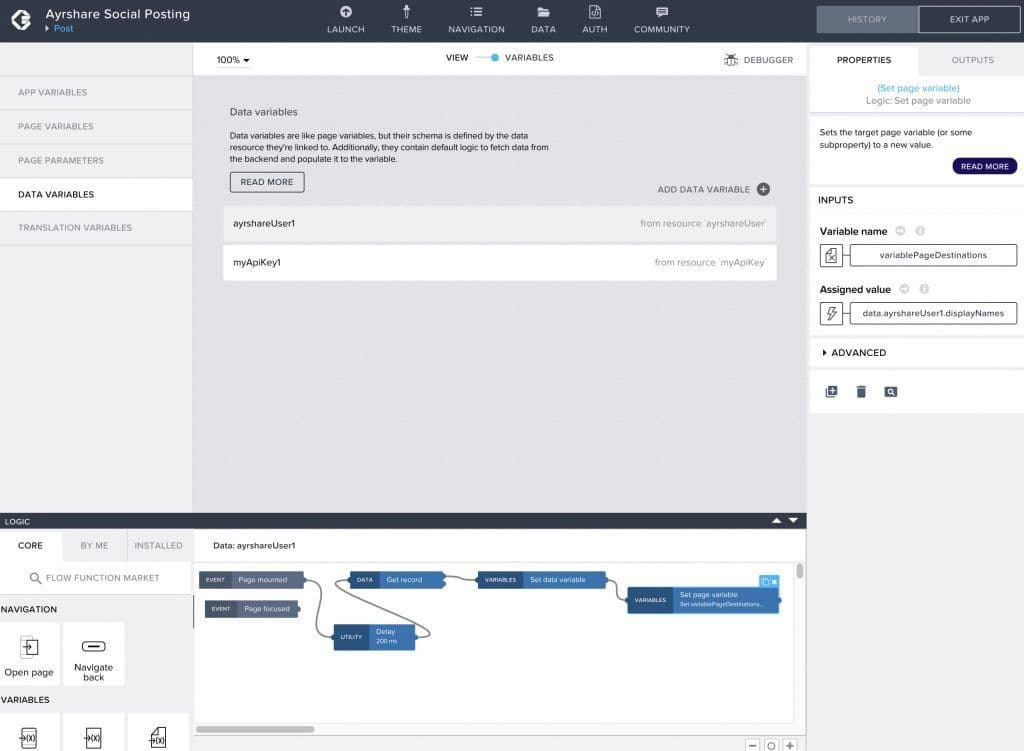
Let’s look at the variables. There are two Data variables needed:
- The
ayrshareUser1connects to theayrshareUserData resource to pull in the user data. This uses the Get Record logic flow to set the variablePageDestinations when the screen is loaded. This populates the available social destinations in the repeating list of checkboxes. - The
myApiKey1connects to themyApiKeyData resource to get the API Key.
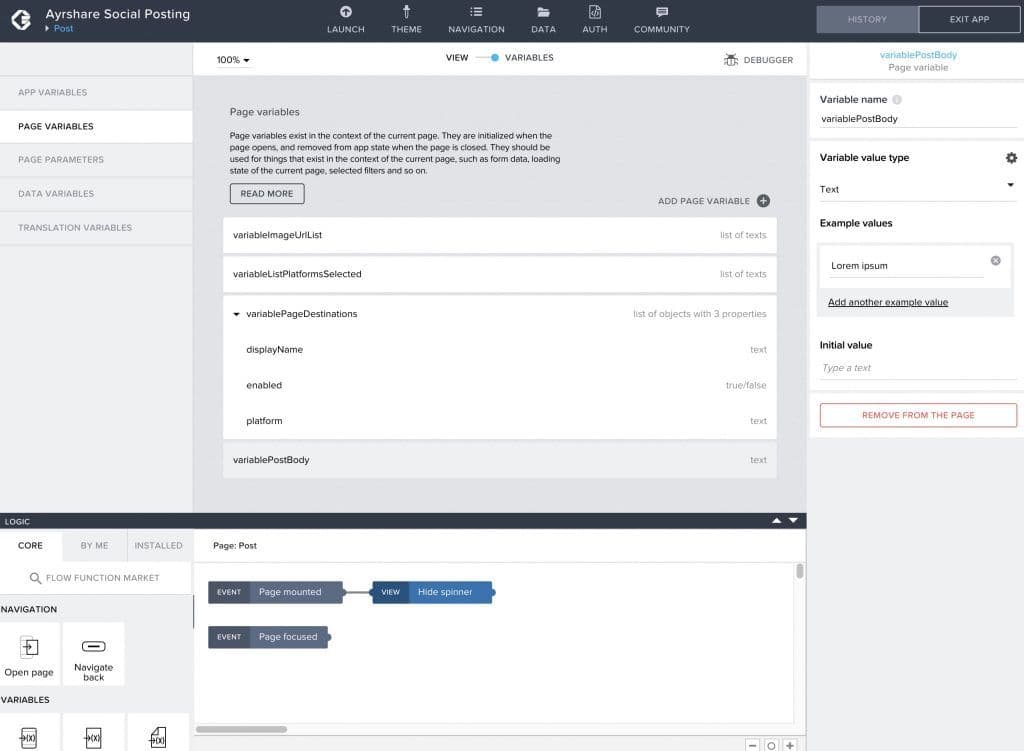
There are four Page variables needed:
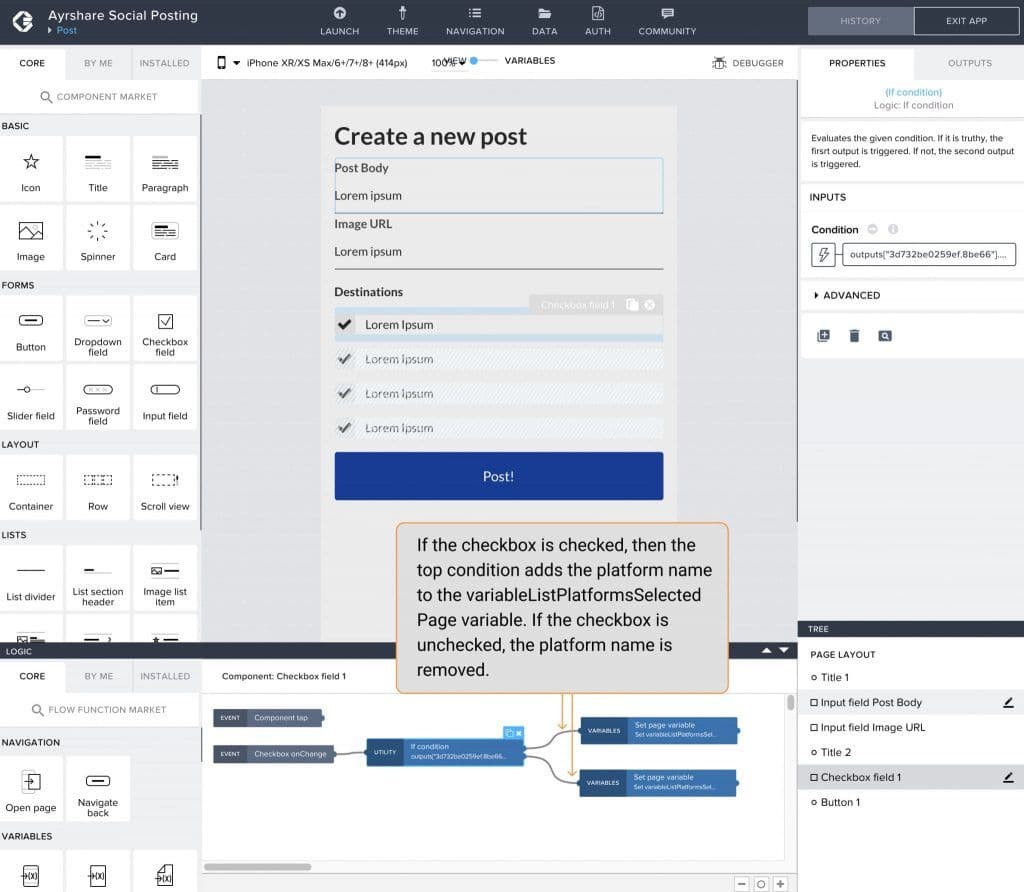
variableImageUrlList– stores the images that will be sent with the post.variableListPlatformsSelected– the list of social networks to which this post will be sent.variablePageDestinations– a list of objects. The list of objects are retrieved from theayrshareUser1Data variable we set up above. These objects represent the list of the display names of the social networks that user has enabled.variablePostBody– stores the body that will be sent with the post.
The Post screen has four main controls:
- The Post Body input field connects to the
variablePostBody. - The Image URL input field connects to the
variableImageUrlListas the first element, since this is an array variable. - The checkboxes are connected to the repeating data variable of
variablePageDestinations. We added logic when the user checks or unchecks the box, to add or remove the platform tovariableListPlatformsSelected. - The button sends the post.
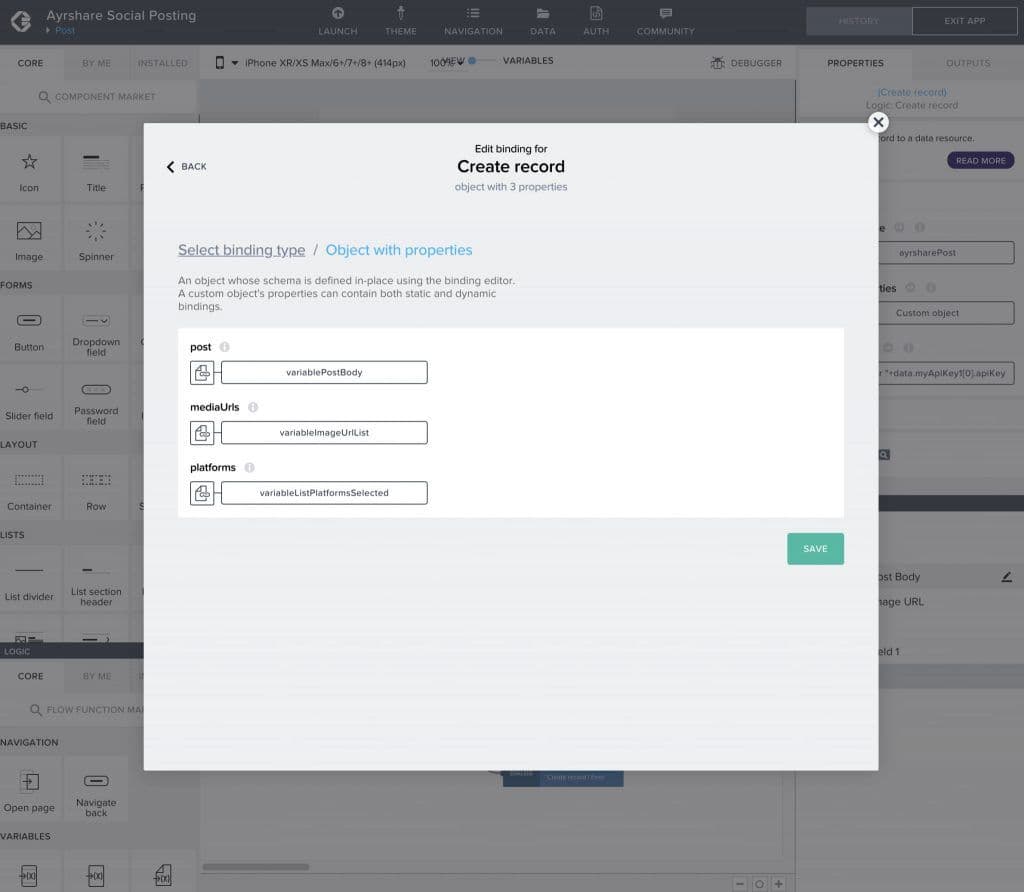
Clicking the post button has a logic flow to Create Record in the ayrsharePost resource, then show a toast with the returned JSON. The post body, media URLs, and platforms are sent via a custom object as the record properties.
Run It!
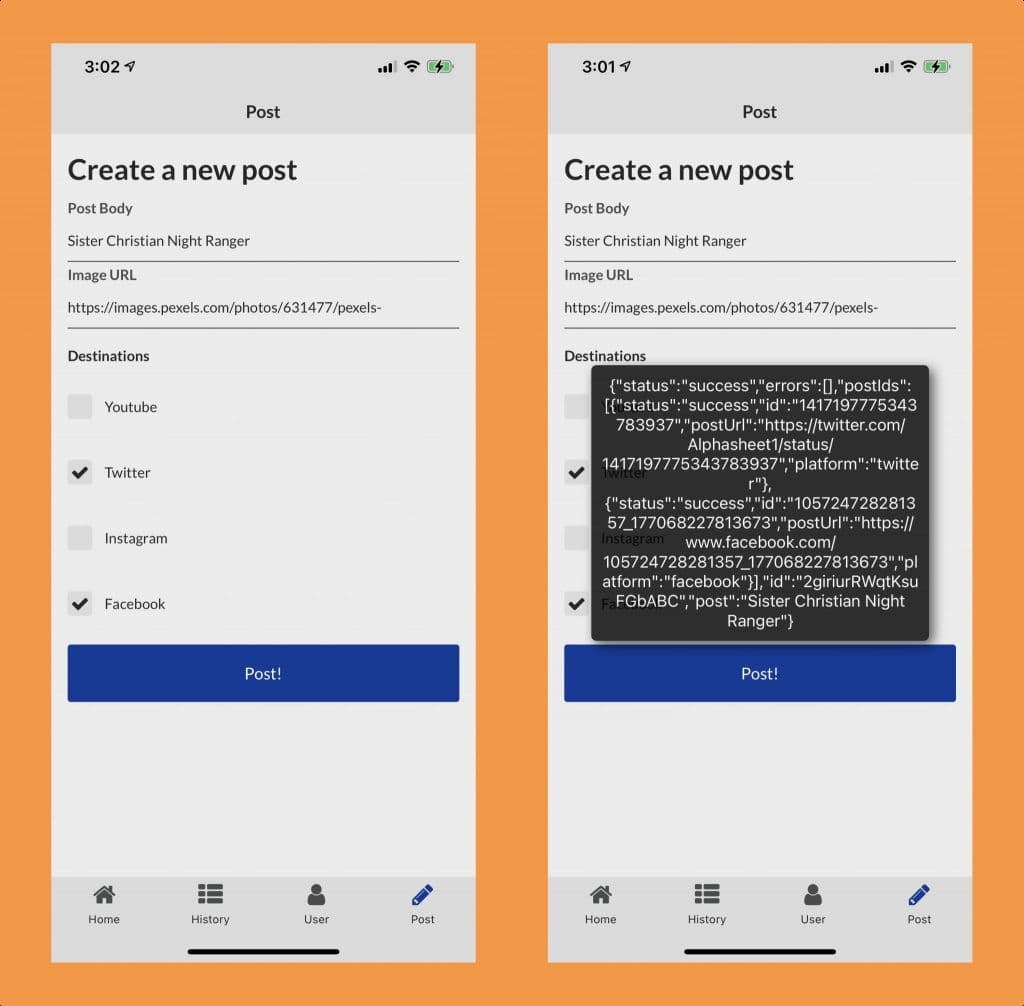
Use the AppGyver app to run your own app. Enter an API Key and try each of the tabs to ensure that the data is loading. Then send a post to several social networks. You should get a JSON object back with a success status.
You now have your own social posting app to publish your posts to multiple networks at once!
About Ayrshare
Ayrshare is a social media API that allows you to publish posts, get analytics, manage comments, and sends direct messages on the social networks directly from your platform. Learn more in our social media API docs.
Written by: Ayrshare Team
Guides and stories from the Ayrshare team, the unified social media API trusted by more than 10,000 teams.
Ask AI about this article
Opens your AI assistant in a new tab with this article preloaded.